How to keep fresh wood from splitting?!?!

Signed-In Members Don't See This Ad
See more from rblakemore

rblakemore

Member
Joined
Jan 20, 2014
Messages
286
Location
Friendswood, Tx
Hopefully, this is write forum for my question; I have just scored some nice maple from a tree a neighbor just cut down (with my help I get the large trunk). The pieces are from 24" in diameter down to about 6" in diameter. My son is experimenting with fresh cut wood also and says that I should paint it as soon as possible. Is that best? I can paint it this afternoon.
Help!!
 
Signed-In Members Don't See This Ad

southernclay

Member
Joined
Sep 6, 2013
Messages
2,260
Location
Dawsonville, GA
I think cutting the pith out is the best way (pith is the center core) After that anchorseal, wax and paint seem to be good options from all I've read. I just recently cut up some ambrosia maple and flame box elder and I used white acrylic paint because I had a gallon of it. Just bought a quart of wood sealer to try on some before long to try to compare results.

Hope you get some pretty wood out of it!
 

Dan Masshardt

Member
Joined
Jan 30, 2013
Messages
4,806
Location
Mechanicsburg, PA
Good advice so far.

You've hot to cut the pith out. Or leave rounds much bigger than you'll need.

End grain us the most important part to deal well

I've got some sealed blanks I need to turn this week.
 

Attachments

  • image-3629117308.jpg
    image-3629117308.jpg
    483.2 KB · Views: 283

rblakemore

Member
Joined
Jan 20, 2014
Messages
286
Location
Friendswood, Tx
A picture now

Thanks for the ideas, I will see what I have. But, a few questions more please. What is Anchor Seal?? How do I cut the pith out? I have a picture attached. If I cut the pith out, do I lose the dark, heartwood spalting??? I wanted the color; I think that it will look really interesting.
 

Attachments

  • 9T4A7263_compressed.jpg
    9T4A7263_compressed.jpg
    127 KB · Views: 262
Last edited:

Jim Burr

Banned
Joined
Feb 23, 2010
Messages
3,060
Location
Reno, Nv
Thanks for the ideas, I will see what I have. But, a few questions more please. What is Anchor Seal?? How do I cut the pith out? I have a picture attached. If I cut the pith out, do I lose the dark, heartwood spalting???

Anchor Seal is just a wood sealant, Google for a location near you. Ask for the classic formulation...the new stuff is crap. The pith is the center core of the wood, the primary pathway of moisture in the tree. Very prone to cracking. Should only amount to 1" of material. Lay the blank flat, bisect it with a horizontal and vertical line, offset those on either side to remove the pith and cut away...you will either end up with a half round or quarter round.
 

rblakemore

Member
Joined
Jan 20, 2014
Messages
286
Location
Friendswood, Tx
I need bowl turning lessons

Did I say that my wife and I do not know how to turn bowls yet!! We have had one bowl turning class at the local WC (great folks, my favorite toy store around Houston) and I have turned a practice bowl that I am not real proud of. So, we need to practice the bowls; but, apparently, I need a class and practice on cutting the wood to bowl blanks. And, thanks Dan, I would never guessed that is the correct way to cut the wood for bowl blanks.
 

robutacion

Member
Joined
Aug 6, 2009
Messages
6,514
Location
Australia - SA Adelaide Hills
Hi there,

Some good advice given....!

You have a few choices, they all depend of what you prefer to do so lets see what those options are, now that I saw the amount of wood you have to deal with, which is not that much, really...!

*- Storing the logs away as they are (cut/length);
In this case, you seal/paint the logs ends (wood exposed) and keep it out of the weather...!

*- You want to work it while is green;
This involves 2 things,

- Either cut the logs into round blanks to turn them as "rough turning" where you turn is to a general shape and leave about 1" of thickness so that, and as it dries, you can clean any out of round and other stuff that
develops in the drying process (some more than others)..!
This is when products like the Anchor seal are ideal to cover the wood (bowl) with before you put it away to dry.

- Or, you can reduce the amount of space the logs will take and process the wood into various types of blanks, particularly the bigger logs into round turning blanks. For that, you simply cut the log length the same as its width, rip it through the middle to get 2 halves, by doing that, you cut the Pith at its centre, and that is normally sufficient to avoid major splitting. At that stage you can either seal the end-grain and stack/store them out of the weather, for this case, I will suggest you cut your logs at least "3 longer than its width as the ends will crack slightly and you lose that bit when you round them.
Or, you can round them, removing all the excess wood and seal the rounds all around the end-grain and about 1" edge on the faces, and store away.

For the small diameter branches/limbs, I would leave them as is, just sealing the ends and store them away...!

It should be said that, rough turning your rounds, offer a few benefits, there is no dust involved, the wood cuts like butter and the wood dries a lot faster, because you removed most of the excess wood so, it sealed with a good sealer, those rounds (semi-turned bowls) will be ready to be finished in 6 months or less...! (depending of where you are...!)

I don't know what tools you have, a chainsaw and a bandsaw are ideal for the logs preparations, if you don't have a bandsaw, you can get the rounds done with a chainsaw however, you either make something to hold the log while you work it or you have to be extremely careful with it, the general "foot in the log" to hold it, is your direct ticket to the emergency Hospital room.

I have invented a log holder make out of round metal tubing that is one of the best things that I ever created, this log vice type thing has been displayed on my old web site for years but last week I started upgrading the site and all the pics from the old site didn't transfer to the new site so, I have to find them all again and bring them back so that people can see it again so, no good for me to give you the link as the pics aren't there yet...!

In the meantime I leave you with a few of pics from that log vice so that you have an idea of what I'm talking about...!

Good luck with it...!:wink:

Cheers
George
 

Attachments

  • Log holding frame 008_(1)_(1).jpg
    Log holding frame 008_(1)_(1).jpg
    52.4 KB · Views: 193
  • Log holding frame 010_(1)_(1).jpg
    Log holding frame 010_(1)_(1).jpg
    45.3 KB · Views: 182
  • Log holding frame 013_(1)_(1).jpg
    Log holding frame 013_(1)_(1).jpg
    48.9 KB · Views: 181
  • Log holding frame 028_(1)_(1).jpg
    Log holding frame 028_(1)_(1).jpg
    48.5 KB · Views: 160
  • Log holding frame 029_(1)_(1).jpg
    Log holding frame 029_(1)_(1).jpg
    48.6 KB · Views: 211
  • 65080-004-260A62CD.jpg
    65080-004-260A62CD.jpg
    37.6 KB · Views: 185
Last edited:

Dan Masshardt

Member
Joined
Jan 30, 2013
Messages
4,806
Location
Mechanicsburg, PA
Yeah, instinctively it would seem that we would just cut off round chunks, but not so much.

You will like what the chainsaw does when you rip the wood It sends off long ribbons rather than the usual chips

The biggest decision that you have to make is whether you want to try to dry the blanks, rough turn green or finish turn green
 

bobleibo

Member
Joined
Mar 15, 2007
Messages
2,130
Location
Utah
You're all going to think I'm nuts but on the advice of a bowl turner who is a lot smarter than me, I started doing this awhile back and have had good success with it....
when I get a green log that is not the size of a Redwood, I wrap it in plastic wrap and - here is the key - keep it in the house where the temperature is fairly consistent. I put mine in the storage room in the basement. The plastic wrap allows the wood to dry at a fairly slow pace so as not to crack and not having the temperature go up and down like it does in the garage, there is no movement in the wood to help cause it to crack. Not 100% foolproof but I've had pretty good luck with it. Just don't plan on it being dry for at least a few months for best results.
Like I said....you'll think I'm nuts. Line forms to the right :)
 

Dan Masshardt

Member
Joined
Jan 30, 2013
Messages
4,806
Location
Mechanicsburg, PA
You're all going to think I'm nuts but on the advice of a bowl turner who is a lot smarter than me, I started doing this awhile back and have had good success with it.... when I get a green log that is not the size of a Redwood, I wrap it in plastic wrap and - here is the key - keep it in the house where the temperature is fairly consistent. I put mine in the storage room in the basement. The plastic wrap allows the wood to dry at a fairly slow pace so as not to crack and not having the temperature go up and down like it does in the garage, there is no movement in the wood to help cause it to crack. Not 100% foolproof but I've had pretty good luck with it. Just don't plan on it being dry for at least a few months for best results. Like I said....you'll think I'm nuts. Line forms to the right :)

That's fine but if I was going to keep in in log form I'd just leave it longer than needed, prob paint the end and leave it under a tarp outside or something

Your way seems like more effort to me, trying to bring a big hunk of wood inside :)

But I certainly don't think you're crazy. Sounds plausible to me
 

robutacion

Member
Joined
Aug 6, 2009
Messages
6,514
Location
Australia - SA Adelaide Hills
You're all going to think I'm nuts but on the advice of a bowl turner who is a lot smarter than me, I started doing this awhile back and have had good success with it....
when I get a green log that is not the size of a Redwood, I wrap it in plastic wrap and - here is the key - keep it in the house where the temperature is fairly consistent. I put mine in the storage room in the basement. The plastic wrap allows the wood to dry at a fairly slow pace so as not to crack and not having the temperature go up and down like it does in the garage, there is no movement in the wood to help cause it to crack. Not 100% foolproof but I've had pretty good luck with it. Just don't plan on it being dry for at least a few months for best results.
Like I said....you'll think I'm nuts. Line forms to the right :)

No, I don't think you are nuts, I'm one that have tried every method I could think of and ideas that I got from others, as ridiculous as they may have sounded, when it comes to dry the wood as fast as possible and avoid the damn cracks, so I know that even the most strange methods use can produce good results, the main issues are, the wood in question and the condition where that person is.

The gladwrap results are very much the same as wood that is totally submersed in a thick coat of wax, you this this practice used by any of the big wood dealers/importers, that is the way most of the blanks are presented in the stores, all those blanks were cut green and waxed, this prevents most of the nasty cracks to occur as the wood will take a long time to dry, without air so, yes gladwrap works in the same way however, useless in some woods, I can give you the name of one that has a mind of its own and regardless of how you try to dry it without cracks and that is the Olive wood and the Olive tree root, totally temperamental...!:mad:

Cheers
George
 

nativewooder

Member
Joined
Feb 26, 2009
Messages
1,193
Location
Fort Pierce, Fl 34982
Whether or not you quickly learn how to cut a log into usable bowl blanks, keep in mind that safety will let you keep all ten fingers and various other body parts that you and your wife would like you to keep. Please don't learn about safety through experience! It can be very bloody and the ER is very expensive!:wink:
 

rblakemore

Member
Joined
Jan 20, 2014
Messages
286
Location
Friendswood, Tx
Thanks everyone!!

Well, everyone is fantastic; thanks for your ideas and advice. I see that I have a lot to learn and practice. I will head to my local WC tomorrow and pickup a gallon of pentacryl for sealing; and I can try that for stabilizing later!!
I will probably cut the big pieces up as soon as I can and seal the pieces. Right now they are outside; but, after cutting them I will move them to the shop to dry.
So, more questions, can I thin the pentracryl so that it will go farther and soak deeper??? In our class, we used wood that was wrapped in plastic with some beer (a waste of good beer??) for spalting, is that possible here also???
 

Dan Masshardt

Member
Joined
Jan 30, 2013
Messages
4,806
Location
Mechanicsburg, PA
That wood has plenty of character now. I wouldn't worry about trying to get it to spalt more.

I've never used that product- so I can't comment about it. I have a gallon of Anchorseal from woodcraft. I've also used latex paint. You can use while glue as well.
 

nava1uni

Member
Joined
Mar 30, 2008
Messages
4,936
Location
San Francisco, CA, USA.
Well, everyone is fantastic; thanks for your ideas and advice. I see that I have a lot to learn and practice. I will head to my local WC tomorrow and pickup a gallon of pentacryl for sealing; and I can try that for stabilizing later!!
I will probably cut the big pieces up as soon as I can and seal the pieces. Right now they are outside; but, after cutting them I will move them to the shop to dry.
So, more questions, can I thin the pentracryl so that it will go farther and soak deeper??? In our class, we used wood that was wrapped in plastic with some beer (a waste of good beer??) for spalting, is that possible here also???

I would not use Pentacryl for sealing the wood. Anchor seal is what you want. Where I live I can seal the ends and stack the wood and it dries slowly without cracking. When I turn green wood I just leave it thick and then return once the wood is dry. The pith does not always run right down the middle of the log. Look for the tiniest circle and that is where the pith is located. I have some logs where the pith is off center due to how the tree grew. Just look at all of your logs and you will come to recognize it. Familarize yourself with different wood and it will help when you cut it up. Please make some type of holder for the wood if you are using a chain saw. I took some 2X4 scraps and made a v shaped form that I put nails in the V shaped parts and then cut off the heads. They shape and the nails help hold the log so it does not roll when being cut.
 

Jim Burr

Banned
Joined
Feb 23, 2010
Messages
3,060
Location
Reno, Nv
when I get a green log that is not the size of a Redwood, I wrap it in plastic wrap and - here is the key - keep it in the house where the temperature is fairly consistent. I put mine in the storage room in the basement. The plastic wrap allows the wood to dry at a fairly slow pace so as not to crack and not having the temperature go up and down like it does in the garage, there is no movement in the wood to help cause it to crack.

I've done this for years Bob...get the big roll from Smart & Final and wrap away. I will put a couple fork holes in a couple spots to let the moisture out. There are some that have been wrapped for 4-5 years and not a simgle check. Never had the need for Anchor Seal.
 

SDB777

Member
Joined
Feb 6, 2010
Messages
6,620
Location
Cabot, Arkansas USA
Yeah, instinctively it would seem that we would just cut off round chunks, but not so much.

You will like what the chainsaw does when you rip the wood It sends off long ribbons rather than the usual chips

The biggest decision that you have to make is whether you want to try to dry the blanks, rough turn green or finish turn green


Noodling will give you the long ribbons...ripping should be done with 'ripping chain' for a cleaner surface.

If you were closer, we could just toss them on the sawmill and make a few passes.....and 'poof' useable stuff!


Scott (nice chunks) B
 

rblakemore

Member
Joined
Jan 20, 2014
Messages
286
Location
Friendswood, Tx
Started, progress

Scott; I wish that we were close enough that you could demonstrate your sawmill for me!!
I have read all of the ideas and advice above; I made a trip to WC and have a gallon of anchorseal for the weekend I made some "X" brackets to support the wood for cutting and a post with a 1/4" bolt cut off for shaping (thanks for the idea to Robuticion!). Here is the first piece worked to see if I can do it.
But, why can't I cut rounds from the trunk that we can use?? I can cut down below the rotten pith to solid wood and use that. Is there a tutorial or guidance for cutting rough logs into bowl blanks???
 

Attachments

  • 9T4A7271_compressed.jpg
    9T4A7271_compressed.jpg
    143.5 KB · Views: 175

Dan Masshardt

Member
Joined
Jan 30, 2013
Messages
4,806
Location
Mechanicsburg, PA
Noodling will give you the long ribbons...ripping should be done with 'ripping chain' for a cleaner surface. If you were closer, we could just toss them on the sawmill and make a few passes.....and 'poof' useable stuff! Scott (nice chunks) B

Clean surface is what comes off the lathe not goes on it. Haha. If I was trying to cut boards from trees I would get a ripping chain, but it's from one cut to the next when I'm working up a tree.
 

Dan Masshardt

Member
Joined
Jan 30, 2013
Messages
4,806
Location
Mechanicsburg, PA
Scott; I wish that we were close enough that you could demonstrate your sawmill for me!! I have read all of the ideas and advice above; I made a trip to WC and have a gallon of anchorseal for the weekend I made some "X" brackets to support the wood for cutting and a post with a 1/4" bolt cut off for shaping (thanks for the idea to Robuticion!). Here is the first piece worked to see if I can do it. But, why can't I cut rounds from the trunk that we can use?? I can cut down below the rotten pith to solid wood and use that. Is there a tutorial or guidance for cutting rough logs into bowl blanks???

It's not about being rotten. It's that the pith will most likely crack.

Plus turning end grain is painful compared to side grain.
 

robutacion

Member
Joined
Aug 6, 2009
Messages
6,514
Location
Australia - SA Adelaide Hills
Scott; I wish that we were close enough that you could demonstrate your sawmill for me!!
I have read all of the ideas and advice above; I made a trip to WC and have a gallon of anchorseal for the weekend I made some "X" brackets to support the wood for cutting and a post with a 1/4" bolt cut off for shaping (thanks for the idea to Robuticion!). Here is the first piece worked to see if I can do it.
But, why can't I cut rounds from the trunk that we can use?? I can cut down below the rotten pith to solid wood and use that. Is there a tutorial or guidance for cutting rough logs into bowl blanks???

OK, issue 1-

Sure, nothing stops you to cut a length piece (log) of a tree and turn it in between centres or mount it in a plate through the end grain however, with wood turning, there are certain "rules" that are there for a purpose and while you have yet to get the experience, you will see why those rules are there, believe me, they are there for a reason.

Apart from the fact that, some woods would easily (explode/disintegrate) if you try to turn them the way you are thinking about, you have to consider how you want the wood grain to show on your finished piece.

Issue -2

I have a series of pics that will answer all your questions on this matter, you can call if the "Woodturners Bible" or anything else you want, I reckon, if you can't get your wood cut right, you may consider so other hobby...!:eek::wink::biggrin:

Have a look and let me know if this is of some help to you, as I know some folks here, will think that Santa come early...!
:):biggrin:

Cheers
George
 

Attachments

  • page-1.JPG
    page-1.JPG
    46.7 KB · Views: 155
  • page-2.JPG
    page-2.JPG
    54.2 KB · Views: 155
  • page-3.JPG
    page-3.JPG
    36.6 KB · Views: 145
  • page-4.JPG
    page-4.JPG
    46.3 KB · Views: 132
  • page-5.JPG
    page-5.JPG
    41.9 KB · Views: 128
  • page-6.JPG
    page-6.JPG
    43.6 KB · Views: 132
  • page-7.JPG
    page-7.JPG
    50.8 KB · Views: 133
  • page-8.JPG
    page-8.JPG
    44.4 KB · Views: 151
Last edited:

rblakemore

Member
Joined
Jan 20, 2014
Messages
286
Location
Friendswood, Tx
More progress

Thanks everyone!! Based on the comments I made a sawbuck for cutting and a support bracket for final trimming. I will work on finishing the rough cutting this morning and seal.
But, George, the drawings of the wood grain and bowl blanks are fantastic!!
I am printing them now and will use them; but, where did they come from??
A book I anticipate - name please??
Now we need to learn to turn bowls.
 

truckerdave

Member
Joined
Dec 7, 2008
Messages
134
Location
Rochester, New York
Thanks everyone!! Based on the comments I made a sawbuck for cutting and a support bracket for final trimming. I will work on finishing the rough cutting this morning and seal.
But, George, the drawings of the wood grain and bowl blanks are fantastic!!
I am printing them now and will use them; but, where did they come from??
A book I anticipate - name please??
Now we need to learn to turn bowls.

I second this request! I have the hardest time turning logs into bowl blanks! EVERY single log I have ever tried has resulted in a fatal flaw and some REALLY scary near misses for me!!! (It is amazing how fast a chunk of wood flys even when turning at only 500 RPM!!!)
 

robutacion

Member
Joined
Aug 6, 2009
Messages
6,514
Location
Australia - SA Adelaide Hills
Hi peoples,

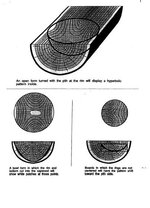
The pics I provided are part of a PDF file that I discover in the days I was a member with the Australian Woodworkers forum years ago, I don't recall who wrote it or how exactly I got a copy, I reckon it was passed on by another turner in that forum, I take no credit for that PDF file, I already had my drawings/notes of how to do many of those cuts but, that document was well made and very clear on what to do so, I have passed it on to many other folks that I saw, could put it to good use.

As for general Bowl turning or, getting things done from wood logs into finished pieces, there is a mountain of info out there, including YouTube videos that are, in my opinion, a great way of learning in real time...!

I myself wrote dozens and dozens of pages on the subject, throughout the web forums I have been part off, all scattered I know, I may one day look for all that info and transfer it to my new website that is a lot more than a webstore, I have had plenty of information for turners in there, since the day I started it all and under a new name/address "Timberssoul".

So, the best way to learn is to find a woodturning club near you and join in, the older master in any club will put you up to speed in no time. The other option is to find someone near you (driving distance) that does that sort of turnings and request some help, you will find that, most of us like to help and teach others what we learnt.

I have regularly people that comes to be for some coaching in that same issue, and every single on of them is now doing well and enjoying it, there is no doubt that distances can complicate things and in this case, It would be unrealistic to invite you to spend a couple of days with me in the workshop but, you should be able to find someone that you can learn from, if all the other options have failed...!

PS: I actually have a 72 years old that was suppose to start last Saturday, I made the mistake of not grabbing a piece of wood and write where he needed to on on Saturday morning and pit it in the passenger seat of his vehicle, why...???
Because the old fellow is very forgetful and I knew that, my mistake really...!

After he left, I actually told my wife that, by the time he would get home, 30km away, we would have already forgotten it...!:redface::)

Oh well, some other time, I suppose...!:wink:

Best of luck...!

Cheers
George
 

rblakemore

Member
Joined
Jan 20, 2014
Messages
286
Location
Friendswood, Tx
This is great thanks; we will be turning some of the maple pieces green and wet and will use these pictures as a guide.
Thanks again.
 
Top Bottom