Jim in Oakville
Member
Hi,
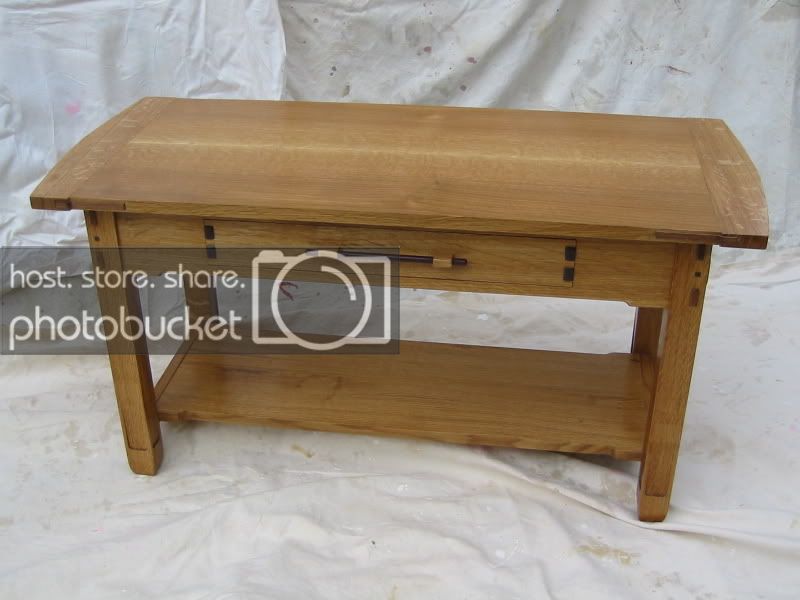
I made this table about a year ago and thought I'd post it here.
")
This coffee table was made using design influences inspired by Greene and Greene. The coffee table design was scaled to fit a space and function that best suited a specific multifunctional application for it’s owner, a close friend of mine.
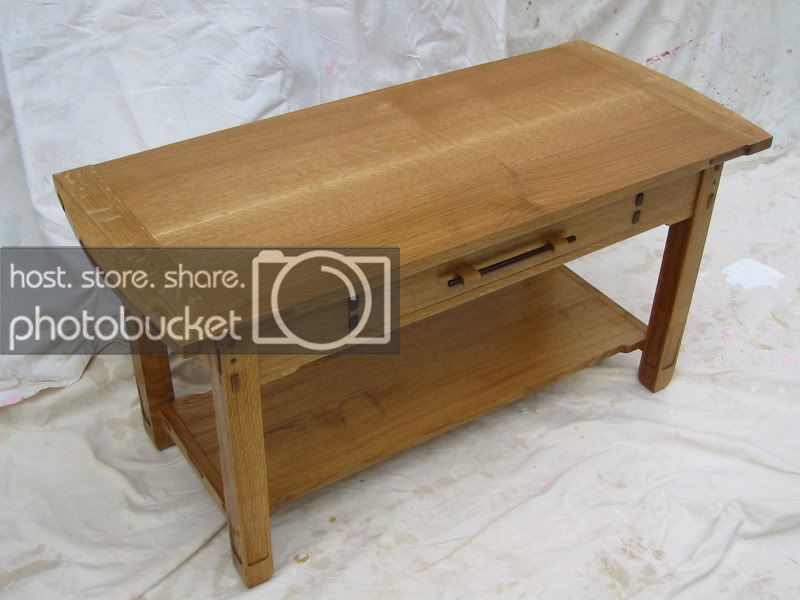
The requirements for the table were that they could use the table as a traditional coffee table, but that height be suitable to place items on top at a comfortable height in front of a new sofa, that the lower shelf was suitable for storage or display. They wanted a drawer to store small items such as TV remotes , cup coasters, and other items. The drawer needed to be accessible from both sides of the table. They also wanted the design to have a top with soft edges so that people could easily move around it and not be hurt by sharp corners.
My coffee table is basically my own design. I researched many typical G&G designs on the internet and I found that there are a multitude of sources available to evaluate. I began by drawing several scaled variations of the table from a variety of perspectives, selecting joinery and detail features that would give the work a classic sense of function with some value added details that keep the viewer looking for more. Visible joinery is important in the design, but also that it has the right balance and visual appeal.
While doing my design research on the internet one current Greene and Greene furniture maker caught my eye, Darrell Peart. As I needed some direction I contacted Darrell on a few occasions and he was very generous in sharing with me some of his methods for detailing legs and drawer pulls. Darrell published a book in 2006 that was not yet available when I began this project.
Once I finalized my design I selected my lumber based on grain and proportion for the final size of the table. I dimensioned my material to ¾†thickness, the legs to 1 ¾†square. I know that traditional G&G furniture often features mahogany as its primary wood with ebony accents
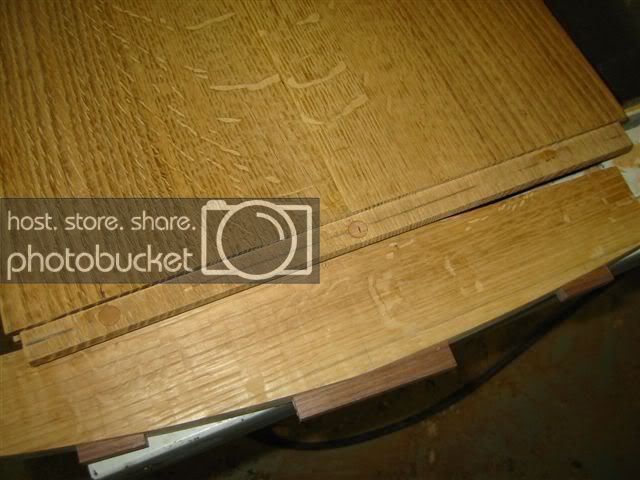
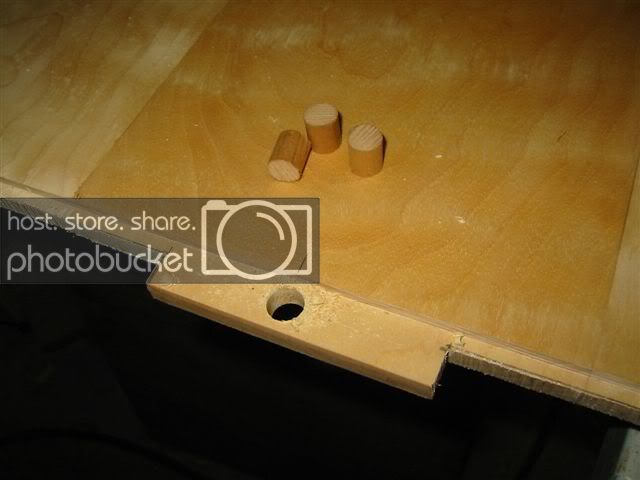
I began construction with the table top. I wanted the table top to have a single glue joint down the middle, this required a wide board that I was able to book match and allow the ray flecks of the quarter sawn white oak to be featured in the top display. I also wanted the top to feature gently curved bread board ends. The bread boards are attached to the top using a 3/8†x ¾†tenon cut the width of the top and a corresponding mortice in the breadboard. The joint is attached to the top using screws through the ends of the bread board, recessed in 3/8†width mortices and hidden by walnut accents. The six securing screws (three in each breadboard) are held firm into the end grain of the table top tenon via the use of dowels that were glued cross grain into the tenons. Only the centre tenon was glued to the breadboard, this allows for seasonal movement of the top. The outer mechanical screw joints are set into mortices with elongated holes that allow the top to move and the screw heads to slide within the breadboard for seasonal movement.
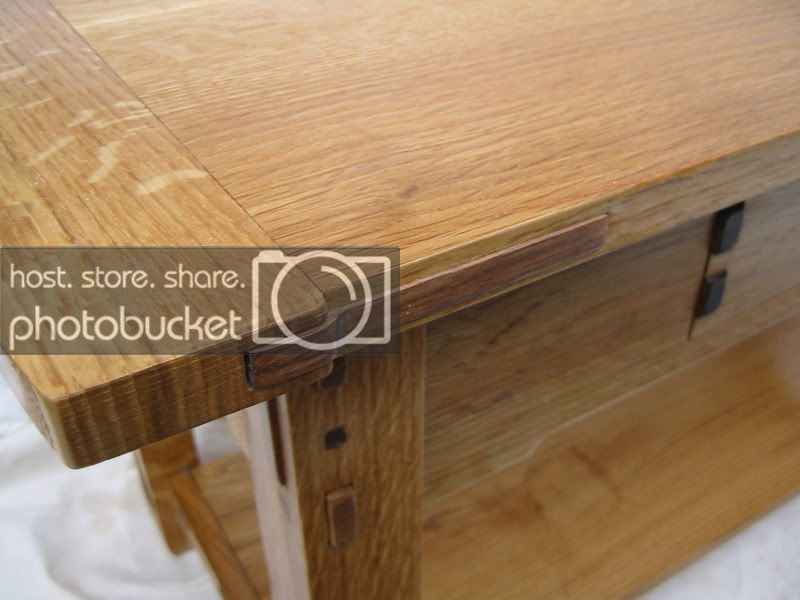
The walnut keys were chosen to add some contrast in appearance, but also to keep in tone with other walnut furniture that would be in the same living space, other wise I would have chosen a darker accent wood. The side walnut keys are set into motices that are cut into the sides of the table top and into the end grain of the breadboard. The side keys are glued only to the table top and allowed to move freely seasonally within the mortice cut into the breadboard end grain.
The table top is screw attached to the case assembly using the side aprons and a wood brace with slotted holes to allow for seasonal movement.
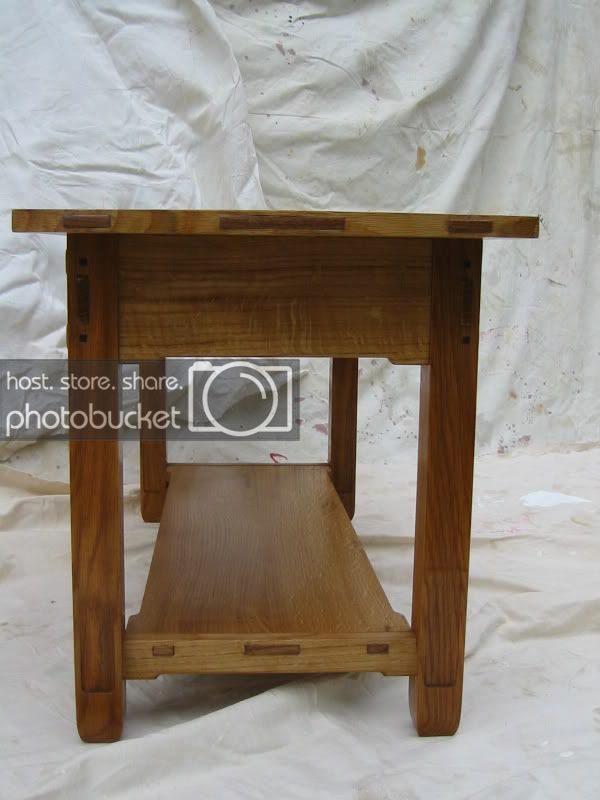
The legs feature a sculpted cut detail on the leg , with a gently curving foot. The detail on the leg is completed using a router and an angled sled that allows the cut to increase in depth towards the foot, about 1/8†deep at the bottom of the detail. This look adds a nice detail and shadow effect creating a lighter look and point of interest. The legs of the table are cut from a single board and the positioning of the legs in the layout was determined by grain match between the legs.
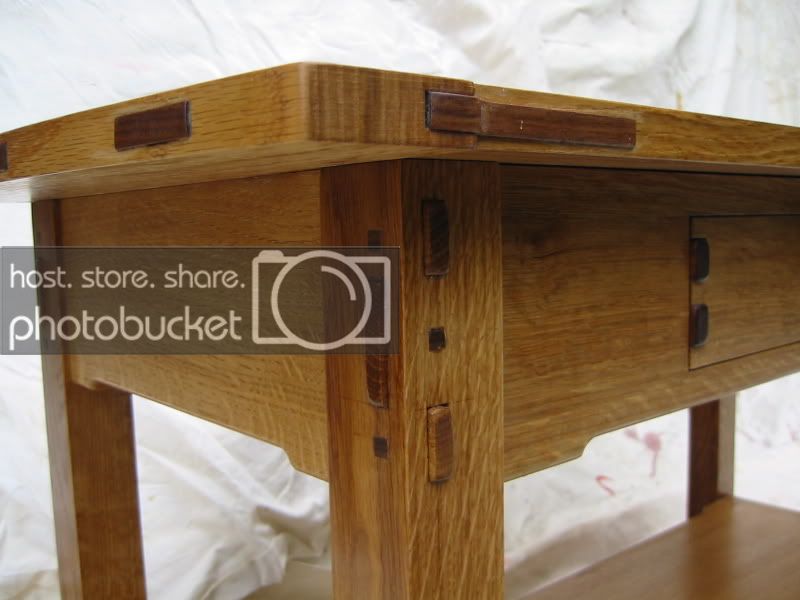
The legs also have through mortices cut into them to accommodate a set of haunched/stepped through tenons that intersect through the leg. The mortices on the legs were layed out and cut to accommodate the tenon configuration. The tenons on the aprons intersect inside the legs of the table. The tenons are full sized till half length, then they are cut to split tenons or a single slim tenon to achieve maximum strength and then still allow them to intersect like fingers. The tenons are then in turn pinned using ¼†walnut square pins.
The foot of each leg was fitted with a felt pad to assist in moving/sliding the table not scratching the fine wood floor.

The aprons of the table are cut from a single board that has a continuous grain match that goes around the table. The aprons were detailed with a small lift detail to give some credence to the G&G influence, but it is not an authentic detail in its reproduction in this work. The lift detail is spaced proportionally along the long aprons and then recalculated for spacing along the short apron.
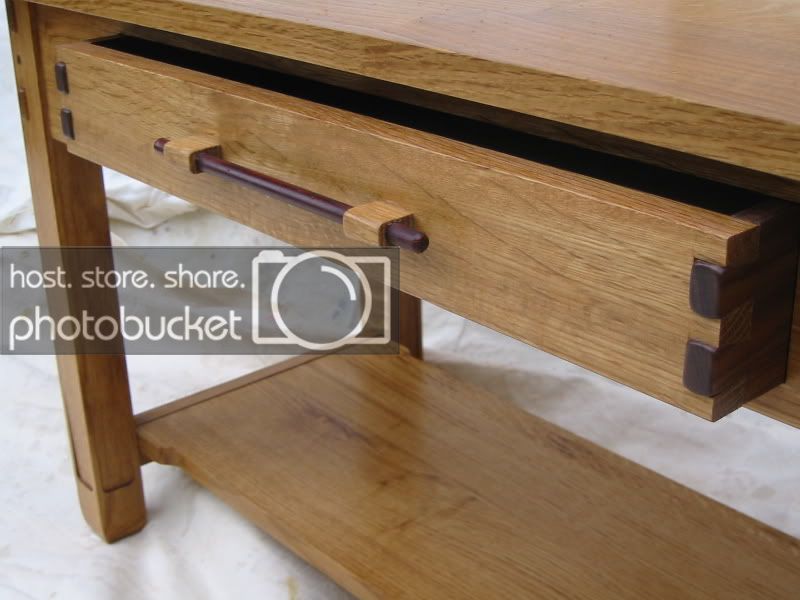
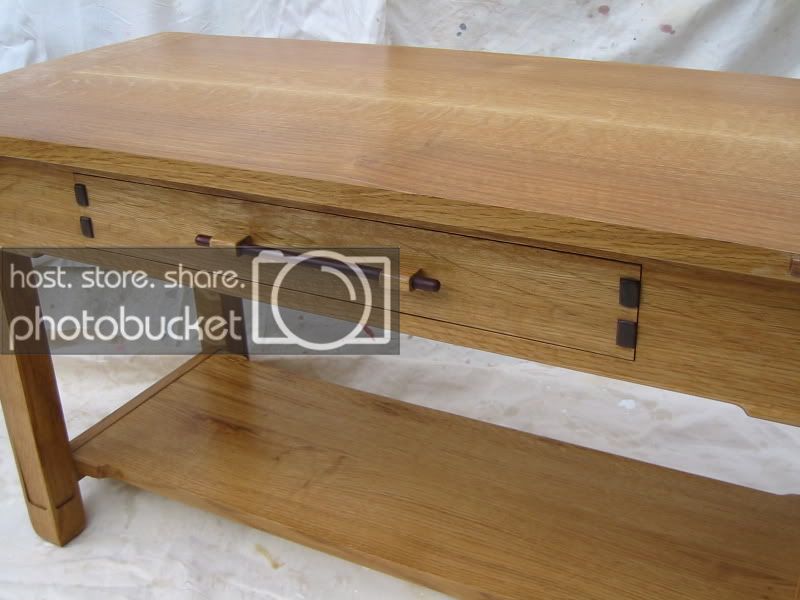
The drawer was one of most important details to satisfy in this design. I wanted a drawer face that was cut and matched from the apron on that face, to have a clean smooth slide through function that allowed it to be opened from either side and to have a visible classic through joinery on the drawer face with an appropriate drawer pull.
I cut out the corresponding drawer faces from the aprons and keep the grain match homogenous with the balance of the apron face. I wanted to tie in the walnut accents on the table with the drawer so I chose walnut for the drawer sides knowing the walnut end grain would add a nice detail to the drawer. I chose through dove tails for the drawer construction. In keeping with the other walnut accents I made them 1 /16" proud of the surface and sanded them to a smooth roundness as I did all the other walnuts accents on the table.
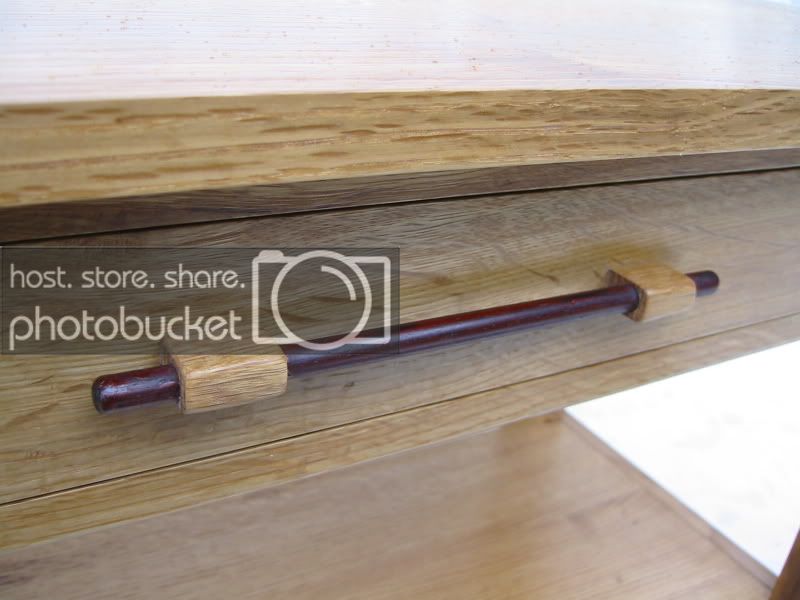
The drawer pull features a simple 3/8" cocobolo dowel set into shaped white oak supports, all glued to the drawer face with no hardware. I liked the dark tone and richness that cocobolo added as a detail, saying the pull is different but still within the design. There are no metal hardware components to the drawer or support assembly.
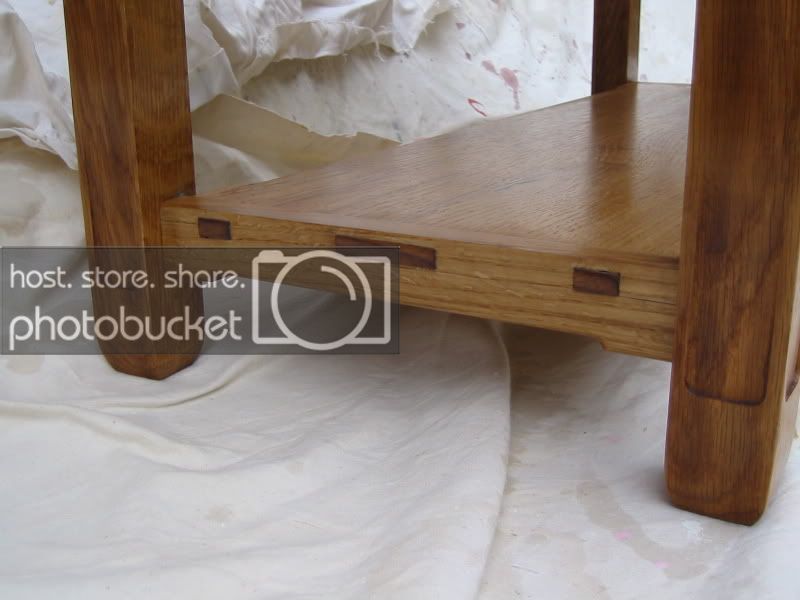
The lower shelf mirrors the top of the table, made from a single wide board with a single centred glue joint. The board was grain matched from a single board. The shelf and the supporting cross rail are shaped to have the same symmetry as the apron lifts. The lower shelf is tenoned into the lower rail. The rail is mortice and tenoned into the legs and has similar accents to the breadboard, but with no screws, only glue in the centre third. The walnut keys are scaled to be proportional to those on the upper bread board and add a nice detail.
The table finish was simple and all hand-applied. I sanded to 220 and hand scraped the surfaces, then finished with two Danish oil coats followed by three coats of a home made oil/poly/thinner mix, rubbed out and waxed with 0000 steel wool.
It now resides in a special place in my friends home, I enjoy seeing when ever I have time for a visit.
I made this table about a year ago and thought I'd post it here.
This coffee table was made using design influences inspired by Greene and Greene. The coffee table design was scaled to fit a space and function that best suited a specific multifunctional application for it’s owner, a close friend of mine.
The requirements for the table were that they could use the table as a traditional coffee table, but that height be suitable to place items on top at a comfortable height in front of a new sofa, that the lower shelf was suitable for storage or display. They wanted a drawer to store small items such as TV remotes , cup coasters, and other items. The drawer needed to be accessible from both sides of the table. They also wanted the design to have a top with soft edges so that people could easily move around it and not be hurt by sharp corners.
My coffee table is basically my own design. I researched many typical G&G designs on the internet and I found that there are a multitude of sources available to evaluate. I began by drawing several scaled variations of the table from a variety of perspectives, selecting joinery and detail features that would give the work a classic sense of function with some value added details that keep the viewer looking for more. Visible joinery is important in the design, but also that it has the right balance and visual appeal.
While doing my design research on the internet one current Greene and Greene furniture maker caught my eye, Darrell Peart. As I needed some direction I contacted Darrell on a few occasions and he was very generous in sharing with me some of his methods for detailing legs and drawer pulls. Darrell published a book in 2006 that was not yet available when I began this project.
Once I finalized my design I selected my lumber based on grain and proportion for the final size of the table. I dimensioned my material to ¾†thickness, the legs to 1 ¾†square. I know that traditional G&G furniture often features mahogany as its primary wood with ebony accents
I began construction with the table top. I wanted the table top to have a single glue joint down the middle, this required a wide board that I was able to book match and allow the ray flecks of the quarter sawn white oak to be featured in the top display. I also wanted the top to feature gently curved bread board ends. The bread boards are attached to the top using a 3/8†x ¾†tenon cut the width of the top and a corresponding mortice in the breadboard. The joint is attached to the top using screws through the ends of the bread board, recessed in 3/8†width mortices and hidden by walnut accents. The six securing screws (three in each breadboard) are held firm into the end grain of the table top tenon via the use of dowels that were glued cross grain into the tenons. Only the centre tenon was glued to the breadboard, this allows for seasonal movement of the top. The outer mechanical screw joints are set into mortices with elongated holes that allow the top to move and the screw heads to slide within the breadboard for seasonal movement.
The walnut keys were chosen to add some contrast in appearance, but also to keep in tone with other walnut furniture that would be in the same living space, other wise I would have chosen a darker accent wood. The side walnut keys are set into motices that are cut into the sides of the table top and into the end grain of the breadboard. The side keys are glued only to the table top and allowed to move freely seasonally within the mortice cut into the breadboard end grain.
The table top is screw attached to the case assembly using the side aprons and a wood brace with slotted holes to allow for seasonal movement.
The legs feature a sculpted cut detail on the leg , with a gently curving foot. The detail on the leg is completed using a router and an angled sled that allows the cut to increase in depth towards the foot, about 1/8†deep at the bottom of the detail. This look adds a nice detail and shadow effect creating a lighter look and point of interest. The legs of the table are cut from a single board and the positioning of the legs in the layout was determined by grain match between the legs.
The legs also have through mortices cut into them to accommodate a set of haunched/stepped through tenons that intersect through the leg. The mortices on the legs were layed out and cut to accommodate the tenon configuration. The tenons on the aprons intersect inside the legs of the table. The tenons are full sized till half length, then they are cut to split tenons or a single slim tenon to achieve maximum strength and then still allow them to intersect like fingers. The tenons are then in turn pinned using ¼†walnut square pins.
The foot of each leg was fitted with a felt pad to assist in moving/sliding the table not scratching the fine wood floor.
The aprons of the table are cut from a single board that has a continuous grain match that goes around the table. The aprons were detailed with a small lift detail to give some credence to the G&G influence, but it is not an authentic detail in its reproduction in this work. The lift detail is spaced proportionally along the long aprons and then recalculated for spacing along the short apron.
The drawer was one of most important details to satisfy in this design. I wanted a drawer face that was cut and matched from the apron on that face, to have a clean smooth slide through function that allowed it to be opened from either side and to have a visible classic through joinery on the drawer face with an appropriate drawer pull.
I cut out the corresponding drawer faces from the aprons and keep the grain match homogenous with the balance of the apron face. I wanted to tie in the walnut accents on the table with the drawer so I chose walnut for the drawer sides knowing the walnut end grain would add a nice detail to the drawer. I chose through dove tails for the drawer construction. In keeping with the other walnut accents I made them 1 /16" proud of the surface and sanded them to a smooth roundness as I did all the other walnuts accents on the table.
The drawer pull features a simple 3/8" cocobolo dowel set into shaped white oak supports, all glued to the drawer face with no hardware. I liked the dark tone and richness that cocobolo added as a detail, saying the pull is different but still within the design. There are no metal hardware components to the drawer or support assembly.
The lower shelf mirrors the top of the table, made from a single wide board with a single centred glue joint. The board was grain matched from a single board. The shelf and the supporting cross rail are shaped to have the same symmetry as the apron lifts. The lower shelf is tenoned into the lower rail. The rail is mortice and tenoned into the legs and has similar accents to the breadboard, but with no screws, only glue in the centre third. The walnut keys are scaled to be proportional to those on the upper bread board and add a nice detail.
The table finish was simple and all hand-applied. I sanded to 220 and hand scraped the surfaces, then finished with two Danish oil coats followed by three coats of a home made oil/poly/thinner mix, rubbed out and waxed with 0000 steel wool.
It now resides in a special place in my friends home, I enjoy seeing when ever I have time for a visit.