Cwalker935
Member
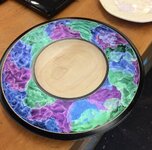
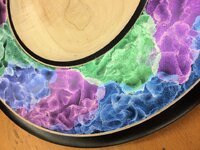
Still trying for the cloud effect, not quite there yet but I am pretty happy with this Bowl. 11" Cherry.


")
Very nice! What did you use to embellish?
Great looking bowl Cody, but more importantly, PLEASE explain how the heck you manage to get so many projects completed !!!!! It seems every day you have another terrific piece of art on here. The only way I could do that would be to sit in my shop 24/7. Just tell us there are actually 4 of you posing as one person, we'll all feel better.


Great looking bowl Cody, but more importantly, PLEASE explain how the heck you manage to get so many projects completed !!!!! It seems every day you have another terrific piece of art on here. The only way I could do that would be to sit in my shop 24/7. Just tell us there are actually 4 of you posing as one person, we'll all feel better.
I also did 8 pens yesterday, 5 pens today, screwed up 2 travel mugs, got up leaves and watched football. First attempts at travel mugs tried to get by with blanks that were too small. Mug was looking pretty good, does it really need a bottom?
View attachment 156253
View attachment 156254
Now THOSE I can relate to, especially the screw up but I've only heard about them thru the grapevine or seen pictures like yours.
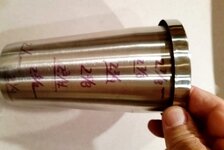
In answer to your question about it needing a bottom....nope. Just glue a block to it and call it a pencil cup. HINT: Outside of mug +/- 7.5", stainless liner +/- 5.5", hole in wood no more than 6.5" :biggrin:, taper inside hole like the liner or you end up with another pencil cup. I have lots of pencil cups (that were given to me by others trying to make mugs).
I've seen some of the smart guys turn old liners into make-shift measuring sticks like this one that tells you when to stop before you have another pencil cup. When you've screwed up as many as "those guys" , you develop some tricks. I'm sure "they" would gladly share, we have enough pencil cups.
Great looking bowl Cody, but more importantly, PLEASE explain how the heck you manage to get so many projects completed !!!!! It seems every day you have another terrific piece of art on here. The only way I could do that would be to sit in my shop 24/7. Just tell us there are actually 4 of you posing as one person, we'll all feel better.
I also did 8 pens yesterday, 5 pens today, screwed up 2 travel mugs, got up leaves and watched football. First attempts at travel mugs tried to get by with blanks that were too small. Mug was looking pretty good, does it really need a bottom?
View attachment 156253
View attachment 156254
Did ya watch the Cowboys win?
Great looking bowl Cody, but more importantly, PLEASE explain how the heck you manage to get so many projects completed !!!!! It seems every day you have another terrific piece of art on here. The only way I could do that would be to sit in my shop 24/7. Just tell us there are actually 4 of you posing as one person, we'll all feel better.
I also did 8 pens yesterday, 5 pens today, screwed up 2 travel mugs, got up leaves and watched football. First attempts at travel mugs tried to get by with blanks that were too small. Mug was looking pretty good, does it really need a bottom?
View attachment 156253
View attachment 156254
I'm not sure what the cloud effect is but the bowl is beautiful.
Great job Cody!
?....did you thin your paints before blowing?
Good to see you and your wifey at the symposium!
I'm not sure what the cloud effect is but the bowl is beautiful.
The cloud is an effect you get when painting the rim. It isn't easy. Here is a video on one.
[yt]_tMdQ3p5dqs[/yt]
Great job Cody!
?....did you thin your paints before blowing?
Good to see you and your wifey at the symposium!
Good to see you guys as well.
Definitely thinned the paint, tried differing consistencies, Too thin paint- beads up, little thicker paint- does not spread smoothly. Tried different air pressures on air brush. I am thinking that my issue may be with background paint and preparation. I used a gloss enamel for the background.
In the pic I posted, they used interference acrylics...Golden is one brand.
They are sort of translucent and some are iridescent as well. I understand that some colors may appear different when applied that you think you will get....sort of a fun experiment! Of course what is under them can influence the final color too.
If you have an internal tenon on the bottom or a vacuum chuck, you could shave that off and have another go without turning another piece.
However, I think your bowl looks very cool the way it is!
Edit:
Perhaps you are on track with the surface causing issues. Maybe it was just too slick with the glossy paint. There should not have been any wax or anything involved. Even hand oils can cause issues.
You could try knocking the gloss back with some steel wool so the paints have a little more to grab onto. Did you use a clear coat between the black and the coloring?
What grit did you sand to before applying black paint?
I wonder if an itsy bitty touch of dish detergent or fabric softener in the paint would help it to flow better and not bead up as much?...sort of a flow aid as in automotive paints?