THarvey
Member
I enjoy finding and restoring old hand tools.
Here are a few chisel I recently rehandled.
The three curved socket chisels are handled with recycled Maple from a discarded workbench top, with leather bolster pads.
The tang chisel handle is turned from hard maple and includes brass ferrule and bolster. The brass are plumbing nuts, threaded on a tenon then turned the corners off.
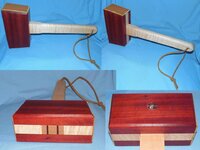
Finally, I decided those new chisel handles deserved a new mallet. This is one heavy hitter. Bloodwood and Curly Maple mallet. Curly Maple handle passes through the head and is secured with two Bloodwood wedges. Mounted leather on the faces to protect the chisels and mallet. Plus, a shiny new 2015 penny to note the year made. The mallet is finished with a healthy dose of Danish Oil.
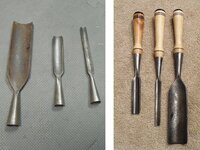
Here are a few chisel I recently rehandled.
The three curved socket chisels are handled with recycled Maple from a discarded workbench top, with leather bolster pads.
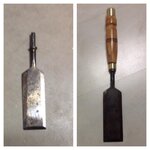
The tang chisel handle is turned from hard maple and includes brass ferrule and bolster. The brass are plumbing nuts, threaded on a tenon then turned the corners off.
Finally, I decided those new chisel handles deserved a new mallet. This is one heavy hitter. Bloodwood and Curly Maple mallet. Curly Maple handle passes through the head and is secured with two Bloodwood wedges. Mounted leather on the faces to protect the chisels and mallet. Plus, a shiny new 2015 penny to note the year made. The mallet is finished with a healthy dose of Danish Oil.