budnder
Member
After seeing some of these finished and completed at a kitchen store, I thought they would make nice Christmas gifts, so ordered a half dozen of the hardware sets from CheeseSlicing.com
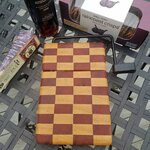
This is the first one I did, just to learn the general process, particularly when it comes to doing something end grained. I didn't put a lot of thought into a pattern or wood, just went to Menards and grabbed some 1x2 Maple and Mahogany. I'm pretty happy that I got a keeper out of the effort. Here's what I learned, never having done one of these before:
1) I got a little tear out when rounding the edge near the kerf cut. I should have rounded the edges over before I did the kerf cut, I think.
2) The clamps I had weren't very good for the glue ups, as I had the wood on a flat surface and clamped over the top. So that made it hard to see the exact alignment on the pattern. I picked up some bar clamps so I can lay the wood on top of the clamp, and that seems like it will work a lot better.
3) For usability, I think it really needs some rubber feet, so ordered a few of those.
4) I had a long 1/4 inch bit to drill the hole, but it was still a little more complicated than I expected. I ended up starting it with my benchtop drill press, but then finishing it with a cordless drill as I didn't have the clearance on the drill press to use my long bit. It all worked out ok.
5) Sanding probably took more time than anything else. I was using a bench oscillating sanding belt, which I think of as fairly aggressive. It didn't think my material was that uneven, but took a lot of sanding to get the thing smooth (where my fingernail wouldn't catch passing over). I've been eyeing those drum sanders that I see everyone use in the videos of making these things. I wonder how many passes it would take with one of those.

