Blacksmithing 101

Signed-In Members Don't See This Ad
See more from Cwalker935

Cwalker935

Member
Joined
May 18, 2014
Messages
3,506
Location
Richmond, Va
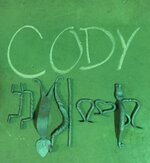
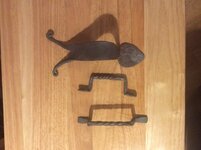
I have been wanting to try blacksmithing for a while so I signed up for a weekend course making handles. I went into the course a total novice and it was all completely new to me. Here are 3 pieces that I finished in order of completion from left to right. The first 2 pieces were made from round stock and we learned twisting, fullering and bending. With the third piece we worked with flat stock and we were supposed to either make a leaf or split the metal, taper and round the tines and then curl them. I decided to do both on the same piece. I am hoping to find ways to incorporate metal work into my woodturning.

IMG_1751.jpg
 
Signed-In Members Don't See This Ad

mecompco

Member
Joined
Apr 24, 2015
Messages
1,607
Location
Fairfield, Maine
Very nice! At the craft show today I was talking to another vendor who does custom wrought iron, etc. He uses a charcoal forge. While I respect Old School, I'm thinking a propane forge would be much more convenient. Getting one going is on my to-do list (having everything else, including a nice 102 lb. anvil made in 1909).

IDK how exactly blacksmithing could be worked into pen making (pen stands, perhaps), but it is fun. If you're at all interested in knife making, a forge is pretty much a necessity, even if you don't forge your blades, you need one for heat treating.

Regards,
Michael
 

Cwalker935

Member
Joined
May 18, 2014
Messages
3,506
Location
Richmond, Va
Very nice! At the craft show today I was talking to another vendor who does custom wrought iron, etc. He uses a charcoal forge. While I respect Old School, I'm thinking a propane forge would be much more convenient. Getting one going is on my to-do list (having everything else, including a nice 102 lb. anvil made in 1909).

IDK how exactly blacksmithing could be worked into pen making (pen stands, perhaps), but it is fun. If you're at all interested in knife making, a forge is pretty much a necessity, even if you don't forge your blades, you need one for heat treating.

Regards,
Michael

We used propane forges. Seemed pretty convenient turn a valve push a button. I was thinking more along the lines of embellishments for bowls and lidded boxes.
 

triw51

Member
Joined
Feb 14, 2012
Messages
2,062
Location
407 East Cottonwood Drive, Cottonwood AZ
I have been wanting to try blacksmithing for a while so I signed up for a weekend course making handles. I went into the course a total novice and it was all completely new to me. Here are 3 pieces that I finished in order of completion from left to right. The first 2 pieces were made from round stock and we learned twisting, fullering and bending. With the third piece we worked with flat stock and we were supposed to either make a leaf or split the metal, taper and round the tines and then curl them. I decided to do both on the same piece. I am hoping to find ways to incorporate metal work into my woodturning.

View attachment 156383

Blacksmithing is like pen turning very addictive... Once you beat hot iron seems like you always want to... Can be even more of a money hole than pen turning.
 
Joined
Sep 24, 2006
Messages
8,206
Location
Tellico Plains, Tennessee, USA.
Back in the dark ages when I was just short of my teens, my dad did some iron work... he did mostly practical blacksmithing, what he needed around the farm, hinges, gate latches, etc.... he used a coke forge and it was my job to stand and crank the blower. Still like the smell of a coke black smith forge.
 

Cwalker935

Member
Joined
May 18, 2014
Messages
3,506
Location
Richmond, Va
Day 2

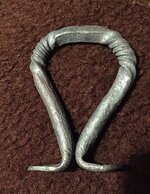
I survived day 2 of the class. I created a couple of design opportunities for my self by working the metal too thin and design elements fatigued as I was working other sections and fell off. I see several possibilities for combining metal work with wood turning and forged a couple of pieces with that in mind. Tapering 5/8" round stock to do spirals takes a lot of hammering. I am tired and sore after 2 days of class.

IMG_0719.jpg
 
Last edited:

MDWine

Member
Joined
Mar 22, 2005
Messages
2,693
Location
Manassas Park, Virginia, USA.
I have always loved the work that can be done.
Good on ya! and well done sir...

Looking forward to examples of your continued success... Remember that there are never failures, only "learning opportunities"!
 

Skie_M

Member
Joined
Aug 7, 2015
Messages
2,737
Location
Lawton, Ok
I survived day 2 of the class. I created a couple of design opportunities for my self by working the metal too thin and design elements fatigued as I was working other sections and fell off. I see several possibilities for combining metal work with wood turning and forged a couple of pieces with that in mind. Tapering 5/8" round stock to do spirals takes a lot of hammering. I am tired and sore after 2 days of class.

View attachment 156466

In regards to the highlighted section ....

Just a thought, but couldn't you protect the thinner elements of the design by coating them with dampened ashes or a mud slurry mixture to keep the metal from oxidizing and reducing too far?

I do know that in Japanese bladesmithing, in order to keep the back of a katana from hardening nearly as much as the edge of the blade, so as to give superior flex and support without breaking, they coat all but the edge of the blade with a mud mixture that contains a large amount of ash. This keeps the blade's spine from oxidizing as much in the fire, and, when quenched, the blade achieves a much higher hardness as it is cooled fast enough, but the spine inside the mud coating stays hot far longer and cools much more slowly.

The resulting differential between the hard edge and the softer spine gives a distinctive line down the blade that is called the "Hamon"... This line also demarks where the polishing of the blade changes it's appearance, and where the life of the blade will meet it's end, if it is sharpened or ground past the line where there is no more hardened material left for the edge.
 

Cwalker935

Member
Joined
May 18, 2014
Messages
3,506
Location
Richmond, Va
I survived day 2 of the class. I created a couple of design opportunities for my self by working the metal too thin and design elements fatigued as I was working other sections and fell off. I see several possibilities for combining metal work with wood turning and forged a couple of pieces with that in mind. Tapering 5/8" round stock to do spirals takes a lot of hammering. I am tired and sore after 2 days of class.

View attachment 156466

In regards to the highlighted section ....

Just a thought, but couldn't you protect the thinner elements of the design by coating them with dampened ashes or a mud slurry mixture to keep the metal from oxidizing and reducing too far?

I do know that in Japanese bladesmithing, in order to keep the back of a katana from hardening nearly as much as the edge of the blade, so as to give superior flex and support without breaking, they coat all but the edge of the blade with a mud mixture that contains a large amount of ash. This keeps the blade's spine from oxidizing as much in the fire, and, when quenched, the blade achieves a much higher hardness as it is cooled fast enough, but the spine inside the mud coating stays hot far longer and cools much more slowly.

The resulting differential between the hard edge and the softer spine gives a distinctive line down the blade that is called the "Hamon"... This line also demarks where the polishing of the blade changes it's appearance, and where the life of the blade will meet it's end, if it is sharpened or ground past the line where there is no more hardened material left for the edge.

I am at the very beginning of the learning curve and learning from mistakes is certainly part of the process. There was simply no need to work the metal as thin as I did that early in the project. Learning the limits of the steel is something that I need to know. Also learning that the steel is being affected in areas other than where you are working is also part of the learning experience. The techniques that you describe may have helped but at this stage I need to learn more about what works and perhaps more importantly about what does not work. For what its worth, the instructor could not believe that this was my first attempt at blacksmithing and said that a couple of my smaller pieces were on par with things done by smith's with years of experience.
 
Top Bottom