UV Stabilization

Signed-In Members Don't See This Ad

jcjc

Member
Joined
May 27, 2017
Messages
54
Location
PDX, OR
Hey guys,
Hope this isn't a double post but I have concerns about fading/yellowing, color change of both resin and dyes. I'm not a pen turner but I do work with epoxy resins, sheet acrylic, and acrylic resin (Weld On 40) for art projects. I found out that most if not all dyes are not color fast and will fade over time. In fact, many of the companies do not test or design their pigments to be UV stable. I found this out by emailing several companies and they were surprisingly forthcoming about their lack of colorfastness. I then looked into clear/water clear resins from various companies and found that only one, Artresin claims to be not UV resistant but UV stable thanks to an ingredient that they claim no other resin makers use. It's called HALS and is used in other products. There's also a vid of 16 resins tested by an independent party and all but a couple showed yellowing. Alumilite was out performed by about half of the others. I'm not here to plug Artresin and I've never used it although for my needs, it should be fine. Also, it's not designed for casting but to cover artwork and not yellow over time. That's actually why it was invented. My question to you guys is, have you noticed yellowing of resin or dyes changing color?
Thanks,
JC
 
Signed-In Members Don't See This Ad

robutacion

Member
Joined
Aug 6, 2009
Messages
6,514
Location
Australia - SA Adelaide Hills
I had a good look at the website and saw a few videos applications and the product does exactly the same as what I know as "liquid gloss" or "liquid glass" same thing, different name.

With this said, I should also say that until I read and compare the technical data of these products, I can not be sure if this new product has some chemicals/composition compared with the older identical products, I was surprised that this stuff is from Australia.

I was also surprised that the manufacturer approves the use of this resin for casting pen blanks, I'm not sure if they referring to single blank or multiple blanks casting, there is if the resin volume in a mold allows for anything bigger than a single pen blank cast.

The requirement for perfectly crystal clear resins for our type of castings is not as critical as other applications and while most people think that the resin they are working with is crystal clear, the truth is that it is not, Epoxy resin is not crystal clear nor is most Polyesters, true crystal clear resin or coatings, are always more expensive, such as the case with this new product.

I may try it...!

PS: It is too obvious that the OP is "promoting" this product, it should never be done in what was supposed to be an "introduction" post from a possibly future pen maker or pen making related. If I'm wrong, and more than willing to apologize...!

Cheers
George
 
Last edited:

jcjc

Member
Joined
May 27, 2017
Messages
54
Location
PDX, OR
Apologies for not making an intro so here's some info: i live in the northwest, ex-military, amateur woodworker, and enjoy working with wood and acrylic (plexiglass) and just picked up a new delta drill press. I've never operated a lathe much less turned a pen nor do I have any interest in doing so although I find the process interesting.
So some backstory to my original post-my next project entails using 1/2" sheet acrylic, wood, and resin. Transparent sheet acrylic is only available in a few colors and I need several colors but in about 10 shades of each to cast my own small section of sheet over the clear acrylic. The only way to do this is to dye your own and this is what got me into researching stability of dyes and resin. My project is going to be a sculpture that's going to be extremely labor intensive and I don't want it fading in a year or two. I thought the lack of availability of color fast pigments was interesting and in my case since I'm looking for transparent dyes, I found out that those fade the worst.
In regards to resin, absolute clarity is not my goal since I'm going to dye the resin and that's not what strikes me as interesting about Artresin. It's the non yellowing chemistry that's most important to me and the 45 minute pot life which will allow subsequent tinting of the same batch. I bought a gallon of it to try out and I'll report back. Interestingly I found out that it doesn't adhere to acrylic but each one of the small panels I'm making will be framed by wood and it'll stick to that.
I was told by several people that acrylic pigments were lightfast and I did find a company that has artist paints thatare independently tested and the lightfast rating is on each bottle.
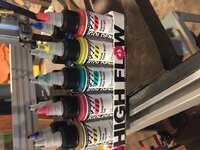
Theyre called "high flow" acrylics from Golden Paints. I tried some out in epoxy resin and they mix well with no curing issues.
I get thinking that my OP was promoting the product but I can assure you guys, I'm not nor do I plan to be a pen turner but I can see how that came across. I wanted to share some unfortunate info in terms of UV effects on products many use and find out some first hand info from guys that do this and/or have done this long enough to see any fading/yellowing.
Thanks for all the replies,
JC
 
Last edited:

jcjc

Member
Joined
May 27, 2017
Messages
54
Location
PDX, OR
A few acrylic artists that do some amazing stuff:
Vasastudio.com
Norman Mercer
Ericzammitt.com
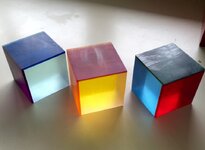
The artist Vasa is widely known for his acrylic cubes and that's what got me interested in acrylics and supposedly he uses dyes to get some of his wide variety of colors. I contacted him and he surprisingly replied but would divulge no secrets.
The pic is of some cubes I made out of 3" acrylic cubes with 1/8" acrylic sheet laminated to 3 sides and in the process of being wet sanded.
 

Attachments

  • IMG_5426.jpg
    IMG_5426.jpg
    132.7 KB · Views: 286

bmachin

Member
Joined
Jul 28, 2013
Messages
613
Location
Owensboro, KY
Hi All,

I've taken a look at Artresin's website. The main takeaways for me were that:
1) it is an epoxy designed as a protective coating rather than for casting.
2) the comparison made in the video to Alumilite was to Amazing Clear Cast which is Alumilite's Casting/Bar Top Epoxy. The comparison was certainly fair and apples to apples.

I just wanted to point out that we are talking epoxy here. I think most of us, when we see Alumilite without modification tend to think of urethane Alumilite Clear.

Speaking of which, I have a piece of Clear that I cast probably 3 1/2 years ago that has taken on a distinct yellow cast. Also, Alumilite specifically states on its website that their casting resins with the exception of their UV cured resin are not UV stable.

Bill
 

jcjc

Member
Joined
May 27, 2017
Messages
54
Location
PDX, OR
good info, bmachine. i realize my application is different from what most of you guys are concerned about but I thought it was odd that all these resins epoxy, poly, whatever will yellow but I don't see much discussion about it. and for me the surprising take away is that most pigments used by us are not at all UV stable and it's safe to assume they will discolor which sucks because a lot of time and money go into people's creations. artresins's website does show their product being used to cast embedded items so I don't see why it couldn't be machined. I'm going to cast some pieces of it when I get it in and do some machining via drill press and router table and I'll post the results. I can still find no other resin with the same UV additive that they use (it seems they'd all be touting it if they did). at this point I'm going to move forward on the project using the resin and the transparent acrylic pigments I mentioned above.
as a last resort in terms of resin I can use weld on 40. It's amazing stuff and is optically clearer than glass but the pot life is shorter and it's pretty noxious. it's designed to stand up to UV since it's used quite a bit in the aquarium industry which are constantly exposed to full spectrum light.
 

robutacion

Member
Joined
Aug 6, 2009
Messages
6,514
Location
Australia - SA Adelaide Hills
Apologies for not making an intro so here's some info: i live in the northwest, ex-military, amateur woodworker, and enjoy working with wood and acrylic (plexiglass) and just picked up a new delta drill press. I've never operated a lathe much less turned a pen nor do I have any interest in doing so although I find the process interesting.
So some backstory to my original post-my next project entails using 1/2" sheet acrylic, wood, and resin. Transparent sheet acrylic is only available in a few colors and I need several colors but in about 10 shades of each to cast my own small section of sheet over the clear acrylic. The only way to do this is to dye your own and this is what got me into researching stability of dyes and resin. My project is going to be a sculpture that's going to be extremely labor intensive and I don't want it fading in a year or two. I thought the lack of availability of color fast pigments was interesting and in my case since I'm looking for transparent dyes, I found out that those fade the worst.
In regards to resin, absolute clarity is not my goal since I'm going to dye the resin and that's not what strikes me as interesting about Artresin. It's the non yellowing chemistry that's most important to me and the 45 minute pot life which will allow subsequent tinting of the same batch. I bought a gallon of it to try out and I'll report back. Interestingly I found out that it doesn't adhere to acrylic but each one of the small panels I'm making will be framed by wood and it'll stick to that.
I was told by several people that acrylic pigments were lightfast and I did find a company that has artist paints thatare independently tested and the lightfast rating is on each bottle.
Theyre called "high flow" acrylics from Golden Paints. I tried some out in epoxy resin and they mix well with no curing issues.
I get thinking that my OP was promoting the product but I can assure you guys, I'm not nor do I plan to be a pen turner but I can see how that came across. I wanted to share some unfortunate info in terms of UV effects on products many use and find out some first hand info from guys that do this and/or have done this long enough to see any fading/yellowing.
Thanks for all the replies,
JC

G'day JC,

Thank you for your reply and explanation of the reason of your OP, as you realized, it did sound a bit strange on its own.

Not everyone here does only pens and we have a lot of subjects that are discussed on IAP however, and I apologize if I sounded a bit harsh but I had no idea what was behind your post, apart from giving the thumbs up to the product.

The type of work you are involved with is quite different than out general pen blank casting however, any possibility that a new product will allow the coating of a wood/hybrid pen that can look as deep and as clear as the CA finish, we all become interested, CA (super glue) is not the most pleasant material to work with, however, we (as far as I know) have not yet found a good replacement.

The liquid gloss/glass type coatings have been discussed on IAP multiple times and many tests have been done but none seemed to be something we would do often, there is off-course the UV issue that you are pointing out, coloring that doesn't fade over time have been also a regular topic so, the information that is providing a product that I wasn't aware of and I would expect most here never heard off, is interesting and appreciated regardless if you are not interested in actually making pens, that's OK by me...!:biggrin:

Cheers
George
 

jcjc

Member
Joined
May 27, 2017
Messages
54
Location
PDX, OR
no worries, George. i didnt think you sounded harsh considering how my OP came across.
i looked up liquid gloss table coat and see that its a 2 part epoxy. i dont know why something used as a gloss coat and something used as a casting resin couldnt be switched. ive seen some very deep clearcoated tables with all kinds of crap embedded in them but that could have been poured in layers. the only issue i see is pot life and the artresin has a long one which is what i need but that seems like a negative aspect for penturners.
i did see a post on here about lack of color stability with alumilite products, particularly red. thats the kind of info that im looking for as well as info other posters provided in this thread.
my resin is supposed to arrive on 01Jun and i plan on casting a few blocks, letting them fully cure, and then doing some machining.
 

jcjc

Member
Joined
May 27, 2017
Messages
54
Location
PDX, OR
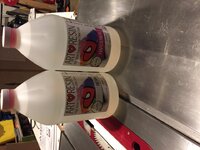
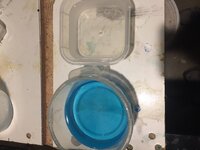
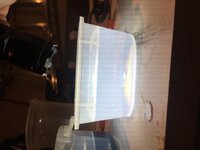
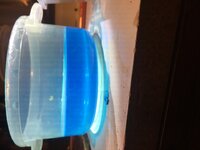
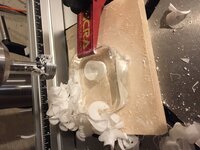
Just received the gallon kit of Artresin. I mixed up a 400 gram batch at the 1:1 ratio and dyed one side light, transparent blue and left the other side clear. I also degassed the blue sample which not surprisingly, got rid of most of the bubbles. The clear sample retained many of the tiny bubbles so pressure casting is likely the way to go. Some of the bubbles may still pop because it's was still liquid at the 45 minute mark. It's supposed to be hard at 8 hours, very hard at 24 and fully cured at 72 hours. I used the Golden brand of transparent acrylic dyes and it mixed in very well. No streaking or excessive stirring required and these dyes are engineered to be light fast with a rating on the bottle from 1 to 3 by the American Society for Testing and Materials. 1 is excellent, 2 is good, and 3 is poor. In the kit pictured, all the colors have a rating of 1 except red and purple which are rated at 2. It's now been about 90 minutes and the resin seems solid and is slightly warm. Sorry for the pic orientation.
 

Attachments

  • IMG_6800.jpg
    IMG_6800.jpg
    206.7 KB · Views: 184
  • IMG_6802.jpg
    IMG_6802.jpg
    176.4 KB · Views: 200
  • IMG_6803.jpg
    IMG_6803.jpg
    138.7 KB · Views: 190
  • IMG_6804.jpg
    IMG_6804.jpg
    130.4 KB · Views: 181
  • IMG_6805.jpg
    IMG_6805.jpg
    246.9 KB · Views: 208
Last edited:

bmachin

Member
Joined
Jul 28, 2013
Messages
613
Location
Owensboro, KY
Good start JC.

What next? Put a piece in the sun and one in a drawer? Testing Machinability? Weak minds want to know.

Bill
 

jcjc

Member
Joined
May 27, 2017
Messages
54
Location
PDX, OR
Going on almost a day since I cast the samples. Each 200 gram sample never got much above slightly warm while setting up. This morning they seemed fully cured and had a very glossy surface. I couldn't make an imprint with my finger nail.
Next is to wait the full 72 hours and try and route a couple of edges and drill a few holes thru it with the drill press. Based on what I've seen so far, I'm going to use this material and the dye for my project. I think it's about the best in terms of available products for my intentions. The resin contains UV inhibitors as all the other UV resistant ones plus the addition of the HALS UV stuff so it seems the logical choice.
When I get though with testing these samples I'll stick them in the window and periodically take pics. Pressure pot arrived today so I may do some testing with that.
 
Last edited:

jcjc

Member
Joined
May 27, 2017
Messages
54
Location
PDX, OR
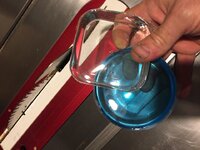
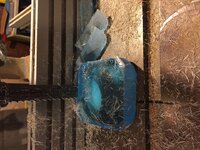
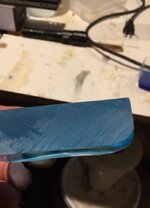
i got impatient plus i figured if this resin is cured enough for machining at 48 hours (or sooner), then that would be good info to know. with that i decided to go ahead and test it out. first, i accidentally dropped the blue piece on a smooth concrete floor from about 4 feet. i was waiting for it to shatter but i couldn't find a mark on it anywhere. i then somewhat squared off the round blue piece on the bandsaw with a coarse resaw blade. it cut fine with no issues. next i bored a hole thru the clear piece with a 1" forstner bit on the drill press. it drilled extremely smoothly and yielded a couple of continuous strands of shavings. i drilled all ther way thru and into plywood with no splintering or tear out from the other side. Next up was cutiing on the table saw. I used a Freud blade designed for cutting plastic and the result was better than expected for the blue sample. Those scratches on the cut side in the pic can't be felt with your finger. After these tests, I didn't bother setting up the router table since it was clear at this point that it would rout just fine.
What looks like a bubble in the pic of the clear piece with the hole bored is a dimple from the container the resin cured in.
my informal testing has shown that this resin is plenty hard, can be cast in a much greater thickness than the typical use for this product and responds well to tooling. although i didn't chuck it in a lathe, i am pretty sure it would work well. put another way, i'd be extremely surprised if it didn't.
 

Attachments

  • IMG_6812.jpg
    IMG_6812.jpg
    196.4 KB · Views: 187
  • IMG_6813.jpg
    IMG_6813.jpg
    315.3 KB · Views: 183
  • IMG_6814.jpg
    IMG_6814.jpg
    235 KB · Views: 180
  • FullSizeRender.jpg
    FullSizeRender.jpg
    127.5 KB · Views: 186
Last edited:

magpens

Member
Joined
Feb 2, 2011
Messages
15,912
Location
Canada
Thanks for posting this, JC. . I'd like to try casting myself.

Do you think you would get better results by using pressure ? . or maybe vacuum ?
 

jcjc

Member
Joined
May 27, 2017
Messages
54
Location
PDX, OR
I think pressure casting is the way to go in general. After I dyed the blue resin I vacuum degassed it and then thought that I should do it again but in a larger container so it could fully expand. Since it has a 45 minute pot life, I figured I might as well. The end result was bubble free by the time it set up. The clear sample was not degassed at all and retained many bubbles but this resin responds well to using a torch to pop the bubbles. For my project though, any bubbles are going to be unacceptable so that's why I just bought a pressure pot. I've never cast anything with intricate detail or with live edge wood so I think you need a pressure pot anyway to force the material in the voids.
 

jcjc

Member
Joined
May 27, 2017
Messages
54
Location
PDX, OR
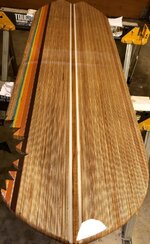
I know this doesn't have anything to do with penturning but I finally had time to do a large scale project with a long open time epoxy resin. this is a surfboard coffee table (no legs yet in this pic) made with about 30 strips of 3/4" maple ply, a center strip of teak, and one fly. The white stripes on either side of the teak and the colored stripes are dyed epoxy poured into routed channels. I applied a seal coat top and bottom, then three fload coats on the top. The fly landed after the second flood coat and is now a permanent part of the table.
 

Attachments

  • 5C8DDA92-6E6D-4EC0-8A2B-2A404CE73304.jpg
    5C8DDA92-6E6D-4EC0-8A2B-2A404CE73304.jpg
    267.6 KB · Views: 172
Top Bottom