Quick / disposible castinf mold?

Signed-In Members Don't See This Ad

Dan Masshardt

Member
Joined
Jan 30, 2013
Messages
4,806
Location
Mechanicsburg, PA
This isn't for a pen, but I wanted casters to see it. Hopefully that's okay.

Does anyone have a a good tip me this for a quick and cheap mold for casting?

In this particular instance I have two pieces that I want to cast into the gap.

I don't have any plans to do these on a regular basis so don't want to spend the time on a cutting board mold.

Maybe a disposible Tupperware type container?

Any ideas?
 

Attachments

  • image-4097716433.jpg
    image-4097716433.jpg
    455.8 KB · Views: 383
Signed-In Members Don't See This Ad

MarkD

Member
Joined
Jan 24, 2011
Messages
2,293
Location
Sayre, PA
A disposable plastic container will work as long as it compatible with the resin your using, assuming you can find one the right size so that your not wasting a lot of resin. Probably the best thing would be to turn a mold from pine. That way you can make it the correct size. I created a mold using pine boards when I cast the Lilac and Alumilite bowl I posted a few weeks ago.
 
Last edited:

wyone

Member
Joined
Jul 16, 2014
Messages
1,764
Location
15314 Grasslands, Parker, CO 80134
I use tupperware (well ok the cheap knock offs) for molds and it works just fine. I agree about the size though, would hate to waste a lot of resin. Wood sealed with foil tape should work though.

What are you going to make with those? Please be sure and let us know what it looks like when you are finished.
 

Dan Masshardt

Member
Joined
Jan 30, 2013
Messages
4,806
Location
Mechanicsburg, PA
I use tupperware (well ok the cheap knock offs) for molds and it works just fine. I agree about the size though, would hate to waste a lot of resin. Wood sealed with foil tape should work though. What are you going to make with those? Please be sure and let us know what it looks like when you are finished.

Pendants is the idea.

I'm thinking of trying one clear and one with some color. I've not yet been inspired on what color would look good though. Ideas welcome.
 

plantman

Member
Joined
Jan 2, 2012
Messages
3,437
Location
Green Bay, Wi
Looking at your pieces, this would be my suggestion Dan. I wood bookmatch the two pieces to make a very interesting pattern. next you could add a boarder top and bottom to make your final size. If you follow this path, there is a two part system called Envirotex that you pour over the surface to create a glass like finish. Idea 2, make a pine frame the size you want and line it with a piece of Seran Wrap to keep your casting materal from sticking to the wood. Spray the mold with Pan or any other non-stick spray. You could band or scroll saw your frame in any shape you want. I would first fill my mold with about 1/8 inch of casting material, let cure, place my pieces face down in the mold, and add the rest of your casting material. That way you will have a smooth surface on the front of your project. Jim S

P.S. I see you are making pendents, so these pieces most be small. Use plactic cups to make round pendents, only place them fase up when pouring. Modeling clay can be used to make freeform molds, just spray with Pam before pouring. The tin foil is good if you want to have an uneven edge. Jim s
 
Last edited:

walshjp17

Member
Joined
Jul 29, 2012
Messages
3,418
Location
Weddington, NC
When I took my first class at Arrowmont, we used aluminum foil to make the molds (as was suggested by Mike). The blanks came out really nice.
 

walshjp17

Member
Joined
Jul 29, 2012
Messages
3,418
Location
Weddington, NC
Yep!. We folded the foil sheet in half and then formed the shapes. In my case, a pen blank. Poured the resin in, then colored rice. Stirred it, let it sit overnight and then into the toaster oven at (IIRC) 225°. Turned really nice.
 

Dan Masshardt

Member
Joined
Jan 30, 2013
Messages
4,806
Location
Mechanicsburg, PA
Yep!. We folded the foil sheet in half and then formed the shapes. In my case, a pen blank. Poured the resin in, then colored rice. Stirred it, let it sit overnight and then into the toaster oven at (IIRC) 225°. Turned really nice.

What about in a pressure pot? See problems there?
 

walshjp17

Member
Joined
Jul 29, 2012
Messages
3,418
Location
Weddington, NC
Yep!. We folded the foil sheet in half and then formed the shapes. In my case, a pen blank. Poured the resin in, then colored rice. Stirred it, let it sit overnight and then into the toaster oven at (IIRC) 225°. Turned really nice.

What about in a pressure pot? See problems there?

Since I've never used a pressure pot, I have to defer to those who have.
 

CrimsonKeel

Member
Joined
Mar 1, 2013
Messages
495
Location
Royal oak, MI
Ive used saran wrap on the bottoms of vertical tubes in a pressure pot and had no trouble. The Resin seems to not cure as well next to the saran wrap but once its sticky hard i peal off the wrap and it hardens up. its hard to tell the size of those pieces but maybe some of those silicon cupcake cups? maybe a solo cup. basidally anything will work as long as the resin doesnt react with it.

Also i would make a river out of those. some blue color would look nice. turquise pearl ex would be perfect.
 

kovalcik

Member
Joined
Jun 9, 2011
Messages
891
Location
Barrington, NH
I have also used foil with good results. I cut a block of wood the size of the blank. I then folded the foil to get a double thickness so it is a little more sturdy and wrap the foil around the wood (not too tightly, you have to get the wood out). A little masking tape to keeps it in place. Remove the wood block and you should be all set.
 

Dan Masshardt

Member
Joined
Jan 30, 2013
Messages
4,806
Location
Mechanicsburg, PA
Thanks guys for all the ideas. I actually found an old mold that I modified for the purpose.
All these ideas should serve us well in the future though!
 

Fordwakeman

Member
Joined
Mar 21, 2013
Messages
224
Location
Washington
another Idea

The following is a plastic package that mints come in. After removing the blue top (just snaps off) I took pictures of the dimensions of the white plastic base. You would probably have to use some sort of mold release, but it might work. sorry for the crappy phone pics.
 

Attachments

  • 20141020_091321 (Large).jpg
    20141020_091321 (Large).jpg
    94.5 KB · Views: 106
  • 20141020_091345 (Large).jpg
    20141020_091345 (Large).jpg
    220.1 KB · Views: 121
  • 20141020_091419 (Large).jpg
    20141020_091419 (Large).jpg
    97.4 KB · Views: 124

Janster

Member
Joined
Nov 13, 2012
Messages
1,645
Location
Nevada
Corrugated plastic sign material and a hot glue gun...perfect for one time of one of a kind size pieces

Cloroplast. That is the material used on all the political signs that are put up EVERYWHERE and are used outdoors. It is just like cardboard but made of plastic.
 

robutacion

Member
Joined
Aug 6, 2009
Messages
6,514
Location
Australia - SA Adelaide Hills
Here's what I did.

Hi Dan,

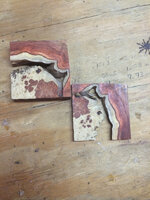
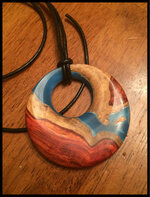
A very pretty pendant you've made mate, the colour goes well with the wood colours.

There is also, a little details that I would like to share with you, do you see those light coloured edges on the resin and wood joint...??? You may not know but, there is "separation" in there, the resin is not stuck to the wood...!

There are some other causes that can make that happen in certain woods, vibrations are one culprit but, specifically with oily woods such as the wood you used, unless the natural oils are dealt with, you get the edge separation and in many cases, full separation altogether, as the resin did not adhere to the wood, as you may think...!

There are 2 "cures" for this, the best one is to neutralise the surface natural oils of the wood, I mean "surface", as most cases the wood will still maintain some oil at its centre, particularly with thicker wood than the ones you have cast, with those, the oils will be gone by, roasting the wood in an oven @ 70° celsius for a few hours. If the heat elements are expose and you want to make sure the wood wouldn't burt, wrap the wood in foil paper and use 80° celsius to make sure the oils are crystallized and therefore become a solid part of the wood, that way, the resin will adhere to the wood surface as good as any other non oily woods...!

The second option is to use the super thin CA to soak each joint of the resin/wood piece. You do this before you start working on it and if required, halfway to the finish product. In this case, and with the wood surface having some oil preventing the resin to stick well, there will be a small gap in between to 2 material, you want see it but, you will see the thin CA going in and darken the light colour resin on the edges, making the colour look even all the way through.

The thin CA is able to create a bond in between the 2 materials, CA chemical components do neutralise the wood oils in small quantities/amounts, an oily wood can maintain most of its natural oils inside, the important thing is to neutralise the surface oils if you want to have it to adhere with something else...!

The "roasting" of the oily woods, is one of the reasons why, I have successfully cast and stabilized many blanks that others have had so many troubles with, it may take a little more time in preparation but the results are well worth it...!

Cheers
George
 
Top Bottom