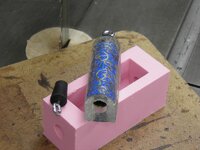
My first home made mold

Signed-In Members Don't See This Ad

bruce119

Member
Joined
Jul 30, 2007
Messages
2,978
Location
Franklin, NC, USA.
Well the molds out there are great. Thanks to Charlie and his resin saver molds that I still use. And The Pen Wizard he has a great concept. But in this world it is hard to please everyone and I found that I wanted something in-between that suited my needs better. So it was time to make my own molds. Thank you to JeremyJ for the UHMW. And thank you to Glass Scratcher, PTownSubbie & all the others on this great forum that helped me with information.

This is a whole new world and I have a new appreciation for those that make molds IT'S NOT EASY. Well it is easy once you figure it out get the supplies and have the tools and take the time. I am posting some photos to help others that mite want to try it and to show off what I did.

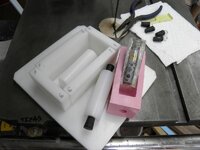
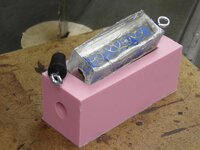
I took a bit of the 2 designs already available above and added to it. Some of the problems that I wanted to improve on casting under pressure, more working room, and not being limited to one kit. The Pen Wizard has the pressure worked out good with the plugs inserted through the sides I like that. I don't like having to fill my molds to the tippy top. Most of the mold makers do that and I understand everyone wants to save. But I want wiggle room I made my mold 1/8 deeper so I do not have to fill it up and make a mess when trying to get it in the pot. I also went longer I can fit a sierra click and a standard sierra also a cigar tube will work with this same mold the extra space and the tapered plug allows that.

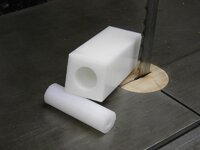
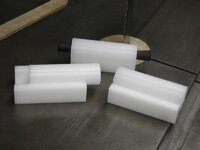
The hole size is 7/8" plenty of space. I made this with a mini metal lathe simply turn a piece of plastic to 7/8" then I chucked up a piece of 1.5 square in a 4 jaw chuck and bored a 7/8" hole in it. Then took that to the ban saw cut it half then CA glued the bottom half to the round core that I drilled straight through to except the rubber plugs. That gave me a squared side and a round side. Then trimmed & sanded the sides flush.

Now make no mistake I am NOT selling these just sharing my experiences.

The photos below should help you with some questions.
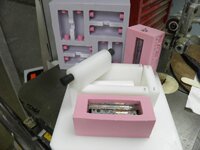
01.jpg

02.jpg

03.jpg

04.jpg

05.jpg

06.jpg

thanks for looking
 
Signed-In Members Don't See This Ad

Celt40

Member
Joined
Nov 26, 2007
Messages
119
Location
Scotland UK
Bruce,
Thanks for your pictures, you have covered all your special needs.
I am working on a mold that has a lot of the things a pen blank needs but also a lot more.
You have helped me with my planning of this mold. I am waiting on some RTV Silicone to arrive then the fun begins.

Dermot.
 

PTownSubbie

Member
Joined
May 15, 2009
Messages
2,229
Location
Chesapeake, VA
Bruce,

Your method has turned on some light bulbs to a few things. I was stuck with the whole stopper thing and was making it way too difficult but your method and pictures made the light bulb shine brightly!!!

Also, whenever I am making a half round mold bottom I just run two sides through a 3/8" router bit. I didn't think about glueing two pieces together. Pretty neat way of doing things!!

Thanks for the information! I am glad that some of my techniques were able to help also. That is what this place is all about. Share and Share alike!!
 

workinforwood

Member
Joined
Mar 1, 2007
Messages
8,173
Location
Eaton Rapids, Michigan, USA.
That looks really great Bruce. I totally get where you are coming from. Nice as the molds are that people sell, they can't fit all needs all the time. I've been wanting to make myself a couple special molds...just trying to find the time.
 

bruce119

Member
Joined
Jul 30, 2007
Messages
2,978
Location
Franklin, NC, USA.
May i ask what type of silicone you used to make your mold with?

Thanks

I went with Mold Max 30 see thread below on more info.
http://www.penturners.org/forum/showthread.php?t=69179

I am happy with the way the mold turn out and the firmness and feel of the silicone. I did get a scale for measuring portions of A & B and I have a vacuum pump and pressure pot for pulling a vacuum. I also post cured as the instructions recommend. I plan on making some more molds when I have time. I maybe picking up a production order so I may have to make myself some molds to handle the production work. The Resin Savers are great but I have had some issues with them so I am designing my own.:wink:
 
Joined
May 16, 2011
Messages
403
Location
Jennings, FL
Nice! I am using PTown's (got a few, cigar, slim line and a Gent) for my Iwo Sand...but they are too tight with the way I am putting the sand on tube for a cartridge pen since I am not using them for a slim line.

I managed to rip my slim line and now have it patched up. With this I could make a bit bigger tube chamber for the sand pens and not rip them possibly.

I love my PTown molds, but may have to play with this some. And I could make some ugly ass masks for the kids?
 
Last edited:

SDB777

Member
Joined
Feb 6, 2010
Messages
6,620
Location
Cabot, Arkansas USA
Bruce,

About how much MoldMax 30 does it take to make the mold you have designed? At $95+ per gallon, I was just wondering how far that stuff goes??

Also...Where did you get the 'stock' to make the reverse mold from?


Scott (needing a few myself) B
 

bruce119

Member
Joined
Jul 30, 2007
Messages
2,978
Location
Franklin, NC, USA.
Could anyone who knows share a place to get the stoppers with screw eyes on the ends? Thanks.
I get the rubber stoppers and the eye screws at the hardware store. For Sierra & cigar I use size 000 then you simply screw the eye screw into the rubber stopper. Bring a tube with you so you get the rite size.

I will add this here
Use a release agent when using the rubber stoppers when making a mold the silicone dose not like to release from the rubber

Bruce,

About how much MoldMax 30 does it take to make the mold you have designed? At $95+ per gallon, I was just wondering how far that stuff goes??

Also...Where did you get the 'stock' to make the reverse mold from?

Scott (needing a few myself) B

Scott your rite I use MoldMax 30. I made about 8 molds I made 4 cavity molds so I can get the most and still fit a pot. I like this design with the rubber stoppers much more durable then building plugs in. I have had 100s of pores in my molds.

MoldMax has an excellent tool for estimating how much rubber to use. At the bottom of there page is a "Quick Tools" box http://www.smooth-on.com/tools.php It is a great an accurate calculator.

Now to make the master that is the P.I.A. and where all the time is. I used 3/4" round delrin I also had some 1/2" and 2" flat delrin that I milled into shape. You could use wood put a real good finish on it then use a release agent. With the delrin you don't need release.

Hope I answered some questions
Thanks
 
Last edited:

SDB777

Member
Joined
Feb 6, 2010
Messages
6,620
Location
Cabot, Arkansas USA
Thanks for the info!

And the calculator(link) was a complete miss....I never even saw it there. Maybe if the Arkansas Chapter wants to do some molds to pass around? Hmmm?


Scott (gotta check) B
 

sbell111

Member
Joined
Jan 16, 2008
Messages
3,465
Location
Franklin, TN
Those are some really pretty molds. The ones that I made for myself are not nearly as 'finished'. My mold boxes were made out of UHMW that I just threw together with Goop.

Rather than milling special-purpose blanks to make the mold from, I just used unmilled extra fat pen blanks. Sure, mine doesn't have a curved bottom, but I don't miss that.

I didn't use a release aqgent on either the stoppers or the blanks, but didn't have a problem peeling them out of the finished molds.

Mine aren't super pretty and are certainly not retail sales worthy, but they work a treat and were super easy to throw together.
 
Top Bottom