Messing up casting more blanks with CA...

Signed-In Members Don't See This Ad

Skie_M

Member
Joined
Aug 7, 2015
Messages
2,737
Location
Lawton, Ok
:)


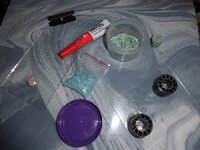
OK, so I didn't go get any alumilite (yet) ... figured these tiny micro-blanks ought to do just fine with CA.


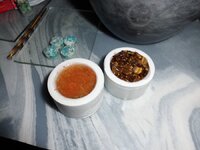
I crushed some abalone shell (natural) into very small pieces and simply flooded the form with CA after I stuffed it full of crushed seashell. The other 2 forms got filled with some greenish turquoise ... fairly generic cheap stuff I get from a local store for 35 cents a rock (1/8th the size of a penny pebbles).

The form itself is some kind of plastic I have laying around ... you ever see the plastic roll that's in the middle of a McDonald's receipt roll? Yup, that's what I'm using. I took one of those (almost 3 inches long) and cut it into 5 roughly equal pieces. I'm not too concerned about getting them exact.

Anyways, this ought to give me a blank that is roughly circular in cross section, only half an inch to three quarters of an inch high, and of sufficient size to fit on an earring or necklace disc mount, which are just about 3/8ths an inch across.

I'm hoping that the forms will be reusable, but if they aren't I'll just go invest in a stick of 1/2 cold water PVC pipe from HD or Lowes.


I'm actually happy to NOT be using epoxy or alumilite for this little project ... one single tube of superglue (at 0.10 oz) got me 3 completed blanks. I don't relish the though of mixing such tiny amounts of resin or epoxy and then getting it to flow into such a tiny form...


If these turn out as I hope, I'll be doing this again ... only next time round I'll include some gorgeous blue Kingman turquoise... :)
 
Signed-In Members Don't See This Ad

JohnU

Member
Joined
Jan 31, 2008
Messages
4,954
Location
Ottawa, Illinois
I'm curious to see if you will be able to actually cut into it while turning. Years ago I took a bag of crushed shell pieces and added some Silmar resin. Drilled ok, dulled the bit a lot but ruined a couple turning chisels trying to shape it. That stuff set up like cement! Way too hard for my turning. After that I switched to gluing the pieces to the tube and clear casting over it. Looking forward to seeing your results.
 

Skie_M

Member
Joined
Aug 7, 2015
Messages
2,737
Location
Lawton, Ok
I use carbide to turn it... or just sand it down to shape, for really small turnings.


I do have to say that the forms are not reusable with this method... :(


Gonna have to find me some small diameter PVC and set up a miniature stand ... or possibly set up to pour full sized blanks and then just cut discs off it for my blanks.

I just bought a mini hacksaw with the 5 inch blade ... it's working nicely to give me a controlled cut very quickly through a lot of different materials, and a VERY thin kerf. :)
 

edstreet

Member
Joined
Aug 12, 2007
Messages
3,684
Location
No longer confused....
Here is your photo.
64cdd68ab0054ce8ef7c8baa5ce1bcd7.jpg
 

Skie_M

Member
Joined
Aug 7, 2015
Messages
2,737
Location
Lawton, Ok
Here is your photo. (messed up photo removed as requested by 97.3% of the IAP...)


Damn, Ed .... got your exposure set high enough?

Did you forget to turn on the light?


Oh wait ... I get it ... this is a picture of your dark room! You know, you're supposed to have red lighting in there, so that you can at least see without messing up your photos while you develop them ....
 
Last edited:

Skie_M

Member
Joined
Aug 7, 2015
Messages
2,737
Location
Lawton, Ok
attachment.php


Second turquoise run ... open container has the crushed Kingman's Mine turquoise... finished blank to the right. The little baggie contains the Sleeping Beauty Mine turquoise that I'll be using for this run.

Bottom right are the 2 remaining molds ... the other 3 were destroyed as I unmolded the blanks.

Top left is my tools for cleaning the glass "trays"... just a razor blade. The molds are sealed on the bottom with a layer of hot glue. The cleaned tray on the left next to the CA tube has half a blank on it made from the crushed abalone shell. The other half is on the lathe.


As for the other Kingman's Mine turquoise blank .... well, I was cutting it on the lathe, and I had forgotten to tighten the chuck down sufficiently ... it went flying an hour ago and I haven't seen it since.

I just got back from Home Depot and Harbor Freight ... picked up 4 10-packs of CA, a snap ring pliers set, a length of schedule 40 1/2" EMT conduit, for my new forms (hey, $1.80 ain't bad for 10 feet!) and some random other goodies ... including some epoxy and some new storage containers.


Anyways ... there's your pic, enjoy.


I'll have to post pictures of the finished earrings later.
 

Attachments

  • Turquoise run 2.jpg
    Turquoise run 2.jpg
    182.4 KB · Views: 378

Skie_M

Member
Joined
Aug 7, 2015
Messages
2,737
Location
Lawton, Ok
attachment.php


Sleeping Beauty turquoise loaded up in both molds ... finished abalone shell blank in between. Remainder of Sleeping Beauty turquoise in the baggie to the left. I estimate I could make 2 more molds this size with what I have left in the bag.


Time to soak both blanks in CA and let em cure ...
 

Skie_M

Member
Joined
Aug 7, 2015
Messages
2,737
Location
Lawton, Ok
attachment.php


Still messing around with CA for the casting medium.


I've found that if I wish to mix pearl ex powders with my Harbor Freight CA, I need to add the CA first, then the powder, and then mix.

These are my new molds.... I went to Home Depot and grabbed a whole 10-foot stick of the 1.5" square vinyl sill material ... I have other uses for it that I bought it for, this is just some leftover pieces that I am working on my lathe for various miscellaneous projects.

They seem to be made with some kind of fiber fill or air bubbled process ... they don't appear to be pure PVC, like what I get from the water pipes. Not liking it for the lathe all that much, but it may work for what I'm trying to do ...


CA doesn't stick very well to PVC, so I'm hoping this stuff releases easily. After turning the section round, I drilled into the center with a 1" Forster bit. I then continued through to the other side with a 1/2" drill bit. I then made a plug by turning the same material to 9/16" thickness and tapering it down to just under 1/2". I fine tuned the plugs on my sander so that they would be nice and tight and level with the rest of the mold bottom. I also had made sure to go in with a square faced chisel and made the bottom level. This gives me a "knockout" hole and plug to use to get my blank out of the mold. I am hoping that this method will be reliable and reusable for some time, though I am planning smaller ones as well.

Top left in background, you can see the 4 prepped Sleeping Beauty turquoise blanks. Top right in background, my marble mortar and pestle.


Mold on left contains: Kingman's turquoise with pearl ex gold (I overfilled with CA intentionally, wanted plenty in there to mix with the pearl ex).

Mold on right contains: mix of gold pearl ex powder in the bottom, for hiding the bottom of the blank, and crushed Tigereye stone in the top, no pearl ex in top.
 

Attachments

  • Turquoise run 4.jpg
    Turquoise run 4.jpg
    168.4 KB · Views: 321

Skie_M

Member
Joined
Aug 7, 2015
Messages
2,737
Location
Lawton, Ok
Oh, I forgot to mention ... the pair of Abalone shell blanks are gone. They were mounted on some cheap "Y" fashion necklaces from Wal-Mart on Christmas morning. The plain stick drops on the ends were replaced with crosses from Hobby Lobby ... one necklace is gold tone, the other is silver tone. They are now in the possession of my cousin's daughters as Christmas gifts ... :)

Didn't make any pictures of them... also don't know why Wal-Mart had them on clearance at 2 bucks apiece, but they were more than worth it for the smiles and hugs I got!
 
Top Bottom