Liquid Diamonds Hickory Nut Shells

Signed-In Members Don't See This Ad

budnder

Member
Joined
Dec 28, 2015
Messages
527
Location
Chicago/Tucson
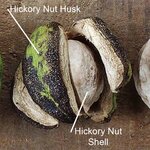
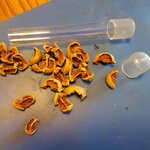
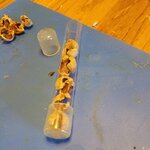
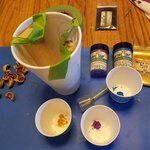
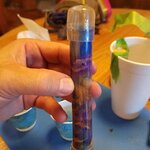
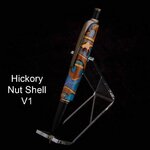
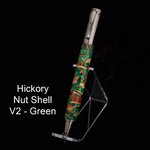
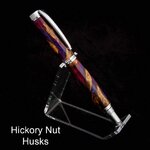
The squirrels around me this time of year are working over time to process the Shagbark Hickory nuts that come off the trees. For the ones they eat (I assume they bury some of them), they usually crack the nut in two halves and remove the meat, leaving the nut halves on the ground. I stepped on one of these the other day and was surprised how hard it was, and I wondered how it would cast up. So I gave it a go. I collected some shells and dried them out in a 200 degree oven for 24 hours. For casting, I simply overlapped the halves into a tube, and swirled in an ounce and half of mica colored Liquid Diamonds. I stuck it in a pressure pot overnight at 30PSI. I went light on the mica, as I wanted it to be pretty translucent, or at least I thought that's what I wanted. I called this V1, and I really like the way the shells turned out. It was too transparent for my taste, though, so I doubled up the Mica for V2, and cast a new blank in greens and one in blues. I also tried casting some of the "husks" this time, in red and blue. On the green one, rather than "half shells", I used "eighth and quarter shells", so the shell material in my casting tube was denser.

I really liked the way the green shells turned out, though not wild about the way I left the profile kinda fat on that Zen. I haven't turned the blue blank yet, but I have high hopes. Since the shells kinda remind me of little islands, I used a blend of colors to try and represent a tropical ocean.

I didn't really care for the way the husk blank turned out. It turned fine, but I think they lack character in the way looked in the end. I used a Caballero for kit on that one.

I really prefer Liquid Diamonds for this sort of thing over Alumilite. For me anyway, it's so much more fun to have that long open time. I don't mind waiting the extra day to turn the result. I know it's more expensive, but at an ounce and a half per blank, the cost isn't much of a factor. So far, the squirrel union hasn't organized to start charging me for the shells.
 

Attachments

  • HickoryPen0.jpg
    HickoryPen0.jpg
    318.7 KB · Views: 329
  • HickoryPen1.jpg
    HickoryPen1.jpg
    325.2 KB · Views: 306
  • HickoryPen2.jpg
    HickoryPen2.jpg
    349.8 KB · Views: 342
  • HickoryPen3.jpg
    HickoryPen3.jpg
    293.5 KB · Views: 319
  • HickoryPen4.jpg
    HickoryPen4.jpg
    235.4 KB · Views: 383
  • HickoryPens-9202.jpg
    HickoryPens-9202.jpg
    114 KB · Views: 463
  • HickoryPens-9210.jpg
    HickoryPens-9210.jpg
    101.5 KB · Views: 453
  • HickoryPens-9212.jpg
    HickoryPens-9212.jpg
    141.8 KB · Views: 467
Signed-In Members Don't See This Ad

dogcatcher

Member
Joined
Jul 4, 2007
Messages
2,361
Location
TX, NM or on the road
They look great, you had better luck than my first cast some pecan shells. But my fault, I forgot to dry them.

Curious? Where did you find the tubes you cast in?
 

JohnU

Member
Joined
Jan 31, 2008
Messages
4,951
Location
Ottawa, Illinois
Congrats Roy! I favor the green one but they all look great! I hope they are easier to turn than walnut shells. I've cast a few of them like this but those things are like cement. I haven't used liquid diamond resin yet but from your success I'm guessing it's good stuff. Keep up the great work!
 

budnder

Member
Joined
Dec 28, 2015
Messages
527
Location
Chicago/Tucson
Where did you find the tubes you cast in?

I'm using Uline 3/4" clear plastic tubes:

https://www.uline.com/Product/Detail/S-13749/Tubes/Clear-Plastic-Tubes-3-4-x-12

I got them a couple of months ago and really like them. I find myself reusing the caps because the epoxy doesn't stick to them, so you can just take them off prior to turning without any damage. They look good post cast, and turn off pretty easily.

I see I can buy 48" versions from a few other places for about the same cost as Uline charges for 12" (Uline is around a 1$/tube). I like the thin wall on the Uline tubes, though, so haven't pulled the trigger yet to try a longer/cheaper alternative.
 
Last edited:

budnder

Member
Joined
Dec 28, 2015
Messages
527
Location
Chicago/Tucson
Did you have to use a finish to seal them?

I finished them with CA.

I experimented a bit with Pens Plus a month ago, and really liked the "sand with Walnut Oil" part of the process that a lot of people use. So lately, I've been doing that with my CA pens - wet "Walnut Oil" sand with 400, 600, and then 1000 grit. Then clean with Alcohol, before going through my "normal" CA application/sanding. I use Satellite City CA, which I find to have a nice couple of seconds of working time before it sets.

I normally end my CA process on the lathe with Novus 2, then Novus 1 and then some Microcrystaline Wax. On these, though I skipped that and buffed on a White Diamond wheel and then a wax wheel. I didn't feel like it was any better than my end process on the lathe, so I'll probably go back to the Novus polish to end as it's easier.
 

Kenny Durrant

Member
Joined
Sep 11, 2012
Messages
2,496
Location
Sachse Tx. 75048
Very nice work! Did you wait any before pouring the two colors? I was wondering if you poured two colors too soon the colors would mix together to make one. All three look great but I like the 2nd and 3rd pens the best.
 

budnder

Member
Joined
Dec 28, 2015
Messages
527
Location
Chicago/Tucson
Did you wait any before pouring the two colors?

No, I mixed up the ounce and half, stirred it well, then divided it up between my three mica cups, and then stirred again to blend the mica. I started pouring into the tube right away. I did a little bit of two colors at a time, then rotated which two I was pouring until I had them all in. Then I angled and rotated the tube around a bit to give any air trapped under the shells a chance to escape.

The "air under" was more an issue for those husks - I think I rotated those around a couple of minutes because I could see air in the tube in this one spot towards the bottom.

I think on all three, I might have had one "pin hole" each that I had to fill with CA when I got them turned close to profile.

I read where somebody felt they needed to wait a bit (45 minutes?) with Liquid Diamonds because the mica would settle if you cast it to soon after mixing. That makes sense to me, however, I've never waited and never seen the mica settle at all.
 

Kenny Durrant

Member
Joined
Sep 11, 2012
Messages
2,496
Location
Sachse Tx. 75048
Thanks I think I'll give it a try. I wasn't worried about the pigment as I was about the colors mixing themselves because of how thin they are.
 

Terredax

Banned
Joined
Nov 1, 2015
Messages
892
Did you wait any before pouring the two colors?

No, I mixed up the ounce and half, stirred it well, then divided it up between my three mica cups, and then stirred again to blend the mica. I started pouring into the tube right away. I did a little bit of two colors at a time, then rotated which two I was pouring until I had them all in. Then I angled and rotated the tube around a bit to give any air trapped under the shells a chance to escape.

The "air under" was more an issue for those husks - I think I rotated those around a couple of minutes because I could see air in the tube in this one spot towards the bottom.

I think on all three, I might have had one "pin hole" each that I had to fill with CA when I got them turned close to profile.

I read where somebody felt they needed to wait a bit (45 minutes?) with Liquid Diamonds because the mica would settle if you cast it to soon after mixing. That makes sense to me, however, I've never waited and never seen the mica settle at all.

Just a suggestion...
First stir the pigment into the epoxy (usually part A) and let it set for a few minutes. This will allow the bubbles dissipate.
Then mix in the catalyst (usually part B) and stir carefully to mix well.
Using this method helps to eliminate the bubble occurrence, since the first step allows most of the bubbles to dissipate and gives extended time for any introduced air to escape after mixing the catalyst, instead of all of the air attempting to escape after the catalyst is introduced.
I'm aware of the pot life of this epoxy as compared to others, but once the catalyst is introduced, it begins the chemical reaction to cure. Eliminating the air with the first step, lessens the chances of air being trapped.

This was a habit we determined to be effective with all of our casts, using any of the resins. Of course our casts were much larger than those used for pens.
 

budnder

Member
Joined
Dec 28, 2015
Messages
527
Location
Chicago/Tucson
FYI - The air wasn't from within the resin, but rather from pouring resin into a tube filled with little umbrellas (e.g. the husks)...
 

budnder

Member
Joined
Dec 28, 2015
Messages
527
Location
Chicago/Tucson
I put these in a pressure pot overnight at 30-40 psi. Since I have one, I didn't really think much about not using it.

I thought I read where people have had success with Liquid Diamonds without potting, but I've not tried it. Given it's thinness and long cure, I could see why you wouldn't need a pot to get rid of bubbles. So maybe, if you're just swirling together different color epoxy, it'd work just fine without a pot. However, when you're embedding foreign stuff, seems to me like you'd want some compression on everything while it's setting so it doesn't come flying apart on you when turning. Do you really need to clamp things up when segmenting? To me, it makes sense you do...
 
Top Bottom