Did some more casting

Signed-In Members Don't See This Ad

Terredax

Banned
Joined
Nov 1, 2015
Messages
892
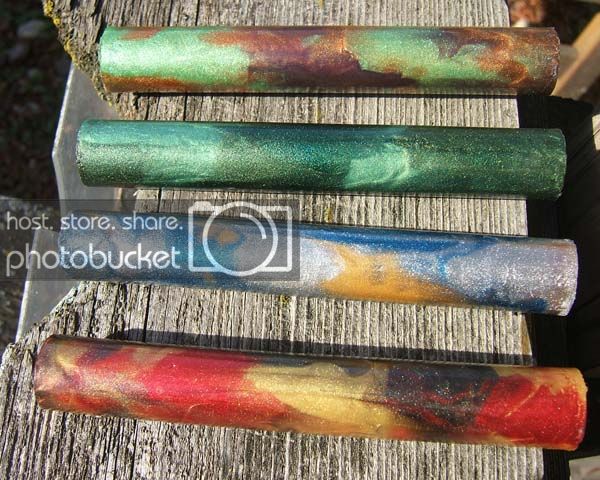
I'm slowly building up my blank inventory and had some time to turn some liquid to a solid yesterday. They're not as impressive as I had hoped, but it's hard to tell what they will look like when finished. I hope better than they look now. The green looks plain, but it has four different greens in it. Maybe they will show when it gets made into a pen?

Anyway, when I was prototyping, we had a commercial oven of sorts to do rapid cures. It didn't have an open flame or element, it just had hot, dry air feeding it from an outside source. I built a crude hot box to help defeat the cold temperatures in my work space. I'm sure the casters know that cold resin doesn't play well, it will trap air pockets along with a very slow gel and cure. The hot box worked well, it maintained a temperature between 85 and 90 degrees. I will spend some time to refine the hot box and make improvements now that I'm confident it works well.

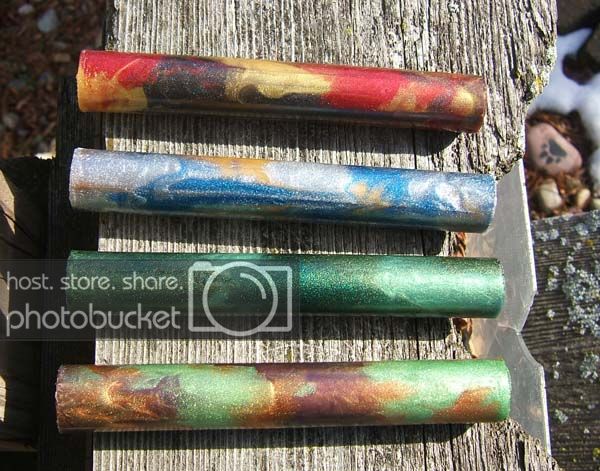
Now the photos of the finished blanks.


Thank you for reading my long post.
 
Signed-In Members Don't See This Ad

AndyUK

Member
Joined
Sep 13, 2014
Messages
16
Location
UK
I'm thinking you will be really pleased with the outcome of these, particularly the top and bottom ones :)

Thanks for the tip on the heated box
 

Brian G

Member
Joined
Jul 2, 2013
Messages
1,571
Location
Bloomington, MN
I agree; those should look fantastic. Do you cast them one at a time, or do you pour multiples of each color scheme? I ask because I found it easier to do 6 of a color scheme in one pour.

I enjoy contemplating color schemes and casting blanks, but my shop is in the basement and winter means I can't properly ventilate. No more casting until spring thaw. :frown: I thought about creating a hot box and casting in the garage, but I think it's time to start turning the blanks I've created into pens.

Keep pouring and posting. :)
 

Terredax

Banned
Joined
Nov 1, 2015
Messages
892
I agree; those should look fantastic. Do you cast them one at a time, or do you pour multiples of each color scheme? I ask because I found it easier to do 6 of a color scheme in one pour.

I enjoy contemplating color schemes and casting blanks, but my shop is in the basement and winter means I can't properly ventilate. No more casting until spring thaw. :frown: I thought about creating a hot box and casting in the garage, but I think it's time to start turning the blanks I've created into pens.

Keep pouring and posting. :)

I only cast a single blank of any given color. I do that for a few reasons, I'm trying to stretch my resin as much as I can, I don't really need a bunch of blanks of the same color. I make these for myself, so as previously stated, I really don't need a lot of the same color. Also, I have short windows of time to cast.
I'm glad I have a detached work space, in fact it's detached by a few miles. I wouldn't want the toxins in my residence. The residue and chemicals permeate the air and soft goods i.e. furniture and curtains. Then it remains long after the casting is finished. After prototyping, my clothes would retain the residue and awful smell that gave my family headaches. I had to do my laundry immediately after getting home.
I will make a pen real soon from one of the casts I've done. I might not show it on here, it could be a little embarrassing along side the caliber of pens I see here.
 

Skie_M

Member
Joined
Aug 7, 2015
Messages
2,737
Location
Lawton, Ok
Easy hot box for beginners .... cheap to make and run!


Takes an old light fixture, an incandescent bulb, an old computer case fan (or some kind of desktop fan at low speed), and a decent sized box to hold your work .... also, grab a roll of aluminum foil and some painter's tape.


First, cut holes in the box for your wires, and plug your light fixture in with a switch in line - put it low in the box, as the hot air will tend to rise and fill the box. Make sure the bulb won't be touching anything.

To avoid glare from the light, put the bulb behind a baffle where the air flow will go over the bulb and into the box before exiting through holes in the top of the box.

Make sure you get several different wattage bulbs, as the higher the watts, the more heat the box will generate. Different bulbs will give you control over how hot the box will get.

The interior of the box will be covered in aluminum foil to reflect and retain heat. If you can get the bubble foil for insulating, this is quite superior ... but if you use this method you may also want to use the aluminum tape available at the home center. It will hold much better.

You can install the fan in the box near a vent hole and secure it to the side of the box near the bulb. Set it to blow past the bulb so as to pick up the heat and push it into the box. If using the case fan, you can power it with a variety of choices of batteries, from 6 volts up to 12 volts, or you can use a DC power supply within that range. The voltage used will determine the fan speed.

If using a desk fan, you can simply use the power cord and plug it into the same outlet as the light. Easiest way to install an in-line switch for this setup? Use a power strip!
 

Terredax

Banned
Joined
Nov 1, 2015
Messages
892
ADDED TO INVENTORY

I spent some more time yesterday after dinner making a few more pen blanks. They're not as nice as some I've seen around here, but they are fun to make. It's rainy out, so these photos are from inside.


Top Bottom