Working on my work area

Signed-In Members Don't See This Ad

JasonC

Member
Joined
Apr 27, 2014
Messages
286
Location
Honolulu, Hawaii
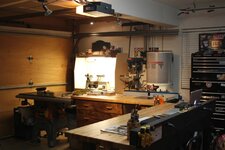
When I got my lathe April 11th this is where I stuck it - on the kids' workbench.
10262271_4188413725911_2453131183297767904_n.jpg


I have a 8' fluorescent in the garage and three LED spot lights so I can direct light where I need it, but with the garage door up one of the LEDs (the one above the dartboard) was blocked by the door. I wanted better lighting so I could more easily see scratches and low spots during finishing so I came up with a solution.

Tonight I started working on a contained, better lit spot for this lathe. Used some 3/4" and 1/2" MDF I had left over from a car audio project and picked up some melamine to laminate the interior portion with. Also grabbed a 2' dual-tube T5 fluorescent that's rated for 2400 lumens. The front will have a lexan shield on a piano hinge.
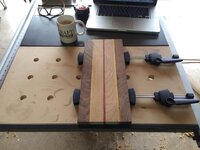
Raw MDF
1795695_4269520833538_5369115751995829119_n.jpg


And with melamine rough cut and stuck in place.
10314574_4269663677109_8784044736262779575_n.jpg


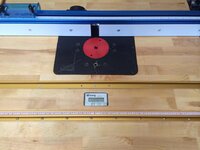
Will laminate everything tomorrow then break it down and send each piece through the router to flush trim before final assembly.
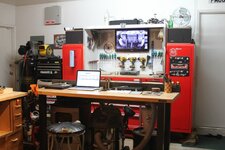
 
Signed-In Members Don't See This Ad

JasonC

Member
Joined
Apr 27, 2014
Messages
286
Location
Honolulu, Hawaii
Forgot about this thread. Made quite a bit of progress.

Picked up a JET DC1100VX-CK and moved the table saw and router table to that side of the garage while leaving nice, wide walkway between them and the lathe area, dust collecter, and little Craftsman toolbox.

The other table is situated in front of the big toolbox. When I want to take a break and get on the computer I'll take a seat here. (I know, the stool needs to be recovered:redface:) That toolbox is a 56" unit from Harbor Freight (awesome deal when they're on sale) and I added the side lockers for their 44" box then built the upper hutch with pegboard storage for commonly used tools (so wife/kids/neighbors don't have to rummage through the drawers) and made the steel reinforcements in the back wall spaced for VESA standard TV mounts.

The router table was made from 3/4" birch ply. I already had the lift (was given to me by a buddy that owns a car audio shop and bought four new lifts when he built the new shop. He kept one of the old lifts and gave me the other. :) I ordered a couple of replacement parts and it's good as new.

Anyway, I wanted a router table with good dust collection, a large work area that would allow me to have pieces hang over each edge yet still be clamped down, and plenty of storage. Woodcraft had 1 1/2" birch worktops on sale so I picked one up and got to work.

I'm right-handed so I made three 19" deep storage drawers to go on the right side of the router chamber. The top one holds various inserts, collet wrenches, and Allen keys for raising and lowering the lift. The middle drawer holds 1/4" bits, and the bottom drawer holds 1/2" bits. I laid them out and drilled with appropriate sizes Forstner bits. I also stuck a short piece of dowel in the front of each bit drawer to hold the proper collet. All of the drawers are on 18" full extension soft-close drawer slides. A Wixey remote router readout is flush-mounted in the middle of the router table - between the Incra miter track and T-track. I made a plexi insert to allow me to access the Wixey's buttons but still protect the display.

I used a Kreg router switch (gutted it) and ran cabling so that I can plug the workbench into the wall and when I flip the Kreg switch on it will turn on the router, internal router chamber light, and a power outlet that's installed in the rear wall of the table. I use this outlet when I use the router with the Shop-Vac. Leave the Shop-Vac on and just flip the switch. Since the power switch and cabling are above and behind the drawers, I made a L-shaped channel for cabling.

The other drawers are all on full extension soft-close slides and hold all of the major power tools, router templates for car audio, Dremel and Kreg storage boxes, and other large items. Drawer fronts are 3/4" maple with 3" wooden pull handles from an Ace Hardware that was going out of business. Finish on the maple and birch ply is a Dark Walnut Danish oil with some clear (forget what) with natural finish Danish oil on the drawer pulls.

The other main tool in the shop is the table saw. I picked up a Ridgid 4512 out of necessity - I needed it for a car audio project and the circular saw just wasn't going to work. In the table extension I drilled a series of holes so I could use Festool clamps to hold projects in place.

So that's the current state of things. Have to keep things fairly light (military) and, since space is a concern, multi-purpose.
 

Attachments

  • 10321495_4352164179570_7749695157273586066_o.jpg
    10321495_4352164179570_7749695157273586066_o.jpg
    181 KB · Views: 342
  • 10295009_4352164219571_3826594210614176422_o.jpg
    10295009_4352164219571_3826594210614176422_o.jpg
    198 KB · Views: 325
  • 1463104_3753926343998_1812335521_n.jpg
    1463104_3753926343998_1812335521_n.jpg
    70 KB · Views: 316
  • 1098202_3418461357583_1506156589_n.jpg
    1098202_3418461357583_1506156589_n.jpg
    78 KB · Views: 262
  • 1150267_3412830016803_180827057_n.jpg
    1150267_3412830016803_180827057_n.jpg
    59.7 KB · Views: 281
  • 1796698_4055755129529_841882958_n.jpg
    1796698_4055755129529_841882958_n.jpg
    68.6 KB · Views: 264
  • 10114_4019357379608_226788449_n.jpg
    10114_4019357379608_226788449_n.jpg
    67.7 KB · Views: 292

JasonC

Member
Joined
Apr 27, 2014
Messages
286
Location
Honolulu, Hawaii
Thanks, Ted.

I clean daily and everything is wiped/vac'd down or blown off with the compressor and put back in place when I'm done. I've found it's easier to be efficient when things are clean and organized. Memory problems kind of forced me to be more organized. :roll eyes: I vacuum the floor daily.

I have a Mac Mini that stays out there in the hutch (to the left of the cable box). It's connected to the TV. I chose the Mac Mini because it's small and doesn't have open vents for dust to get in. Bluetooth keyboard and trackpad have been reliable in the garage. I much prefer the trackpad over a mouse out there.

I'll bring the Macbook or iPad to the garage when I have something on the TV that I want to listen to while I work or - when I'm doing car audio or maintenance stuff - I need to plug into a car for diagnostics. The iPad is nice when I'm in a car and need to pull up schematics. Typically, though, the Macbook stays in the house.
 
Last edited:

JasonC

Member
Joined
Apr 27, 2014
Messages
286
Location
Honolulu, Hawaii
Very nice. I think I would end up living in that shop:)

I basically do. From 7am to about 10 or so at night with breaks in between for lunch and such.

Been working a lot on the table saw and don't like cutting MDF due to all the dust. I had researched various blade guard dust collector setups and decided to order the SawStop TSG-DC. I looked at their overarm dust collection setup as well, but it was $199 and in my research I found where a guy made his own for about $40 from 1 1/4" EMT tubing and compression couplers. I liked this idea so that's what I'm going with. The TSG-DC should be here on Monday. Made a trip to Home Depot for EMT tubing, couplers, and some orange Rust-oleum primer+paint and have been shooting this thing with light coats and letting it sit in the Hawaii heat. I started to spray this piece black but orange kind of matched the Ridgid saw and I know it'll also be easier to see. I usually use the table saw as a table for lathe tools and such when I'm standing at the lathe and the black would make the arm "disappear" in my mind. With it painted orange it'll be hard to not see.

It wasn't until I applied paint that I had the thought of "You know, I should've zapped that together with the MIG." :rolleyes:

1239587_4833512692982_886523900390668064_n.jpg
 

wyone

Member
Joined
Jul 16, 2014
Messages
1,764
Location
15314 Grasslands, Parker, CO 80134
Looks great... you could also have found a local electrician that is skilled and he could have bent you that conduit and it would have been all one piece. :) (BTW I am an electrician :) Just not even close to where you live )
 

JasonC

Member
Joined
Apr 27, 2014
Messages
286
Location
Honolulu, Hawaii
Thanks, guys.

Looks great... you could also have found a local electrician that is skilled and he could have bent you that conduit and it would have been all one piece. :) (BTW I am an electrician :) Just not even close to where you live )

I've got some plumber friends that said the same thing. My next door neighbor is an electrician, too.

Got this thing wrapped up tonight. Made a quick and dirty mounting block/clamp that holds the arm to the rear fence rail with 5/16" x 4" bolts in the T-slot with ergo knobs on the bottom of the box. Loosening the knobs allows me to swing the arm down out of the way or remove it entirely by sliding it off the rear fence rail. Ran some 1 1/2" holes through some 2 1/2" blocks then slit them with the table saw so the blocks could clamp the pipe.
10671401_4837279387147_7313450125914282153_n.jpg


Ran a 2 1/2" Y on the main 4" hose running into the bottom of the saw. Put a blast gate on the back of the saw so I can close off the 2 1/2" if I remove the overarm. I'm already thinking about a new mounting block for the arm. Maybe one that's longer. Also wonder if the clamping force will pull the unit apart at the opposite side (nearest the camera). Will have to see.
10671275_4837278867134_7982211548962655291_n.jpg


Will trim the upper arm and hose to length when the blade guard arrives. I'm using a hose kit for Ridgid shop vacs.
1779175_4837278987137_3746343107615115187_n.jpg


I found the idea for this here. For the price of the parts and what little time it takes to make/install, it's a no-brainer.

When the SawStop blade guard arrives I'll have to cut/drill the riving knife assembly to fit my Ridgid, but that shouldn't be much of a problem.
 
Last edited:

wyone

Member
Joined
Jul 16, 2014
Messages
1,764
Location
15314 Grasslands, Parker, CO 80134
I think it is great, but I do think you may need to either tack weld the fitting together, or put a set screw or something in the couplings. As I said, I am an electrician, for WAY too many years and I can tell you that compression couplings will eventually loosen from vibration. I would hate to have all your awesome work get loose because of that.
 

JasonC

Member
Joined
Apr 27, 2014
Messages
286
Location
Honolulu, Hawaii
I think it is great, but I do think you may need to either tack weld the fitting together, or put a set screw or something in the couplings. As I said, I am an electrician, for WAY too many years and I can tell you that compression couplings will eventually loosen from vibration. I would hate to have all your awesome work get loose because of that.

Definitely thinking about it. I broke the plasma cutter and welder out tonight to adapt the SawStop riving knife/blade guard/dust collector to the Ridgid riving knife. The plasma is one I picked up a couple of years ago from a buddy. It's a Miller Cutmate 300. Took some time to get the settings correct. You can see where I practiced on the back side of SawStop riving knife. That was the non-important bit so I could abuse it getting the plasma set up. :biggrin:

1526993_4845852561471_9105851949561811140_n.jpg


10425152_4845852681474_7004859786138871890_n.jpg


Cleaned up the surface that would mate to the Ridgid riving knife on the belt sander.
10384209_4845852881479_232749954326161891_n.jpg


Tried tacking the two pieces together with the MIG using gas wire and no gas. Had to go get inner shield to get the job done.
10710733_4845853081484_8672329922926319236_n.jpg


Completely welded the two pieces together, ground the welds flat, and it's installed.
10355808_4846142168711_1505064233899940902_n.jpg


10305601_4846142288714_439191775729066090_n.jpg


10703957_4846142408717_2116976203349049864_n.jpg


Plumbed the dust collection to the guard and made a few test cuts. I'm happy.

Will have to wait for a big project to get a better idea for how well the SawStop guard works, but ANY top-side dust collection is better than none.
 
Last edited:
Top Bottom