Trimming on the lathe, no endmill or sandpaper.

Signed-In Members Don't See This Ad

edstreet

Member
Joined
Aug 12, 2007
Messages
3,684
Location
No longer confused....
This is some scrap wood I have, it's cracked like crazy. I used a chuck and a flat skew. No need for barrel trimmers, sand paper pads or the like. I even did this one with an off centered drill hole on one side to show a few points.

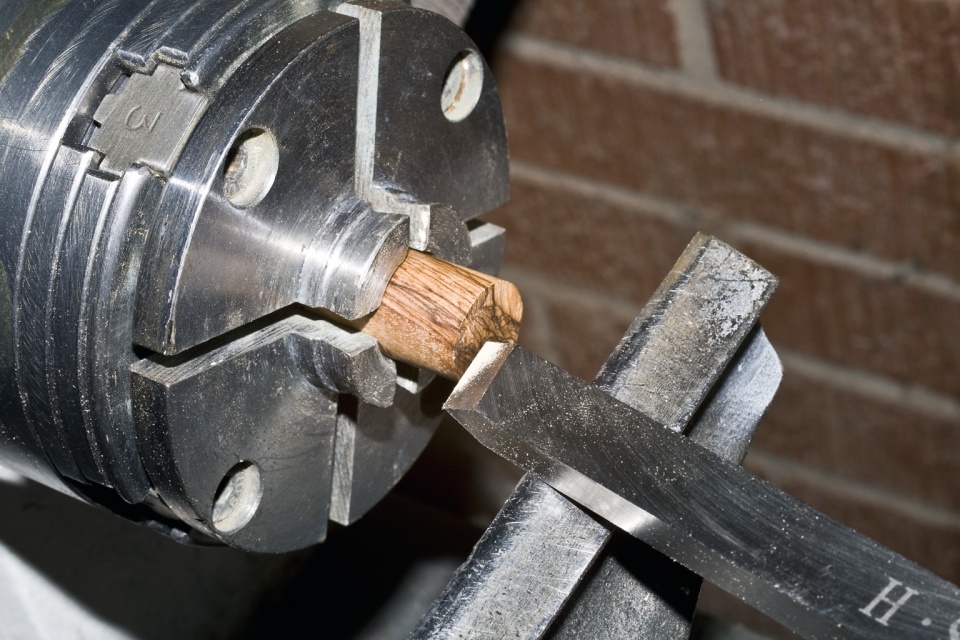
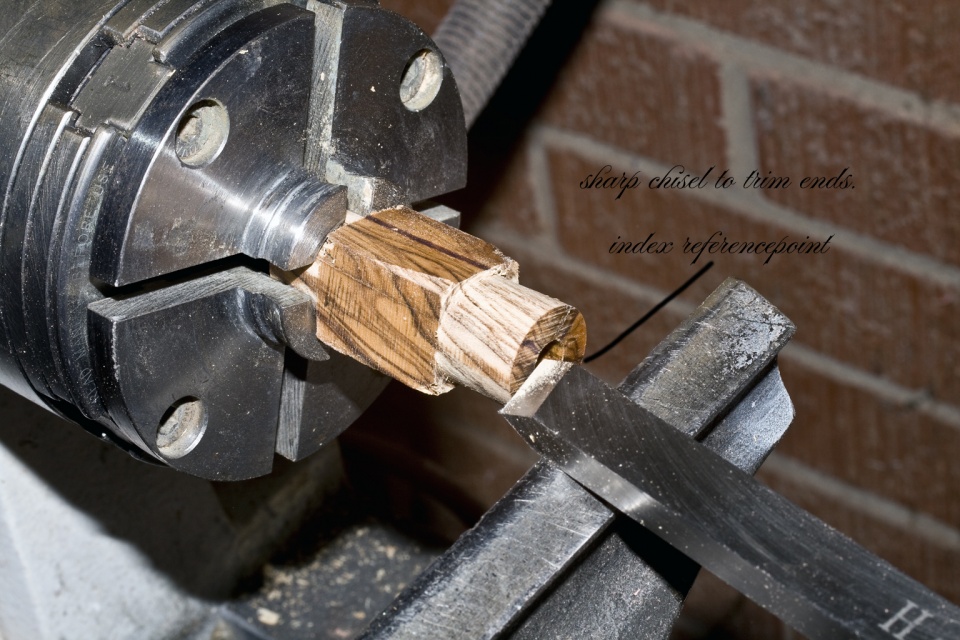
chuck the blank and flatten the end, clean as you can, sharper the chisel the cleaner the cut.
attachment.php


----
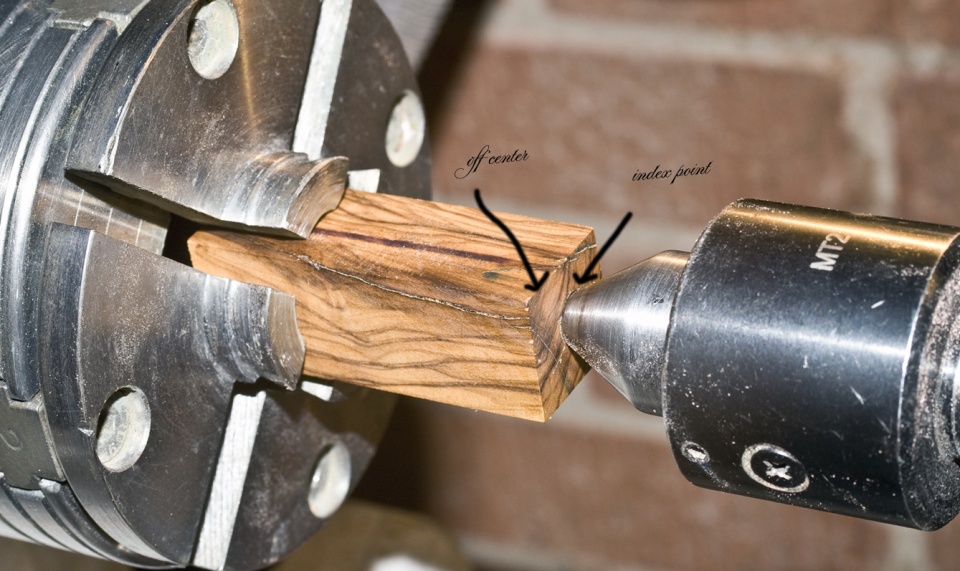
then drill the hole. Once that is done you created an reference / index point. This hole, on both sides of the blank, will be used several times down the road to align things. The example I used is off center on one end, the off center is the bottom of the drill hole. I reversed it on the lathe to align the off center part to the tail stock.

attachment.php


----
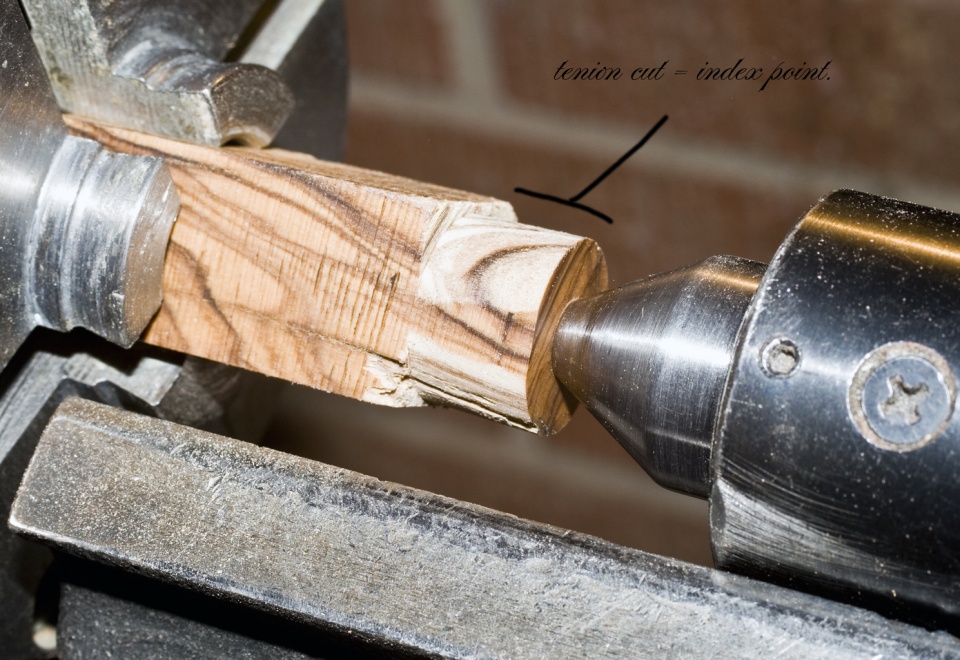
Then I cut a tenon on that. No more off center.
attachment.php


----
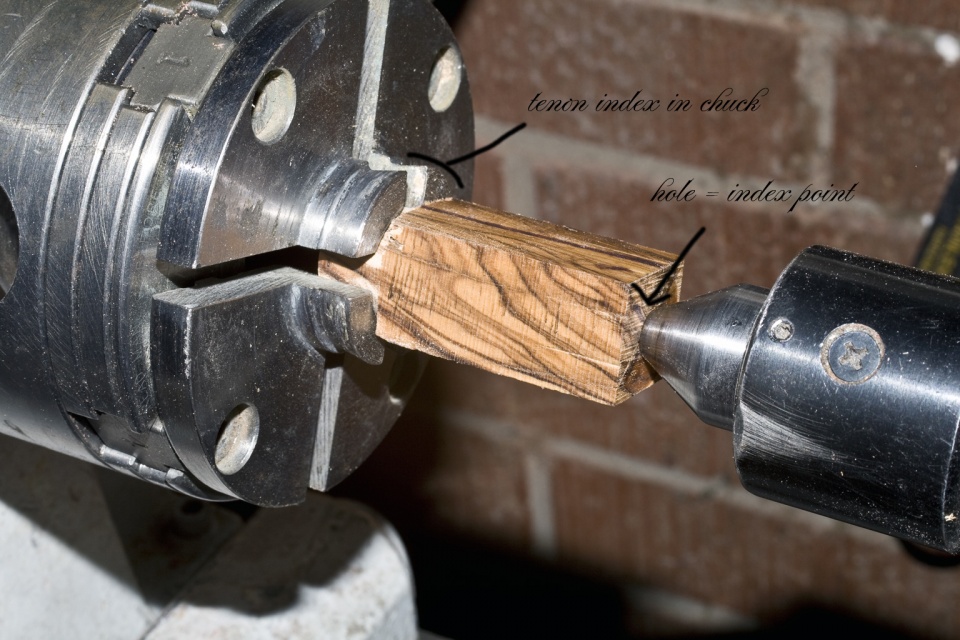
This new cut tenon is a new index point that will be reversed and put in the chuck jaws, it will line up with it perfectly and the tail stock will again index the drill hole.
attachment.php


----
Then a tenon cut on that side as well should clean it up super nicely.
attachment.php


----
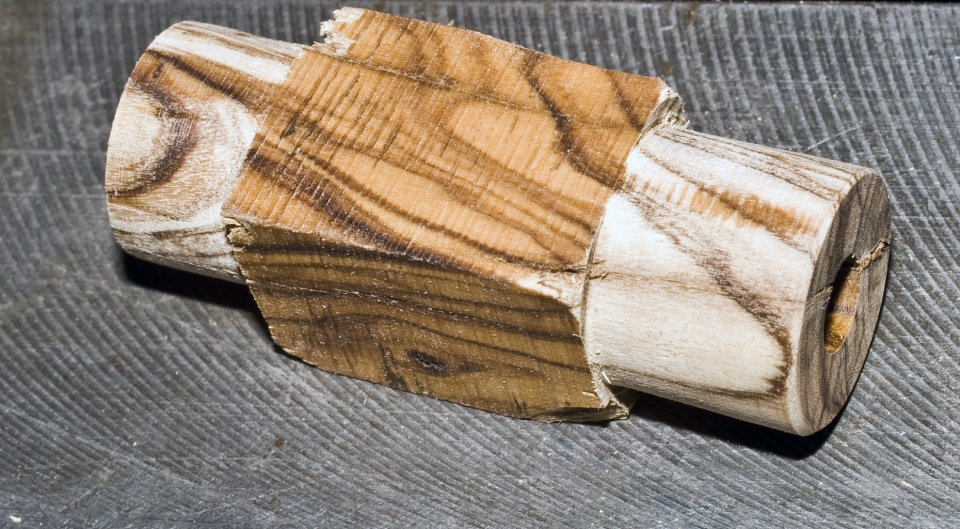
When you are done the blank looks like this. I did not fully round it either and it is a short block to show references. If you glue the tube in beforehand you can use this same setup to trim the ends for the bushings.
attachment.php


Also worthy of note is the edge of the tool rest is a reference point. :) Line it up 90 degree's to the lathe bed and that will allow you to get flat cuts on the end. If you look down at the end of the blank you will very quickly see if it is off.
 

Attachments

  • IMG_8709.jpg
    IMG_8709.jpg
    198.2 KB · Views: 2,040
  • IMG_8714.jpg
    IMG_8714.jpg
    243 KB · Views: 1,896
  • IMG_8727.jpg
    IMG_8727.jpg
    217.1 KB · Views: 1,904
  • IMG_8731.jpg
    IMG_8731.jpg
    225.5 KB · Views: 1,821
  • IMG_8739.jpg
    IMG_8739.jpg
    229.4 KB · Views: 1,892
  • IMG_8735.jpg
    IMG_8735.jpg
    269.3 KB · Views: 1,859
Signed-In Members Don't See This Ad

edstreet

Member
Joined
Aug 12, 2007
Messages
3,684
Location
No longer confused....
Thanks,

Was there any part that I left out or any part that was unclear? This seems to be one of those complex task that is difficult to explain in words alone for some reason, at least for me anyways.
 

southernclay

Member
Joined
Sep 6, 2013
Messages
2,260
Location
Dawsonville, GA
I think you did well with it. I at least feel confident going into it. I haven't got to try it yet though. The pics help, I can learn more from a few pictures or video then reading an entire book it seems....then I really learn when I try something, fail or succeed. I should be able to try it in the next few days though. I thought I was done with making bottle stoppers for gifts but have a couple more to do and then on to other projects. I did get a few blanks drilled and tubes glued tonight though so soon. I'm doing all of my turning after the kids are asleep so anything requiring saws/sanders are tough to do due to noise level so learning all that can be done on the lathe as an option lets me do a lot more and not take away from family time.

Thanks again for taking the time, this forum continues to amaze me with the level of knowledge and help fellow members provide each other.
Warren
 

Carl Fisher

Member
Joined
Jun 7, 2011
Messages
2,761
Location
Cape Coral, FL
One thing that I discovered was watching videos like this you can really learn new things from them. This is what got me started of doing on the lathe trimming.

Masters of the Fountain Pen - Harumi Tanaka

I love watching his videos. It's amazing how much we overcomplicate things with machines sometimes rather than truly learning the art. The threading especially.

What they skipped however was the finishing process.
 

edstreet

Member
Joined
Aug 12, 2007
Messages
3,684
Location
No longer confused....
over complicate is a very good description. We have a tendency to throw tools and equipment at a skill problem. The chuck techniques that I described is easily seen in the video and it's very simple to do yet very difficult to describe.
 

raar25

Member
Joined
Mar 29, 2011
Messages
770
Location
Glastonbury CT
Of course you are correct about over complicating things but some things take considerable fine motor hand and eye coodination along with a feel which many people just dont have. lts face it, cutting a diamond only takes a hammer and chisel, but in the wrong hands you usually end up with dust. Hence the entrance of machines. I for one am a huge fan of the pen mill and will take that any day over trying to get the ends of my pen bodies square to the center tube. I only wish someone made a 4 cutter carbide mill.
 

edstreet

Member
Joined
Aug 12, 2007
Messages
3,684
Location
No longer confused....
I only wish someone made a 4 cutter carbide mill.


You know this is the sole purpose of the new sub forum on group buys. It is a place where we can get design changes for group buy orders. Granted those would be special order items but it's doable with the power of numbers and we have those numbers here on IAP. So if there is interest and the design is good and sound and you have a shop that can do the work then it should be a very good chance.
 

Dale Allen

Member
Joined
Oct 27, 2012
Messages
1,384
Location
Massillon, OH
The picture shown in that link shows a 4-blade cutter but the part number reference to PSI indicates it is a 2-blade, which gets poor reviews.

Ed; I use a similar method to trim ends.
One thing that is a good reference to square is putting the edge of a good chisel or straight edge along the end. If it lays flat across the center-line then it is square. I also use this method after the tubes are glued in. I put in the bushings and give it another light pass to turn the blank perfectly round all the way along the length.
Then when it is again put into the chuck for trimming the ends I know the ends are square with the tube. I do this because there is no guarantee the tube is perfectly in parallel with the hole drilled in the blank.:)
 

yaroslaw

Member
Joined
Sep 1, 2012
Messages
344
Location
Kyiv, Ukraine
Ed, few problems.
1st - if a chuck has runout (my fairly new Barracuda has!) or head/tailstock is not perfectly lined out (my aren't) method is far from perfect
2nd - first when you've glued in your tube, your end would be not parallel to the tube end if you are not lucky, end tube would be inside - which makes "indexing" on this hole be false. And you should be indexing a TUBE, not a hole (if you drill a bit extra, and your tube is loose, you would get error).

And, I think, it's overcompicated. Sorry:)
I developed method of trimming on lathe much simpler, using only a skew (and sometimes parting tool when I cut blank too long, say quarter of an inch). It uses a brass tube as a reference, and it's fast. A bit abusive on a tool, though. But it have worked perfectly even when I've had a runout in a lathe spindle of 0.15-0.2mm!! (that's just TOO MUCH!). And for me it's faster then endmill...
 

edstreet

Member
Joined
Aug 12, 2007
Messages
3,684
Location
No longer confused....
Please post your similar methods I would love to hear about them.

Runout is going to cause problems with everything you do and if it's that bad then you need to replace the equipment and get something cleaner.
 

southernclay

Member
Joined
Sep 6, 2013
Messages
2,260
Location
Dawsonville, GA
Chris I like your method compared to using the mill with a hand drill. My need for this has arisen from not having barrel trimmers for certain kits, went to start my first non slimline pen last week and realized the "universal" pen mill isn't universal at all haha. So I went looking for answers. Finally got to turn my first non slimline tonight though.


Ed I actually tried your method tonight and worked for me sort of.......my tool rest holder body is too long for me to get it close to the chuck to be 90 degrees, it was still a few inches away. The pics below were made with a different blank but wanted to show general idea of what I meant. I sort of worked it from the side and front and made it work. Blank was cast round so that made it easier. I may be missing something really simple? Usually am and like to overcomplicate things.
 

Attachments

  • trim.JPG
    trim.JPG
    40.9 KB · Views: 181

edstreet

Member
Joined
Aug 12, 2007
Messages
3,684
Location
No longer confused....
Chris I like your method compared to using the mill with a hand drill. My need for this has arisen from not having barrel trimmers for certain kits, went to start my first non slimline pen last week and realized the "universal" pen mill isn't universal at all haha. So I went looking for answers. Finally got to turn my first non slimline tonight though.


Ed I actually tried your method tonight and worked for me sort of.......my tool rest holder body is too long for me to get it close to the chuck to be 90 degrees, it was still a few inches away. The pics below were made with a different blank but wanted to show general idea of what I meant. I sort of worked it from the side and front and made it work. Blank was cast round so that made it easier. I may be missing something really simple? Usually am and like to overcomplicate things.

:facepalm: Rotate that banjo 90 degrees ;)

'universal' is only given with the proper usage ;)
attachment.php


This is a 'sleeve' that I made with a slimline tube. They are cut to go into the tube size in question, in this photo it's a Gent Jr series.
 

Attachments

  • trimmer-sleave.jpg
    trimmer-sleave.jpg
    211 KB · Views: 527

edstreet

Member
Joined
Aug 12, 2007
Messages
3,684
Location
No longer confused....
That's ok. I was wondering if somehow that tool rest was fixed and not rotatable on the banjo :) At some point when that eureka moment hits things start becoming very clear and we want to slap ourselves for not seeing things before.

One other thing that I did fail to mention. Using a WIDE chisel, i.e. skew, and using the BACK side of the blank to gauge the squareness of the end.
 

yaroslaw

Member
Joined
Sep 1, 2012
Messages
344
Location
Kyiv, Ukraine
Ed, that runout/missaligment is not a problem at all for me. As I've learned how to turn very consistent with all that stuff:)

Actually I've changed spindle in the lathe to new one. It was made on order so it took a long time while I had a chance to "have better" equipment. But let's assume your spindle is good and dead 60 degree machinist center is running in it without runout.

I'm slow on photos so I'll try to explain in a words first (and may be some photos after New Year).

I glue in the tubes that way that on side is almost flush with a blank. Than I mount tubbed blank between centers ("flush" end to headstock) and in several passes with a long point of skew down making trimming tailstock end. If tube is more than 1mm down, it will need retightening of tailstock. At final passes both centers are holding a tube therefore it is VERY precise. Than swap ends and 1-2 passes for other end.

It is not "simplest" method - you should be very comfortable with a skew. But I developed that method 2 month after started turning at all. I had some "catches" at beginning, but nothing I couldn't save. Sharp skew is vital, as always:)
It helps to took away corners first at ends.
Giving that technique, I can turn a pen EXCLUSIVELY with a skew without using other cutting tools (except for drill bits).
 

Dan Masshardt

Member
Joined
Jan 30, 2013
Messages
4,806
Location
Mechanicsburg, PA
Let me chime in with my variation.

I was inspired by Ed to try this method, which I currently use with every tube where proper length is critical and some where it's not.

I've found that precision etc does not matter with this method. I'd gotten exactly the results that I've needed every time (blank flush with tube).

It doesn't matter at all if the center hold is way off center as long as there is enough meat on the smallest part to be bigger than the bushing. Not that this happens often to me - just saying!

It's simply this:

1. Chuck up the square blank ( cut a bit longer than the tube) in pin jaws so about half is in the jaws.

2. Round half of the blank and hit the end with a narrow parting tool.

3. Drill the hole.

4. Take blank out and epoxy in tube.

5. Put rounded end into pin jaws and round the other side. If there some blank overhanging, take the thin parting tool and trim close.

Then I take a square carbide tool and come in perpendicular and trim the end flush with the tube. (Sometimes I'll use the skew from the end, but normally it's either the carbide or a box scraper from the normal spindle turning setup.

6. Then I flip the blank and touch up the other side where some epoxy often is on the end. That way I don't have to be dead precise when lining up the tube during gluing.

When I'm done, the blank is already rounded and much of the way to a pen. No catches because it's already round except for a tiny bit closest to the chuck before.
 

Dale Allen

Member
Joined
Oct 27, 2012
Messages
1,384
Location
Massillon, OH
Dan, using your method, by not referencing with the glued in tube, is it possible that the tube is not exactly parallel with the outside of the blank?
Maybe if something would have caused the tube to be pushed to one side more when it is glued in? I try to get the hole size matched as close as possible to the actual tube size but there still needs to be room for the glue.
Just wondering!
 

Dan Masshardt

Member
Joined
Jan 30, 2013
Messages
4,806
Location
Mechanicsburg, PA
Dan, using your method, by not referencing with the glued in tube, is it possible that the tube is not exactly parallel with the outside of the blank? Maybe if something would have caused the tube to be pushed to one side more when it is glued in? I try to get the hole size matched as close as possible to the actual tube size but there still needs to be room for the glue. Just wondering!

My limited experience has shown me so far that it doesn't matter at all.

As long as the end is perfectly flush with the end of the tube (even taking a TINY bit of brass off has proved fine) it hasn't mattered if the tube is way crooked in the blank. Pretty cool actually.

As long as the bushing sits perfectly flush, it's good to go.

I turn between centers and when I put the bushings in and tighten it up, I always feel the spinning bushings to make sure there is no vibration etc.

all if this is my own experience and YMMV. I'd encourage experimentation.
 

Jim Burr

Banned
Joined
Feb 23, 2010
Messages
3,060
Location
Reno, Nv
Ed's post is how I've been trimming laser kits for a few months. Due to the limited throw on my drill press, this method will be used more and more on "regular" blanks, just a lot more accurate. Dan, I too peel off just a tad of brass from the tube...always a beautiful fit.
 

yaroslaw

Member
Joined
Sep 1, 2012
Messages
344
Location
Kyiv, Ukraine
When tube is not parallel with a blank strange things happens when you press your parts. Cause they a pressed in a TUBE. Just saying.

Things can work perfectly fine... until you hit something strange - difficult material (overexpanding or overtightening or bending after drilling ), dull or wrong drill bit (that you haven't noticed), etc. So you have your hole undersized/oversized/oval/not straight. Usually happens with expencive rare one-of-a-kind pieces (as per Murphy Law). And your method could fail during assembly.

PS I've turned several hundred pens with my method - and I've had pens with a problematic drillings - my method works 100% of time with those. Again, it's much less work and faster:)
 

Dan Masshardt

Member
Joined
Jan 30, 2013
Messages
4,806
Location
Mechanicsburg, PA
When tube is not parallel with a blank strange things happens when you press your parts. Cause they a pressed in a TUBE. Just saying. Things can work perfectly fine... until you hit something strange - difficult material (overexpanding or overtightening or bending after drilling ), dull or wrong drill bit (that you haven't noticed), etc. So you have your hole undersized/oversized/oval/not straight. Usually happens with expencive rare one-of-a-kind pieces (as per Murphy Law). And your method could fail during assembly. PS I've turned several hundred pens with my method - and I've had pens with a problematic drillings - my method works 100% of time with those. Again, it's much less work and faster:)


Of course the tube is parallel to the blank when the pen is finished being turned and the parts pressed together.

When you turn the pen, any irregularities should be turned out.
 

tim self

Member
Joined
Oct 2, 2008
Messages
2,150
Location
Atoka, Oklahoma
I do it both ways depending on how I'm feeling.

Chuck up the mandrel with a trimmer on it,
tail stock in place against the mandrel. This insures the mandrel won't "bend".

I've also been squaring in the collet chuck.
Squaring the ends, drilling, place between center, turn insuring it's round in relationship to the centerline.
Tube and do it over again.

This may be overcomplicating the whole thing but I enjoy the process.
 

Dan Masshardt

Member
Joined
Jan 30, 2013
Messages
4,806
Location
Mechanicsburg, PA
Dan, with your method - no, it would not "even itself". Some drawings will help, try it:)
the bushings go into the tubes and that's the access point that spins If the tube is not perfectly centered in the blank before turning, the material comes off to even the proportions of material so that it is even to the tube all the way around when the pen is completed

I've done many pens this way - it works perfectly
 

Dan Masshardt

Member
Joined
Jan 30, 2013
Messages
4,806
Location
Mechanicsburg, PA
When tube is not parallel with a blank strange things happens when you press your parts. Cause they a pressed in a TUBE. Just saying. Things can work perfectly fine... until you hit something strange - difficult material (overexpanding or overtightening or bending after drilling ), dull or wrong drill bit (that you haven't noticed), etc. So you have your hole undersized/oversized/oval/not straight. Usually happens with expencive rare one-of-a-kind pieces (as per Murphy Law). And your method could fail during assembly. PS I've turned several hundred pens with my method - and I've had pens with a problematic drillings - my method works 100% of time with those. Again, it's much less work and faster:)

We may be talking about different things

The END of the tube and blank must be perfectly flush of course The blank cannot protrude out beyond the tube

I meant if the tube is not perfectly centered all the way through the blank

So I'm not sure if we are actually disagreeing or not Haha
 

Dale Allen

Member
Joined
Oct 27, 2012
Messages
1,384
Location
Massillon, OH
At this point in the thread, I think there is confusion between 2 different aspects.
First is the reference to the tube being parallel to the OD of the blank.
That is being done in all methods I see here.
The other aspect is with regard to the brass tube being at a right angle to the finished end.
If both ends were to be rounded and squared while just being put in the pin chuck, and no hole drilled, then all would be fine.
I basically add an extra step or 2 in that I put the blank, with the glued in tube, back between centeres and trim the OD to be sure it is parallel with the tube. This eliminates any chance the tube was not perfectly centered in the hole when glued.
THEN, I put it back in the pin vise and square the ends. At this time I am as sure as possible that the tube and OD of the blank are parallel. This is necessary because you are using the OD of the blank as reference when squaring the ends. Without this extra step of truing the OD to the tube, you may be squaring the end to the outside of the blank but not to the brass tube.
That sure looks like a lot of words to describe this!:rolleyes:
 

edstreet

Member
Joined
Aug 12, 2007
Messages
3,684
Location
No longer confused....
The original images I posted the drill bent wobbled while drilling, it was offcenter (non-parallel with the OD) and the method worked perfectly to re-align it.
 

Dan Masshardt

Member
Joined
Jan 30, 2013
Messages
4,806
Location
Mechanicsburg, PA
At this point in the thread, I think there is confusion between 2 different aspects. First is the reference to the tube being parallel to the OD of the blank. That is being done in all methods I see here. The other aspect is with regard to the brass tube being at a right angle to the finished end. If both ends were to be rounded and squared while just being put in the pin chuck, and no hole drilled, then all would be fine. I basically add an extra step or 2 in that I put the blank, with the glued in tube, back between centeres and trim the OD to be sure it is parallel with the tube. This eliminates any chance the tube was not perfectly centered in the hole when glued. THEN, I put it back in the pin vise and square the ends. At this time I am as sure as possible that the tube and OD of the blank are parallel. This is necessary because you are using the OD of the blank as reference when squaring the ends. Without this extra step of truing the OD to the tube, you may be squaring the end to the outside of the blank but not to the brass tube. That sure looks like a lot of words to describe this!:rolleyes:

That is probably a reasonable extra step to take.

My hypothesis (personally) and based in the experience of 20 or more tubes is that all that matters when trimming ends is the the end of the blank Is flush and even with the end of the tube.

Everything else equalizes once the tube is put with TBC bushings and put between centers to turn.

I didn't think this would be true in theory beforehand but based on my experience I'm convinced that it is true in reality.

Again, I've yet to have a problem. Most of my tubes are well centered but I've had a couple that were quite a bit off and have turned out just fine.
 
Joined
Feb 24, 2012
Messages
4,368
Location
Claremont NH
At this point in the thread, I think there is confusion between 2 different aspects. First is the reference to the tube being parallel to the OD of the blank. That is being done in all methods I see here. The other aspect is with regard to the brass tube being at a right angle to the finished end. If both ends were to be rounded and squared while just being put in the pin chuck, and no hole drilled, then all would be fine. I basically add an extra step or 2 in that I put the blank, with the glued in tube, back between centeres and trim the OD to be sure it is parallel with the tube. This eliminates any chance the tube was not perfectly centered in the hole when glued. THEN, I put it back in the pin vise and square the ends. At this time I am as sure as possible that the tube and OD of the blank are parallel. This is necessary because you are using the OD of the blank as reference when squaring the ends. Without this extra step of truing the OD to the tube, you may be squaring the end to the outside of the blank but not to the brass tube. That sure looks like a lot of words to describe this!:rolleyes:

That is probably a reasonable extra step to take.

My hypothesis (personally) and based in the experience of 20 or more tubes is that all that matters when trimming ends is the the end of the blank Is flush and even with the end of the tube.

Everything else equalizes once the tube is put with TBC bushings and put between centers to turn.

I didn't think this would be true in theory beforehand but based on my experience I'm convinced that it is true in reality.

Again, I've yet to have a problem. Most of my tubes are well centered but I've had a couple that were quite a bit off and have turned out just fine.

Actually it is very important that the end of the blank be square with the end of the tube. If you are off at the end of the blank you could have a nasty gap on one side of the hardware.

The only time I have had to be careful about making sure my blank is drilled down the very center of the blank is with my segmented blanks. If you are just turning a wooden blank it isn't all that important to be exact center as the turning will center all to the bushings or mandrel. Also I find that drilling on my lathe usually gives me a very nice center drilled hole. The lathe will let you know if it is not. Nasty shake..
 

edstreet

Member
Joined
Aug 12, 2007
Messages
3,684
Location
No longer confused....
I plan on taking additional shots for this thread this weekend. I have many things on my plate right nowbut I should find time for it. On those re-shoots I plan on doing a grossly offcentered drill hole
 
Signed-In Members Don't See This Ad

sschering

Member
Joined
Dec 23, 2009
Messages
382
Location
Eugene, OR
I think we all have a different method to achieve our goal.
Mine isn't all that different

I like to mark my center points and drill some dimples with a center drill to get them mounted between centers.

Then I'll turn the whole blank round keeping it as large as possible so I can mount it in the Nova chuck, face each end square (taking as little as possible. I scrape the end square using the side of the parting tool rather then the skew) and finally drill.

Now it's ready to glue the tubes and do the final trim and square.
Since I am squaring with the blank chucked the exact same way as it was drilled it runs fairly true.

I do use the live center to align the end of the blank when tightening the chuck for squaring. It's fairly easy to eyeball and tell if the blank is running true or not before cutting. If not loosen the chuck, rotate a little and try again.
 
Last edited:
Top Bottom