Shop Update

Signed-In Members Don't See This Ad

beck3906

Member
Joined
Aug 13, 2005
Messages
2,139
Location
Belton, TX 76513
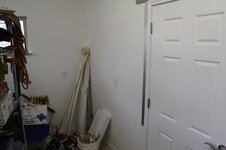
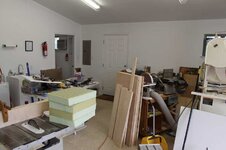
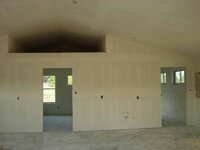
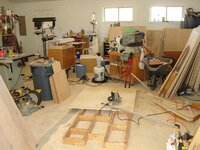
Here's the latest on our house and shop. We had a 2 week delay on getting the foam blocks for our house due to equipment problems at the plant. The shop just had the texture put on the drywall today. We get paint and trim next week. I'll be ready for final electrical and plumbing soon but final connections to the meter may be another 4 weeks until we can get the house further along. We're still evalauting a floor covering for the main shop room.

The roadside view shows the shop in the rear of the house.

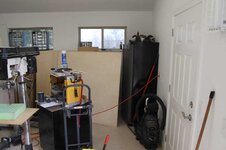
We'll have a 6 or 10 gallon water heater installed in the space above the right room. It will have a separate switch to turn off the heater when not needed.

Thanks for looking. Suggestions are still possible although we're getting close to the end and some cannot be implemented.
 

Attachments

  • Shop with Brick.jpg
    Shop with Brick.jpg
    96.1 KB · Views: 522
  • Shop Textured.jpg
    Shop Textured.jpg
    27.9 KB · Views: 553
  • 436 View.jpg
    436 View.jpg
    77.1 KB · Views: 540
Signed-In Members Don't See This Ad

holmqer

Local Chapter Leader
Joined
Aug 3, 2007
Messages
1,662
Location
CT, USA.
Looking good.

Is that open space at the peak of the roof for storage of long boards?
 

snyiper

Member
Joined
Aug 24, 2009
Messages
1,601
Location
St Inigoes, MD
Ceiling water heaters are fine with a properly drained pan, seldom is it anything catastrophic unless the whole bottom drops out.
 

sbell111

Member
Joined
Jan 16, 2008
Messages
3,465
Location
Franklin, TN
In that case, replace the word 'huge' with the phrase 'pain-in-the-butt'. Replacing the water heater at floor level in a shop is a quick and easy job. Above the ceiling? Not so much.
 

beck3906

Member
Joined
Aug 13, 2005
Messages
2,139
Location
Belton, TX 76513
The area above the rooms is for storage. We reinfrced rhe ceiling joists of the rooms to carry extra weight. With the space being about 14 feet deep, I can have 8-10 ft boards kept there. Also can place boxes like Christmas decorations.

I was aloso concerned about the water heater being up, but I can always turn the water supply off when I won't be needing it for a while. There's also a drip pan with an outside drain for code purposes.

Shop is now painted and the electrician is coming Friday to finish the inside. I'm hoping to start cleaning the floors this weekend so I can either epoxy paint or apply another finish in about a week.
 

beck3906

Member
Joined
Aug 13, 2005
Messages
2,139
Location
Belton, TX 76513
Shop Progress Jan 2012

I've had people ask about the shop progress and thought I would post pictures as to where things have developed.

We finally moved into our house in September and took several weeks to get things organized in the house. I also had several shows during November that slowed our settling process, so we're just now getting the house where we can do the decorating part.

This means getting my shop orgainzed has taken the backseat to the house. One of the first things I've done is to move things to where they will geenerally need use or storage. This means things are still cluttered and disorganized, but I'm trying to see what is needed as far as cabinets and organization.

I'm finally starting on organizing the shop by building several cabinets for storage. I have a "man cave" as we call it in the house of about 100 sq ft that needs cabinets also. I'm working on cabinets for the shop office to organize the many things I have collected related to my craft business. There'll be counter space in the office to do assembly work at such. Right now I have about 7 different cabinet boxes underway for 3 different rooms.

My next construction plans include cabinets for the lather room along both walls.

This is just a slow process getting everything done. :frown:

Anyway, here are photos of where I am today.
 

Attachments

  • Front2.jpg
    Front2.jpg
    73.5 KB · Views: 263
  • Shop-Side.jpg
    Shop-Side.jpg
    77.9 KB · Views: 247
  • Shop-Side-2.jpg
    Shop-Side-2.jpg
    55 KB · Views: 252
  • Shop-Office-1.jpg
    Shop-Office-1.jpg
    23.9 KB · Views: 265
  • Shop-Office-2.jpg
    Shop-Office-2.jpg
    18.9 KB · Views: 249

beck3906

Member
Joined
Aug 13, 2005
Messages
2,139
Location
Belton, TX 76513
More inside shots
 

Attachments

  • Shop-Inside-3.jpg
    Shop-Inside-3.jpg
    56.3 KB · Views: 284
  • Storage-Room.jpg
    Storage-Room.jpg
    54.2 KB · Views: 303
  • Lathe-Room-1.jpg
    Lathe-Room-1.jpg
    44.8 KB · Views: 295
  • Shop-Inside-2.jpg
    Shop-Inside-2.jpg
    49.4 KB · Views: 245
  • Shop-Inside-1.jpg
    Shop-Inside-1.jpg
    51.8 KB · Views: 290
  • Lathe-Room-2.jpg
    Lathe-Room-2.jpg
    33.8 KB · Views: 275

randyrls

Member
Joined
Feb 2, 2006
Messages
4,829
Location
Harrisburg, PA 17112
Rick; Dang!!! That looks better than my house!!!

It's a vicious cycle, set the tools up to do something and then you need to rearrange tools so you can tackle the next task.

I expect that all the electrical is GFCI protected? That keeps you from doing the "electric dance".
 

sumterdad

Member
Joined
Sep 1, 2011
Messages
1,159
Location
sumter sc
Ceiling water heaters are fine with a properly drained pan, seldom is it anything catastrophic unless the whole bottom drops out.

As a plumber I will say I never recommend any body putting their water heater in the attic. Unless you have the whole ceiling seal for water drainage. It is a definitely a sign that you want trouble. People put way to much faith in those drain pans. If you have a leak in the line it can spray outside of the pan. Never never trust those pans in the attic. If they tell you its alright ask them how many ceilings they have seen damaged.
 

PenMan1

Member
Joined
Jul 8, 2009
Messages
6,380
Location
Eatonton, Georgia
Nice looking shop, Rick! I like it!!!

In regards to the water heater, for not much money, you can buy "auto shutoff" lines for the heater. That coupled with a $20 water sensor device should work fine. ((I'd also spend a few more dollars and put it onto an electronic timer).

The beauty of a 6-10 gallon tank is that if the tank splits (the only real worry with auto shutoff and sensors), it's like kicking over a 5 gallon bucket of water. This is done all the time here in "bonus rooms" and the technology really IS much better than the old days.
 

Don Wade

Member
Joined
Nov 30, 2010
Messages
129
Location
Hawkins, Texas
I recently sold my farm and shop in NE Texas and moved to Temple. Downsizing to double garage. Have to get used to it. Sold many of my large tools but kept enough to do some work.

I would like to see your place if possible.

Don Wade
 

BSea

Member
Joined
Dec 28, 2009
Messages
4,628
Location
Little Rock, Arkansas
That's very similar to my shop. . . . . . . . . . . They both have garage doors.:rolleyes:

Of course my wife likes to park her car in mine. And it's attached to the house.
 
Joined
Feb 25, 2010
Messages
1,799
Location
webberville, mi
A man cave AND a shop. Rick knows how to do it!!

Rick - I, too, live "in country" and I built my outbuilding shop several years ago. Best thing ever! I was in the basement and the dust and smells were getting to be an issue. Here's hoping your shop experience is better than mine (and mine has been completely superior!
 
Last edited:

beck3906

Member
Joined
Aug 13, 2005
Messages
2,139
Location
Belton, TX 76513
Thanks for the comments. My wife and I have been blessed with good jobs where we can finally have our dream house. I've always wanted a shop where I could possibly retire to one day and create an income at my pace. Things just seemed to come together.

We looked at building a metal building but the cost kept approaching that of a stick framed building that could look really good once we added in the electrical, insulation, walls, and such. Part of the savings was realized by having the contractor negotiate for the house construction and then say, "Oh, by the way, there's another building we need help on." There were a lot of "hungry" tradesman that reduced their rates to get both jobs.

We wanted the shop to blend into the front view of the house so it wouldn't look out of place. I had extra rock and bought a couple of pallets of brick to get the front of the shop done.

I mentioned I have a man cave in the house. Following are a couple of pictures of that space. I have 4 cabinets built with face frames already on to go inside....three along the back wall behind the chair and another to the left of the chair. I have plastic laminate to make counter tops along the back wall and the left wall. I should have the cabinets sanded, stained, and finished next weekend. (Have to go out of town this week due to the beans-and-taters job.)

The rolling box with the drawers just inside the door is my inventory box we use at shows. Lots of stock in each drawer plus selling supplies in the top drawer. We work off the top.

I hope to make good progress on the cabinets over the next 4-6 weeks and get things better organized. I would love to host a "Central Texas" gathering sometime possibly in April. Others can come if you like. :)

Stay tuned.....more to come as I get things built and installed.
 

Attachments

  • Man-Cave-1.jpg
    Man-Cave-1.jpg
    97.4 KB · Views: 118
  • Man-Cave-2.jpg
    Man-Cave-2.jpg
    88.2 KB · Views: 132
Last edited:

beck3906

Member
Joined
Aug 13, 2005
Messages
2,139
Location
Belton, TX 76513
Building my cabinets has caused a need to research dust control. I have dust collector and a air cleaner, but I need to get a unified approach. I guess I'll get the cabinets done and then look at tool placement.

I'm looking at the Laguna cyclone but need to do more research.

Anyone have suggestions about tying together dust collection?
 

beck3906

Member
Joined
Aug 13, 2005
Messages
2,139
Location
Belton, TX 76513
I've been in my shop for about 16 months and just now starting to outfit the shop with cabinets and benches. I've started with the upper cabinets so I can get some of the clutter out of the way.

This photo shows the office. Yeah, pretty trashed out due to working on stock for last fall's shows. There will be a bookcase on the right rear wall and three 24 inch wide uppers on the left wall. I need to remake the countertop for the right side as I made it 24 inches and I should have made it 30 inches. Trying to save money making it 24 cost me in the long run.

http://www.penturners.org/forum/attachment.php?attachmentid=88047&stc=1&d=1358602544

The work room will have several cabinets along both side walls. The left side will have 2 sets that flank the dust collector. The right side will have 1 set. Base cabinets are planned to replace some of the stands I have there now. The cabinet with the lathe on it will be for sale later this spring.

http://www.penturners.org/forum/attachment.php?attachmentid=88048&stc=1&d=1358602551

I have three 24 inch uppers started for this corner. There will be base cabinets a bit later. This will give me a 72 inch workbench between the door and the corner. The cabinet standing there now will move to the garage.

http://www.penturners.org/forum/attachment.php?attachmentid=88046&stc=1&d=1358602551

I have 60 inches of upper cabinets underway for the area between the door and the window. Base cabinets will run along that area and then come out 90 degrees from the wall.

http://www.penturners.org/forum/attachment.php?attachmentid=88045&stc=1&d=1358602551

There's another 60 inches of cabinets planned for this back corner. The base cabinets will be complicated due to the twists and turns I currently plan.

http://www.penturners.org/forum/attachment.php?attachmentid=88044&stc=1&d=1358602551

Much of the rough cutting is complete for the uppers. I have the routing for the joints and shelf standards to complete and assembly can begin. I believe I have about 19 cabinets underway right now.
 

Attachments

  • Back-Corner.jpg
    Back-Corner.jpg
    21.1 KB · Views: 123
  • Door-Area.jpg
    Door-Area.jpg
    34.9 KB · Views: 121
  • Front-corner.jpg
    Front-corner.jpg
    33 KB · Views: 129
  • Shop-Office.jpg
    Shop-Office.jpg
    31.9 KB · Views: 120
  • Work-Room.jpg
    Work-Room.jpg
    41.9 KB · Views: 135
Top Bottom