Shop Made Threading Jig

Signed-In Members Don't See This Ad

JD Combs Sr

Member
Joined
Jan 30, 2010
Messages
767
Location
Owingsville, KY
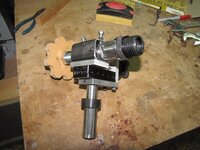
Been planning on making myself a threading jig going on 2 years and finally got around to it this past week. The jig is similar to commercially available units that push $300. I have about $122 invested in this one.

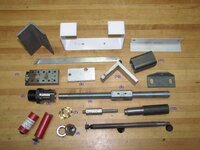
These are some of the components that went into making the jig.
IMG_0548.jpg

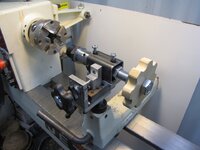
Mounted it looks very similar to factory units.
IMG_0551.jpg

The cutter is identical to those use with factory jigs
IMG_0552.jpg

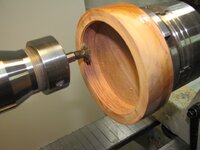
This is a close-up of the threads cut into a quickly turned plum box.
IMG_0553.jpg

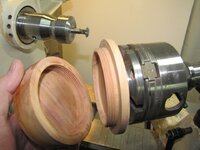
It wasn't an exact fit on first pass but taking an extra slightly deeper pass on the lid made for a great fit. The threads on the lid did not get close enough to the lid flange but a parting tool cut next to the flange solved that problem.
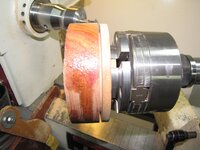
IMG_0554.jpg

"Continued in the next post"
 
Last edited:
Signed-In Members Don't See This Ad

JD Combs Sr

Member
Joined
Jan 30, 2010
Messages
767
Location
Owingsville, KY
More Details

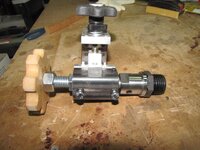
These pics give some close ups of the construction. One of the more expensive components was the linear slide(item 1 in 1st pic). I really wanted a dovetailed slide but could not find anything reasonable priced. Got this on eBay for a reasonably price. Item 10 in pic is kind of the frame and has every thing mounted to it. The tool post(12) has been threaded and screws into the bottom of the frame(10) and the larger one inch diameter cleaned up(I think I must have used it for a punch at some time or another. The large end was slightly mushroomed.) Fitted with a shaft collar it provides mounting in my Jet 1642 banjo.
IMG_0557.jpg

Item 11 holds items 2,3,4,5,7, and 8 in place. These parts make up the business end of the jig. The 3/4"10tpi threaded rod(4) is turned to turn the mounted part and "gauges" the 10tpi threads cut into the box or lid. The coupler(5) and jam nut(8) have one of the wave washers(7) sandwiched between them which removes any play/wobble in the turning of the rod and mounted chuck/box. The MDF knob on the end of threaded rod provides ample grip to turn the rod/chuck/box against the cutter.
IMG_0559.jpg

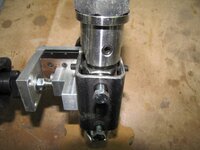
The set screws seen in the housing(11) capture and center the coupler and nut and the threaded rod. The two hex head bolts are acting as set screws also. The set screws and bolts allow the threaded rod to be removed and another with a different TPI installed. There is enough room in the housing(11) to go up to 1"-8tpi. The chuck spindle adapter is made for a 5/8" Shopsmith spindle. Any future threaded rod would have a short section of one end turned down to 5/8" and fitted to the adapter.
IMG_0561.jpg

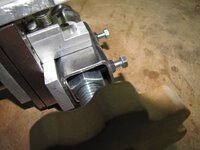
The depth of cut adjustment is a piece of 5/16" threaded rod similar to the one shown in the component pic between items (7) and (12). It is threaded into the block at the side of housing(11) and spins inside a slip fit hole in the frame(10). A lock nut and wave spring keep it snug to the housing and takes out any play. The knob and threaded rod on the depth adjustment is from a Rockler set of knobs and bolts intended for jig making.
IMG_0562.jpg

All comments and critiques appreciated.
 
Last edited:

magpens

Member
Joined
Feb 2, 2011
Messages
15,911
Location
Canada
Pretty clever engineering ! I think I need a user's manual .... seems to me that when you turn the big whitish knob, the bowl (or lid) turns and advances and the thread is cut at the rate of 1 thread per revolution of the white knob. The depth of the thread cut is adjusted by the black plastic knob. You would not cut the thread to its full depth on one pass - you would back out and repeat at a greater depth. When you are cutting, the axis of your spinning lathe cutter and the axis of the jig chuck are parallel ... right ?

If the thread pitch of item (4) is 8 threads per inch, then you get 8 threads per inch on your bowl (or lid). (pardon my thinking as I write!)
 
Last edited:

JD Combs Sr

Member
Joined
Jan 30, 2010
Messages
767
Location
Owingsville, KY
Pretty clever engineering ! I think I need a user's manual .... seems to me that when you turn the big whitish knob, the bowl (or lid) turns and advances and the thread is cut at the rate of 1 thread per revolution(that is correct) of the white knob. The depth of the thread cut is adjusted by the black plastic knob (correct) . You would not cut the thread to its full depth on one pass - you would back out and repeat at a greater depth (That is correct as far as making a deeper cut but you can go to the maximum depth of the cutter on first pass if you want to, probably not advisable though for a clean cut) . When you are cutting, the axis of your spinning lathe cutter and the axis of the jig chuck are parallel ... right (correct) ?
If the thread pitch of item (4) is 8 threads per inch, then you get 8 threads per inch on your bowl (or lid) (correct) . (pardon my thinking as I write!)
Mal thanks for posting, hope I have answered your questions.

Very nice job, yours is little more elaborate than mine, I cheated and used a cross slide vise with a 1-8TPI all thread.
Thanks dogcather, one of my first thoughts was to buy a second crossslide for my Griz metal lathe and use it but never got around to pricing it.
 

Wildman

Member
Joined
Jan 12, 2008
Messages
1,390
Location
Jacksonville, NC, USA.
Super impressed with your genius and threading jig! Thanks for sharing!

It is hard to tell from pictures if you are cutting a recess at back of male and female threads or cutting champers on the front of female & male threads? I do that when hand chasing so not sure if necessary with your set up.
 

JD Combs Sr

Member
Joined
Jan 30, 2010
Messages
767
Location
Owingsville, KY
How do you align the jig on centerline of the bed? You have the banjo and post locations as points of rotation.
Most of the threads I will cut with one of these are at the most 1/2" of thread, mostly boxes, urns, etc. I am guessing here but I would say that parallelism with the spindle shaft is important and even critical for long threads but less so for short threads. For the demo box I show in the photos I just eyeballed parallelism and it worked fine. In actual use there is nothing about the jig that could be said to be on "center line" with the spindle, bed, or even the cutter, just parallel to them for consistent depth cut(and thread). To insure that depth adjustment works as expected it should be perpendicular to the lathe center-line and at the same height as the spindle CL. This of course goes back to the parallelism concern. If parallelism is correct and the jig is at the proper height then depth adjustment will be function correctly. BTW anyone that reads this should be able to tell that I am thinking out loud(or at least typing what I am thinking):biggrin::wink: here.
Super impressed with your genius and threading jig! Thanks for sharing!
It is hard to tell from pictures if you are cutting a recess at back of male and female threads or cutting champers on the front of female & male threads? I do that when hand chasing so not sure if necessary with your set up.
Bill, thanks for commenting. As to the recess/champers I actually did both. I had watched this video on the "EZ Threading Pro Jig" and the fellow on it champered his demo part. The recess was just something I realized I had to do to make room for the first thread inside the box lip to have some place to go. The cutter cannot get close enough to the box-top flange to cut the male thread all the way to it. It comes to with in about 3/32" then hits the flange. If you put the male threads on the box/bottle/vase/urn you would have the same problem. Either recess after the last thread or turn away the first thread in the female part or start the female part in at a deeper smaller ID within the female lid.
Hmmm, thinking out loud again. Remember I don't have any experience with thread cutting.:eek::biggrin::wink:
 

JD Combs Sr

Member
Joined
Jan 30, 2010
Messages
767
Location
Owingsville, KY
Think your first attempt at cutting threads outstanding! I have resorted to buying threaded male/female PVC couplings and SB weld.
Thanks Bill, appreciate the comments. PVC was one of my first thoughts when it came to making threaded/lidded vessels. Never got around to making any but if I had before my jig I would have tried PVC. Come to think of it I believe I have a couple black PVC threaded parts put away someplace for that purpose.:eek: Now I will have see if I can find them just for the heck of it.:wink:

great design and execution... you lost me after threading jig...
Thanks for posting Rich. Sorry about loosing you:redface:, not intentional I assure you. I have seen may things on here that more or less lost me so don't feel by your self. If you are at all interested in what the jig does then check-out this video showing the commercial version in use. As to why you would want to cut threads in a turning in the first place, I believe it is mostly to do with urns used to store a deceased body's ashes. I believe most all urns have lids and a large portion of them have screw-on or glue-on lids. In my opinion I think most people would prefer screw-on versus glue-on. I am planning on make a couple urns for display and capability advertising purposes and will be making them with threaded lids. Other uses include making the threaded wooden rods and nuts for wooden bench clamps and the like. Hope this info helps a little getting you "un-lost".:wink:
 
Top Bottom