Router Jig or Template - Looking for ideas

Signed-In Members Don't See This Ad

76winger

Member
Joined
Aug 30, 2009
Messages
2,784
Location
Lebanon Indiana
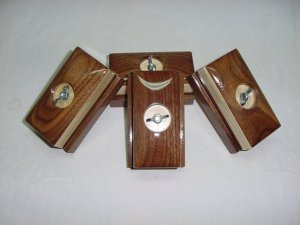
I've been contacted to make some Coaster holders for a relative like the one below. I've got a Rockler router table and Milwaukee router, which I'm thinking would be the best tool for the job. I'm trying to figure out what guide or jig or whatever I may need to get to make them.

I'm not sure of the best way to make these, keeping the grooves evenly spaced, and gaining repeatability to make about 30 of them for him. And he may want more in the future. Does anyone have any thoughts on a good process for making this? I'm out Googling for ideas.
 

Attachments

  • Coasters and stand.jpg
    Coasters and stand.jpg
    19.5 KB · Views: 454
Last edited:
Signed-In Members Don't See This Ad

rherrell

Member
Joined
Aug 22, 2006
Messages
6,334
Location
Pilot Mountain, NC
Cut some strips of wood to act as spacers, make them the same width as the spaces in between the grooves. Make them long enough so you can clamp them to the router fence at each end. Adjust the fence for the first cut, rout all your pieces once, then remove one spacer at a time until you're done.
You also need to set up a stop for the length of the groove, for that I would clamp some boards to the table. Start your routing by dropping the piece over the bit somewhere in the middle and then move it back and forth until you hit both stops clamped to the table...at least that's how I'd do it!:biggrin:
 

jttheclockman

Member
Joined
Feb 22, 2005
Messages
19,132
Location
NJ, USA.
Rick has got it. That is the way to do it unless you have a plunge router. Then you can line them all up and use a router fence and make the first cut in each and keep moving the fence for each cut. Either way would take abit of planning but easily be done.
 

ve3bax

Member
Joined
Jun 29, 2011
Messages
142
Location
Perth, On. Canada
Rick pretty much summed up my method of doing this sort of thing... the only extra thing i do is pencil in some reference marks on my router table... that way i can remove everything, do something else, and if i need to make more, line up the jig/fence/whatever to the starting reference marks and away i go. if you go that route, just remember to LABEL the reference marks! :biggrin: a few different setups on the router table with no labels doesnt help at all... :confused: im sure everyone can figure out how i came to that conclusion...

--Dave
 

jttheclockman

Member
Joined
Feb 22, 2005
Messages
19,132
Location
NJ, USA.
Could you not make them on the table saw, with a 6" dado blade?
Len

I thought about this, but it would have to be about a 4 inch dado blade to match the curve of the coasters.


Wow if you are trying to match the curve of the coaster you now have opened a different thought process. Short of carving them out by hand, the only thing I can think of is making a sled for a dremel tool. I do not think you can get a router base small enough to make a curved sled. You may want to rethink the curved idea.
 

76winger

Member
Joined
Aug 30, 2009
Messages
2,784
Location
Lebanon Indiana
Thanks for the ideas guys.

Ricks suggestion is what's been going through my head already, I'll just need to determine how thick I need to make the spacers and I'll have to create some stop blocks that extend further from my fence than the 3/4" ones I use now. Was hoping there might be an easier way and I was just trying to overly complicate the process, which I'm good at...

I DON'T have a plunge router, and since this job won't pay for one it's out of the question for now at least. And of course I'd love to get a CNC Bruce, and toy around with one of those. Some day, but not for this project. :frown:
 

76winger

Member
Joined
Aug 30, 2009
Messages
2,784
Location
Lebanon Indiana
Could you not make them on the table saw, with a 6" dado blade?
Len

I thought about this, but it would have to be about a 4 inch dado blade to match the curve of the coasters.

Wow if you are trying to match the curve of the coaster you now have opened a different thought process. Short of carving them out by hand, the only thing I can think of is making a sled for a dremel tool. I do not think you can get a router base small enough to make a curved sled. You may want to rethink the curved idea.

No, I wasn't thinking of that John, but I felt my 6 inch dado would make too wide of a grove by the time I got it deep enough to hold the coasters up.

I'm definitely looking for a simple solution, not a complicated one.
 

jttheclockman

Member
Joined
Feb 22, 2005
Messages
19,132
Location
NJ, USA.
Could you not make them on the table saw, with a 6" dado blade?
Len

I thought about this, but it would have to be about a 4 inch dado blade to match the curve of the coasters.

Wow if you are trying to match the curve of the coaster you now have opened a different thought process. Short of carving them out by hand, the only thing I can think of is making a sled for a dremel tool. I do not think you can get a router base small enough to make a curved sled. You may want to rethink the curved idea.

No, I wasn't thinking of that John, but I felt my 6 inch dado would make too wide of a grove by the time I got it deep enough to hold the coasters up.

I'm definitely looking for a simple solution, not a complicated one.


Man I would not think of doing this on a tablesaw using any blade. You are talking about doing a blind cut by placing over a spinning blade and lifting without making a through pass. You are asking for kickback.

The first one is always the hardest. Once you get all the stops and spacers made up you can mass produce as many as you want. Good luck and post a photo when done.
 

beck3906

Member
Joined
Aug 13, 2005
Messages
2,139
Location
Belton, TX 76513
I would consider cutting the grooves in a board and then gluing a piece across each cut end (90 degrees to the grooves). I wouldn't think the groove would have to be rounded, just wide enough to support the round coaster.
 

airborne_r6

Member
Joined
Oct 28, 2008
Messages
279
If it was me I and you are not trying to match the curve of the coaster which I understand you are not, I would use the router table and fence. Clamp a stop block for the start of the cut and a stop block for the end of the cut to the fence. Use a core box bit and butt the piece up against the fence and the first stop block then route to the second stop block and lift the piece off. Very safe to do it like this.
 

reible

Member
Joined
Mar 22, 2013
Messages
2
Location
IL
This is from another project that looks like it could be applied to the holder you are trying to make. In this case the design was for a coin.... you would need to make a template to cut the 4" circle hole with the router of if you have other tools like a band saw it could be cut that way. Big hole saw? No ideas as to what tools you have.

coin 1.jpg

Depending on the size of the wood you are using you could put several holes and then cut them to size for the holder after assemble. The thickness of the strips would have to be slightly larger then the coasters. You could use a contrasting wood for the separators (same is good too).

coin 4.jpg

The glue up when done can be crosscut to size. After it is finished stick a couple of cork feet under it and your good to go.

Hope this helps.

Ed
 

Lucky2

Member
Joined
Mar 2, 2012
Messages
1,502
Location
New Brunswick/ Canada
Dave, if you set your Dado blade at 1/4" that's as wide as the cut would be. And if your looking to make a groove about 1/4" wide you will need to use 1/2" spacers. That will give you the proper distance between the grovves, and it will leave 1/4" between each groove. That is the size of spacer to use if your making a 1/4" groove, with a 1/4" between grooves. If you want larger grooves, you will need to use thicker spacers.
Len
 

sbell111

Member
Joined
Jan 16, 2008
Messages
3,465
Location
Franklin, TN
Dave, if you set your Dado blade at 1/4" that's as wide as the cut would be. And if your looking to make a groove about 1/4" wide you will need to use 1/2" spacers. That will give you the proper distance between the grovves, and it will leave 1/4" between each groove. That is the size of spacer to use if your making a 1/4" groove, with a 1/4" between grooves. If you want larger grooves, you will need to use thicker spacers.
Len
I think his issue is not with the width of the groove, but with the length.
 

duncsuss

Member
Joined
Jun 29, 2012
Messages
2,160
Location
Wilmington, MA
Dave, how much flexibility do you have in the design?

Could you, for example, make them by gluing together multiple parts (along the lines of a butcher-block chopping board)?

If so, route a groove along each side of a long piece of stock. Rip the grooved side pieces off, then cross-cut them into shorter pieces.

Use these as spacers in between each end of 5 pieces of wood, and you've created 4 evenly-spaced slots for the coasters to stand up in.

Just a thought ...
 

76winger

Member
Joined
Aug 30, 2009
Messages
2,784
Location
Lebanon Indiana
Dave, how much flexibility do you have in the design?

Could you, for example, make them by gluing together multiple parts (along the lines of a butcher-block chopping board)?

If so, route a groove along each side of a long piece of stock. Rip the grooved side pieces off, then cross-cut them into shorter pieces.

Use these as spacers in between each end of 5 pieces of wood, and you've created 4 evenly-spaced slots for the coasters to stand up in.

Just a thought ...

I thought about this as well as cutting multiple groves in a long board and ten cutting to length and gluing ends on each side. All are possibilities but add to the complication of making each holder I think. Plus I like the look of the base pictured where it's made from a single block of wood. I guessing this is going to be about 4 inches square and about 3/4 to 7/8 inch high.

I added some needed dust collection components to my router table today an will get something made up for stop blocks tomorrow. Next will be to make a mock up out of some pine. The plan is starting to come together! :)

Sent from my iPad using Forum Runner
 

76winger

Member
Joined
Aug 30, 2009
Messages
2,784
Location
Lebanon Indiana
Router setup and first prototypes

Hey guys, thanks for all great ideas. After spending some $$ this weekend (mostly to get better dust collection to the router, but a few t-bolts and knobs for the table as well I've got something figured out as you can see below.

In order to get the coasters to lean back just a little I went with a 5/16" slot and determined 5/8" spacing center to center would work out pretty good and give enough meat in between the slots.

I penciled this up on a scrap piece of pine (left of router) and set up my router fence and stop blocks for the cuts I wanted to make. Then figured out the depth so the coasters would fit snugly, touching the bottom and sides. Cut a test piece from pine and checked the fit (also left of router), and it looked good so I went ahead and made two sample bases (shown in front-right).

The spacers were made so I could use one at a time instead of stacking them. In such tight quarters I didn't want to mess with any more than necessary. First one is 5/8", then 1 1/4" and finally 1 7/8".

Using leftover Mahogany cutoffs from another project I took some "almost" 2x4 peices, and cut a 3 1/4 in square, then ripped the piece on my Shopsmith's bandsaw to get two pieces from the square.

Here's the router setup and a couple pics of the prototype. The coasters were samples sent to me for the project.
What do you think?
 

Attachments

  • Router Setup and Results.jpg
    Router Setup and Results.jpg
    76 KB · Views: 2,403
  • CB_Prototype1.jpg
    CB_Prototype1.jpg
    49.6 KB · Views: 251
  • CB_Prototype3.jpg
    CB_Prototype3.jpg
    53.5 KB · Views: 273

jttheclockman

Member
Joined
Feb 22, 2005
Messages
19,132
Location
NJ, USA.
If it were me I would take it to the next level and make it a bit classier. To me it looks like a block of wood and the coaster are very nice. Add a accent piece in the middle. Or route the edges. I probably would take a 45 degree chamfer bit and knock off all edges on the top and the bottom. Now add about a 1/8" accent piece in the center of the block. I would also make the thing abit larger say 4" square. I also would slant the slots. To do that just add a piece of shim material under the front edge of the block. Maybe something like 3/16" thick. Just keep in the same place for all the cuts. You could hot melt it to the edge so it is in place all throughout the cuts. Knocks off easily later. These are just a few things I would do to dress them up. I am not a fan of plain jane stuff. Just my opinion.

By the way this is the safest way to handle that cut. Good luck.
 

jttheclockman

Member
Joined
Feb 22, 2005
Messages
19,132
Location
NJ, USA.
If it were me I would take it to the next level and make it a bit classier. ...
I wouldn't. The coasters are the thing that is to be noticed with this project, not the holder. I think that keeping the holders simple puts more attention on the coasters.


Just a matter of an opinion. An accent ring would not take away from the coasters but add more class to the stand. His project. Just throwing ideas out there. that is what I do. :) In fact if that is brass or chrome on the edges I would use aluminum or brass to accent the base. Ties the coasters into the base.
 

76winger

Member
Joined
Aug 30, 2009
Messages
2,784
Location
Lebanon Indiana
If it were me I would take it to the next level and make it a bit classier. To me it looks like a block of wood and the coaster are very nice.

  • Add a accent piece in the middle. Or route the edges. I probably would take a 45 degree chamfer bit and knock off all edges on the top and the bottom.
  • Now add about a 1/8" accent piece in the center of the block.
  • I would also make the thing a bit larger say 4" square.
  • I also would slant the slots. To do that just add a piece of shim material under the front edge of the block. Maybe something like 3/16" thick. Just keep in the same place for all the cuts. You could hot melt it to the edge so it is in place all throughout the cuts. Knocks off easily later.
These are just a few things I would do to dress them up. I am not a fan of plain jane stuff. Just my opinion.

By the way this is the safest way to handle that cut. Good luck.

(Note: I bulleted your points so I could address them easier)

I like your ideas John, and may or may not use some, depending on what my contact wants to spend on these. I know he was conscientious of cost when we were discussing this initially, and for this first run we decided to see how these would look using cut-offs of mahogany I had on hand (that he had actually given to me a couple years ago). This also limits the size to the dimensions of the available wood.

I were were to out to purchase new wood for this, I believe I would go for something allowing me to make a 4" square as well.

The 45 deg. chamfer would be easy enough to do with what I've got, may give that one some thought.

I DID think about angled slots. Didn't think about your way of doing it though. :cool: I would also have to change the depth of the router bit for each different slot, but that would be doable. They do lean back fairly naturally with the straight slots though.

You are right that something nicer than a plain block of wood should accompany these. I'll just have to see how much he wants to go down that road.

I do kind of agree with steve's point that the coasters are the main item, they're solid brass with a leather insert and cork backing. Finding the right point where the base complements but doesn't overstate would be an interesting challenge now that I've gotten this far.
 

76winger

Member
Joined
Aug 30, 2009
Messages
2,784
Location
Lebanon Indiana
Well, I've had over a week to play with this project a bit more (and try a couple of Johns ideas), so here's what I've come up with.

I took one of the initial holders pictured earlier and put a 45 deg. chamfer around the perimeter. Then sprayed a couple coats of Polyurethane on it. Added a gold stripe to the front and side chamfers, then sealed with another coat of Poly. Final result is the middle one in this picture.

Then I made a couple more, adding 1/4 in. to either side, making it the same width as the diameter of the coasters. I also made a plastic channel to slip over the front edge and raise it about 1-2 degrees for a very slight lean to the grooves. Then to dress these up, I put a 45 degree chamfer on one (pictured on the right) and a 1/8 inch radius on the other (left).

How are they looking?
 

Attachments

  • CB_Prototypes3-1-2finished.jpg
    CB_Prototypes3-1-2finished.jpg
    81.7 KB · Views: 358

76winger

Member
Joined
Aug 30, 2009
Messages
2,784
Location
Lebanon Indiana
And here's each of them posed with the coasters.


  • The smaller holder with gold chamfer (will do this treatment on the larger one if that's what is preferred)
  • The larger one with with 45 deg. chamfer
  • And a larger one with radius.
  • Finally a group shot showing the two larger ones holding coasters and the smaller one with gold chamfer empty in front.
Now to find out which one he likes.
 

Attachments

  • CB_Prototype1d-finishedwithstripe.jpg
    CB_Prototype1d-finishedwithstripe.jpg
    53.5 KB · Views: 233
  • CB_Prototype2c.jpg
    CB_Prototype2c.jpg
    48.5 KB · Views: 247
  • CB_Prototype3b.jpg
    CB_Prototype3b.jpg
    50.4 KB · Views: 232
  • CB_Prototypes3-1-2finished_b.jpg
    CB_Prototypes3-1-2finished_b.jpg
    62.4 KB · Views: 271

jttheclockman

Member
Joined
Feb 22, 2005
Messages
19,132
Location
NJ, USA.
Well Dave you have been busy. I will stick by my original suggestions which I understand is abit more work and possibly would increase cost. So with that said if I had to choose from what you have I would choose the one on the right but I would deepen the chamfer. If that is 1/4" I would make it 5/16 to 3/8" The one in the middle looks like a deeper chamfer from the front. That would be a good measurement. What happens when you put a chamfer on a piece like that you take away that boxy look. The roundover doesn't do it. The chamfer makes it look lighter.

Definetly leave out the painting. Makes it look cheap. Mahagony is a nice rich looking wood. Unless you were rimming the top with brass then I would skip the paint. At first I thought if you wanted to paint then black would have been the color. But the more I look at them I say no paint.

I did not follow the thing about the plastic to tilt the holders so I have no comment on that. I stick with cutting the slots on an angle if you want that to happen.

Otherwise it will get the job done and get it done well. I am sure they will be a hit. That is my opinion.:)

That is good that you are letting the customer choose. You do see how the coasters overwhelm the smaller base.??? Looks out of place. Just by adding just a bit more material on the sides makes it flow better. Good job.
 
Last edited:

76winger

Member
Joined
Aug 30, 2009
Messages
2,784
Location
Lebanon Indiana
Well Dave you have been busy. I will stick by my original suggestions which I understand is abit more work and possibly would increase cost. So with that said if I had to choose from what you have I would choose the one on the right but I would deepen the chamfer. If that is 1/4" I would make it 5/16 to 3/8" The one in the middle looks like a deeper chamfer from the front. That would be a good measurement. What happens when you put a chamfer on a piece like that you take away that boxy look. The roundover doesn't do it. The chamfer makes it look lighter.

The chamfer on the one I painted is about 1/4 inch and yes I like the size of it better as well. I thought about trying to apply gold leaf, but since I've never messed with the stuff I chose gold paint just to see what the effect looks like.

Definetly leave out the painting. Makes it look cheap. Mahagony is a nice rich looking wood. Unless you were rimming the top with brass then I would skip the paint. At first I thought if you wanted to paint then black would have been the color. But the more I look at them I say no paint.

I agree paint alone doesn't complement the mahogany well, it's go so much chatoyance that the paint does distract from that natural beauty.

I did not follow the thing about the plastic to tilt the holders so I have no comment on that. I stick with cutting the slots on an angle if you want that to happen.

Basically I took some plastic (an unused pen tube to be exact) and wrapped it around the outer edge of the wood as I ran it upside down over the router. I also folded the lip on the bottom side to raise it a bit more. That way the block went over the router bit at a slight angle, cutting the grooves at an angle to the surface. Had I raised it much, I would have ad to adjust the depth, but it wasn't that steep of an angle to affect depth much.

Otherwise it will get the job done and get it done well. I am sure they will be a hit. That is my opinion.:)

And I thank you for your thoughts and opinions!

That is good that you are letting the customer choose. You do see how the coasters overwhelm the smaller base.??? Looks out of place. Just by adding just a bit more material on the sides makes it flow better. Good job.

I do see how there's a better balance (look and feel) with the wider base. I didn't go deeper to keep them square, mostly because of the limitations of the material I have on hand, but I don't really thing the extra depth would have done much functionally or visually.

Along with the three visual options shown in the photos, I've also offered the option of putting 1/16 in. cork on the bottom side. I think it would be beneficial, so we'll what the customer thinks.
 

jttheclockman

Member
Joined
Feb 22, 2005
Messages
19,132
Location
NJ, USA.
Dave they came out real well and I am sure they will like them all and have a hard time to choose.

Here is just another way you could have gone. I do this alot of times too. I stack 2 different woods. Can be of any size and thickness as you choose. To get the accent ring I chamfer the top layer away. I did it with these billiard ball clock display stands. The idea I was after to make it look like a ball rack. Just something to keep in mind if you ever do any other projects like that.


Here is another example of an accent ring which I was talking about. Again in this case with the pen rack I stacked 3 pieces of wood with the accent being thin in the middle. You can do this in many versions.


I like the idea of cork on the bottom. Again it ties the base to the coasters. Alot of time when I make desk clocks I place felt dots under them. Helps to keep from sliding around and keeps from scratching the desk or tables. Just a little extra that I find customers appreciate.


Just throwing ideas out there for future projects because you maybe called on to do so after they get a look at these great holders. I really like the coasters and they do desrve a nice display rack. I bet they are not cheap. Thanks for showing and keep us informed as to how the customer likes them and which ones he chooses. Cool. Take care.
 

76winger

Member
Joined
Aug 30, 2009
Messages
2,784
Location
Lebanon Indiana
Great idea on the laminating John.

I've done that technique once a few years ago on these Maple & walnut sanding blocks. I need to play with it more. :wink:


I think the photo of your Billiard Ball clocks have caught my eye in the past as my wife is an avid pool player and I noticed it as an idea to make for her one day.

I *AM* curious how you hold the ball to make the hole for the clocks... I can picture some crazy mechanism to hold them on a drill press while you dig into it with a forestner bit, but I have this feeling you've mastered a better method.
 

jttheclockman

Member
Joined
Feb 22, 2005
Messages
19,132
Location
NJ, USA.
Dave I did make a jig to hold the ball. You are correct. There actually is alot more that goes into drilling a billiard ball than what meets the eye. If you are going to do it get yourself some spares you will need them.:) I too love the games.
 

teamtexas

Member
Joined
Apr 24, 2013
Messages
147
Location
Gatesville, Texas
Dave, great work on the prototypes. I like the one with the gold band but I think gold leaf may look better. Contrasting woods on an overlay may make them more intresting but matching a color of the coasters makes it seem as though they were ment to be displayed together.

Just my 2 cents....
Dan
 

76winger

Member
Joined
Aug 30, 2009
Messages
2,784
Location
Lebanon Indiana
DARN!!!

Well my customer made the decision for a chamfered edge and today I got busy cutting and milling. Cut the sections to length on the miter saw and ripped each section into two pieces on the Shopsmith's bandsaw. Broke the bandsaw blade :bulgy-eyes: but thankfully I had a spare to finish the task :redface:. Then sanded everything smooth on the SS's 12 disc sander.

Made the chamfer on them using my 25 year old Black & Decker router mounted in the woodworking vice and fitted with a 45 deg. bit. Then took the box of 30 (plus a few spares) to the router table and double checked the setup and depth of the Milwaukee router mounted it in and began cutting the first grove in the blocks. About 1/2 way through a quick bang noise and no more sound as I progressed the board across the router...

Lifted up the block and found I broke the 5/16 router bit right at the base befor it expands out to the 1/2 inch shaft. :eek::bulgy-eyes::frown::confused:

So now it's off to Rockler tomorrow to get a replacement since I just bought it 2-3 weeks ago for this project. Will probably get a spare in case it happens again.

Any thoughts on whether a spiral bit might be a better choice for routing a 1/2 deep hole all at once than a straight bit?
 

airborne_r6

Member
Joined
Oct 28, 2008
Messages
279
I think a spiral would definitely be better but the only ones I know of are solid carbide. They cost more and I have broken them too. The last one was a 1/4" spiral upcut that broke routing a 1/8" deep slot. Although I think I could have put more of the bit into the collet and it might have prevented it.
 

jttheclockman

Member
Joined
Feb 22, 2005
Messages
19,132
Location
NJ, USA.
Well my customer made the decision for a chamfered edge and today I got busy cutting and milling. Cut the sections to length on the miter saw and ripped each section into two pieces on the Shopsmith's bandsaw. Broke the bandsaw blade :bulgy-eyes: but thankfully I had a spare to finish the task :redface:. Then sanded everything smooth on the SS's 12 disc sander.

Made the chamfer on them using my 25 year old Black & Decker router mounted in the woodworking vice and fitted with a 45 deg. bit. Then took the box of 30 (plus a few spares) to the router table and double checked the setup and depth of the Milwaukee router mounted it in and began cutting the first grove in the blocks. About 1/2 way through a quick bang noise and no more sound as I progressed the board across the router...

Lifted up the block and found I broke the 5/16 router bit right at the base befor it expands out to the 1/2 inch shaft. :eek::bulgy-eyes::frown::confused:

So now it's off to Rockler tomorrow to get a replacement since I just bought it 2-3 weeks ago for this project. Will probably get a spare in case it happens again.

Any thoughts on whether a spiral bit might be a better choice for routing a 1/2 deep hole all at once than a straight bit?


Sounds like this is a project that just doesn't wanted to get done:)

First thing is why did you not mount the chamfer bit in the router table??? If it was a case of resetting just make witness marks on the table where your stop block was. Measure the depth of the bit. Heck you had the sample so you could use that to reset.

Next is I never ever make any cut in one pass. Spiral bits are no better that a straight fluted bit. I say this because you have no place for the routed material to exit. It is trapped under the coaster which makes it even more correct to do this in a couple passes. Was this a double fluted bit, which is better than a single fluted bit??? I would make at least 2 passes if you are going to a depth of 1/2" To do this just stick a couple pieces of material 1/4" thick to the table between the stop blocks. The coaster will now slide on those. Take them out and now it will slide on the table for the rest of the cut. It is alot easier to control a piece when you are not taking out so much material at a time and a whole lot less stress on that small of a bit. Thats a lot of material to hog out and by the way is the depth of cut of the bit able to handle 1/2". Need to make sure or you might have to get a longer cutter. They make different sizes.

Lastly, did they choose the painted or plain chamfering??? Good luck.
 
Last edited:

76winger

Member
Joined
Aug 30, 2009
Messages
2,784
Location
Lebanon Indiana
Well my customer made the decision for a chamfered edge and today I got busy cutting and milling. Cut the sections to length on the miter saw and ripped each section into two pieces on the Shopsmith's bandsaw. Broke the bandsaw blade :bulgy-eyes: but thankfully I had a spare to finish the task :redface:. Then sanded everything smooth on the SS's 12 disc sander.

Made the chamfer on them using my 25 year old Black & Decker router mounted in the woodworking vice and fitted with a 45 deg. bit. Then took the box of 30 (plus a few spares) to the router table and double checked the setup and depth of the Milwaukee router mounted it in and began cutting the first grove in the blocks. About 1/2 way through a quick bang noise and no more sound as I progressed the board across the router...

Lifted up the block and found I broke the 5/16 router bit right at the base befor it expands out to the 1/2 inch shaft. :eek::bulgy-eyes::frown::confused:

So now it's off to Rockler tomorrow to get a replacement since I just bought it 2-3 weeks ago for this project. Will probably get a spare in case it happens again.

Any thoughts on whether a spiral bit might be a better choice for routing a 1/2 deep hole all at once than a straight bit?


Sounds like this is a project that just doesn't wanted to get done:)

First thing is why did you not mount the chamfer bit in the router table??? If it was a case of resetting just make witness marks on the table where your stop block was. Measure the depth of the bit. Heck you had the sample so you could use that to reset.

I should have done this there would have been a lot less cleanup afterwards :eek: and wouldn't have been hard. I just got in my mind using different station for each step of the process and ran with it.

Next is I never ever make any cut in one pass. Spiral bits are no better that a straight fluted bit. I say this because you have no place for the routed material to exit. It is trapped under the coaster which makes it even more correct to do this in a couple passes. Was this a double fluted bit, which is better than a single fluted bit??? I would make at least 2 passes if you are going to a depth of 1/2" To do this just stick a couple pieces of material 1/4" thick to the table between the stop blocks. The coaster will now slide on those. Take them out and now it will slide on the table for the rest of the cut. It is alot easier to control a piece when you are not taking out so much material at a time and a whole lot less stress on that small of a bit. Thats a lot of material to hog out and by the way is the depth of cut of the bit able to handle 1/2". Need to make sure or you might have to get a longer cutter. They make different sizes.

I hadn't even though of using a spacer as a possibility. That's a great idea developed from experience you have that I hadn't even considered. I'll think about taking two passes and just changing the bit depth. But the bit has a 1 inch cutting surface, so I didn't think 1/2 an inch would be too much. I got plenty of slots to cut yet, so I may give it whirl for the rest of them now that I got the bit replaced. At least with a closed metal box around the router in the table, and the DC hooked up, it removes the shavings quite well and has enough fresh air coming in low to keep the router motor running cool to boot.

Lastly, did they choose the painted or plain chamfering??? Good luck.

They chose the plain chamfer.
 

jttheclockman

Member
Joined
Feb 22, 2005
Messages
19,132
Location
NJ, USA.
I always go to the home centers and pick up a sheet or 2 of hardboard. I use that alot of time for spacers because it has the smooth face on it and things slide easily. Makes for a good work surface too on top of a work bench without have to worry about spilling things. Good luck.
 
Top Bottom