Pen assembly presses?

Signed-In Members Don't See This Ad

jennera

Member
Joined
Feb 12, 2017
Messages
236
Location
Texas
Rebecca is enjoying the hobby more and more. She has been using a pipe clamp to assemble the pens which sometimes presses too hard and cracks the wood or the kit doesn't assemble straight. I have been looking at the presses but we haven't purchased one.

Are the pen assembly/disassembly presses worth the investment? I am interested in any recommendations.

Thanks!
Jennifer


Sent from my SAMSUNG-SM-G890A using Tapatalk
 
Signed-In Members Don't See This Ad

leehljp

Member Liaison
Joined
Feb 6, 2005
Messages
9,326
Location
Tunica, Mississippi,
There are different ways to press them together, including using the drill press. Harbor Freight used to have 3 different models and now only have one:
https://www.harborfreight.com/1-ton-arbor-press-3552.html

Harbor Freight prices on some things have gone through the roof. That model used to be less than $30 a few short years ago.

There are other kind of clamps that work but make sure the jaws or clamping areas are square, and that the jaws open wide enough.
 

KenV

Member
Joined
Oct 28, 2005
Messages
4,720
Location
Juneau, Alaska.
Jennifer

Two points.

I have used several different schemes to press parts. MilesCraft is the one I use. I was getting some minor marring on the nibs and made a UHMD plastic insert.

The lathe inserts sold by Craft Supply work well, but are a bit ackward. They are lower on cost and take up less space.


Light reaming of tube and careful cleaning of glue and debris will eliminate most all problems with fittings going in hard and cracking barrels. Loctite to set loose fittings is the worst outcome of agressive reaming, and does not break pen parts.
 

tonylumps

Member
Joined
Nov 7, 2016
Messages
164
Location
newtown square pa
I use the assembly -disassembly press.Of course I take pens apart a lot.Either for mistakes or I just don't like the looks of the pen.It is so much easier to take apart a pen with the press than it is with the vice grip clamp and hammer.I salvaged a lot of pens with it.
 

magpens

Member
Joined
Feb 2, 2011
Messages
15,912
Location
Canada
When assembling a pen it is important to press the pieces together with controlled pressure that you can release easily and retighten.

You need to be able to see if the assembly is not going straight. . If that happens you need to release the pressure, rotate the partially pressed pieces, and then retighten slowly and very carefully in such a way as to straighten the assembly.

With the pipe clamp it is difficult to do that (if I am visualizing a pipe clamp correctly).

A proper pen press, or a lathe, or an arbor press will allow you to do this accurately and reliably and allow you to see (and perhaps even feel) that you are doing the assembly straight. . The lathe method is by far the cheapest and, IMO, the best.

With the lathe method you can keep your left hand on the pen parts as you tighten the tailstock with your right hand. . With your left hand you can often feel if the assembly is not going straight, so that you can back off the tailstock, rotate the pen parts slightly and retighten the tailstock, all the while observing by eye that the assembly is correctly proceeding.
 
Last edited:

TonyL

Member
Joined
Mar 9, 2014
Messages
8,913
Location
Georgia
I bought the Milescraft and didn't like it because I didn't feel I had as much control when the arm was close to 90 degrees, especially when installing transmissons. It is a well-made product though and highly adjustable. I gave mine to IAP member.

I like these inserts, but like all of the presses/inserts I find there are pros and cons.
https://www.woodturnerscatalog.com/...-Ultimate-Assembly-Tool?term=pen+press+insert
 

eharri446

Member
Joined
Mar 17, 2016
Messages
1,036
Location
Marietta, GA
I use the MilesCraft press and have only had one incident where a pen barrel cracked.

I have used it for almost 100 pens.
 

keithncsu

Member
Joined
May 28, 2016
Messages
372
Location
Catawba, SC 29704
I used a regular old quick grip/trigger grip clamp for the first 50-100 pens. The real name escapes me right now. After pressing a few transmissions in too far, I chose to purchase the Milescraft press. I would've probably chosen the lathe inserts for pressing at the time but everywhere I checked was out of stock at the moment. And I wasn't patient.

Seems like I remembered an email recently that there is an assembly and disassembly combo press out now. I would probably spend the extra bucks (I'm assuming) for this one. Pressing a pen apart rather than beating on transfer punches seems like it has to be better. At least when compared to my process.
 

Dehn0045

Member
Joined
Mar 19, 2017
Messages
1,533
Location
US
I use my lathe for assembly. Has worked for well over 200 pens. Here is a link to the article I found about making lathe inserts for this purpose. Oh, and they are pretty much free to make.

https://www.woodturningonline.com/assets/turning_projects/pen_assembly_press_improvement.pdf

Regards,
Michael

I use this same method and really like it. Only warning is that if humidity changes substantially wooden inserts will swell. I had mine get fused in pretty bad because of this -- required several curse words to get them out.
 

jennera

Member
Joined
Feb 12, 2017
Messages
236
Location
Texas
Yes, the pipe clamp is very long and she sits on the floor or in a chair and tries to balance everything. I wish I had a photo, it is quite something to watch.

We watched a couple of videos on the combo assembly/disassembly press and her Dad likes that parts do not go flying everywhere. With that tool we might have saved a few more pens when she pressed the mechanism in far.

We will take a look at using the lathe as a method of pressing as that sounds like it would work better than the pipe clamp and be cheaper but might go ahead and invest in the press later so she can more easily disassemble pens if she needs to. Right now she depends on Dad to do that.

Thanks to everyone for all the suggestions!! We have a lot to look at and consider!

Sent from my SAMSUNG-SM-G890A using Tapatalk
 

stuckinohio

Member
Joined
May 3, 2015
Messages
1,695
Location
Columbus Ohio
The nice thing about the pen press I mentioned from Woodcraft is, you don't have to use the lever for assembly. You can twist the nob and it gently presses the pen together like on the lathe.

It is very nice, though I does not do disassembly.
 

Herb G

Member
Joined
Nov 13, 2015
Messages
1,461
Location
Southern Maryland
I bought one of these after smashing pen after pen in my bench vise.
LINKY
It has worked perfectly ever since.
Sure, you could pay more, but why would you?
 

randyrls

Member
Joined
Feb 2, 2006
Messages
4,829
Location
Harrisburg, PA 17112
Yes, the pipe clamp is very long and she sits on the floor or in a chair and tries to balance everything. I wish I had a photo, it is quite something to watch.

This is a pipe clamp like this one??

Get a shorter piece of pipe and attach one threaded end of the pipe to a pipe flange and screw it to a base plate or the work bench so it is vertical.

BUT; if you enjoy the entertainment, by all means carry on!:biggrin::biggrin:
 
Last edited:

Ambidex

Member
Joined
Nov 2, 2011
Messages
1,108
Location
Bristol NH 03222
I'm of the arbor press ilk. I've used for several hundred pens and not had a problem. Some say it's overkill but it works fine with a little patience, which you'll need no matter the form of assembly you use. I've made delrin caps and a base to avoid marring any surfaces.
 

jennera

Member
Joined
Feb 12, 2017
Messages
236
Location
Texas
Yes, the pipe clamp is very long and she sits on the floor or in a chair and tries to balance everything. I wish I had a photo, it is quite something to watch.

This is a pipe clamp like this one??

Get a shorter piece of pipe and attach one threaded end of the pipe to a pipe flange and screw it to a base plate or the work bench so it is vertical.

BUT; if you enjoy the entertainment, by all means carry on![emoji3][emoji3]
If hers had those nice feet, it would be easier! This is what her Dad had and it's been working ok but it makes it tricky to get things assembled straight since it won't stand up on its own. Plus she applies too much pressure sometimes using the crank.

I was wondering if the ones with the press handles give more control and might apply less force?

Jennifer
7d877da0fad6db8461cb454bd7924c70.jpg


Sent from my SAMSUNG-SM-G890A using Tapatalk
 

mecompco

Member
Joined
Apr 24, 2015
Messages
1,607
Location
Fairfield, Maine
Jennifer, I don't think it is the force that's causing the cracks. Force applied when the parts are too far out of alignment, can of course.

I think having perfectly clean tubes is mandatory in my book. I'll usually roll up some 240 paper around a transfer punch and chuck it in my drill, then spin it up inside my tubes--gets rid of any contamination. If I have any inkling that my blank is fragile, I'll spend some extra time sanding to relieve the fit a bit and use blue Loc-Tite if necessary.

Oh, and I'm sure you are chamfering the tubes after they've been squared--makes assembly much easier and less stressful on the components.

Regards,
Michael
 

edicehouse

Member
Joined
Jun 8, 2011
Messages
3,515
Location
Suffolk, VA
First does she debur inside the tube before inserting the nib and other components?

I use an arbor press it was $20 from Harbor freight (well was a Christmas gift several years ago from the inlaws. I took a piece of pine 1x2 and drilled a small 7 MM hole in it. I put in the transmission then put the transmission in the hole and put the nib in. Making sure everything is straight.

What it sounds like is she is a little bit at an angle during assembly, or as someone just said some stuff not cleaned out in the tube.

Is she using CA or apoxy when putting tubes in? I notice that the apoxy seems a lot easier to clean out.

Using the arbor press from Harbor freight (don't forget your 20% or 25% coupon) for the last 3 and a half years or so, I have had a couple sets of 7 MM that I honestly don't think it was operator error; it seemed all the tubes were just a fraction too small. Any of the cracks were I let the parts go in at an angle.
 

jennera

Member
Joined
Feb 12, 2017
Messages
236
Location
Texas
She is deburring and I think she is having problems holding everything together and tightening the clamp so sometimes they do not assemble straight.

There is a harbor freight nearby and Brian (her Dad) is always looking for an excuse to go there so we will check out the Arbor presses.

Rebecca is interested in turning some other things like pepper mills. Will be Arbor presses open enough to press larger items? It looks like it can do things about 5 1/2" tall or long?

Sent from my SAMSUNG-SM-G890A using Tapatalk
 

jennera

Member
Joined
Feb 12, 2017
Messages
236
Location
Texas
I hope to have our Internet back on tomorrow and can check more of the suggestions out on the computer! It is hard sharing videos and links with Brian and Rebecca on my phone.

Will using a CA finish help prevent some of the cracks that appear around the top of the pens? She tried her first CA finish this weekend and it was not flawless but I think she was pleased with the results. Just 2 coats of thin but it was much shinier than the friction polishes she has been using.

Here is a photo of one that cracked. It isn't happening on every pen.

Jennifer

d52166488cd9cc340db9d69d557e3290.jpg


Sent from my SAMSUNG-SM-G890A using Tapatalk
 
Last edited:

mdburn_em

Member
Joined
Mar 16, 2006
Messages
679
Location
Chesapeake, VA, USA
Jennifer,
The arbor press won't open up enough for a pepper mill unless it's a small mill. I don't know how much pressing there is in a mill since I've not made one but if you're going to make one, why make a small one?
The CA finish will not hide a crack. If the black is cracked to start with, then use, you can create a slurry with sand dust and ca and fill the void or use some type of man made material like imitation turquoise to fill voids and cracks. That will turn our pretty spectacularly. The photo you showed appears to be something that happened during assembly and the CA will not help with that. That type of cracking has happened to me when I used my pen press and the pieces were not perfectly aligned. I am going this weekend to get the arbor press from Harbor Freight. I think it will be easier to keep the pieces aligned letting gravity assist me rather then having gravity work against me. My particular pen press has gotten slightly out of alignment so it is particularly troublesome and tends to want to malign everything.
 

duncsuss

Member
Joined
Jun 29, 2012
Messages
2,160
Location
Wilmington, MA
Here is a photo of one that cracked. It isn't happening on every pen.

That's a great pity -- it was a nice looking pen, and all the hard work has been done at this point. If it makes you feel any better, I can tell you that it's the kind of thing that still happens to me if I don't pay attention to what I'm doing.

The usual reasons why it happens to me:

1) There's some glue from when the tubes were glued in that got inside the brass tube.

It only takes a very small amount -- roll up a small piece of 220 grit sandpaper and polish the inside of the tube end. Any left over glue will show up under a bright light -- I usually scrape it out with an X-acto knife, then sand again to check that I got it all.

2) There's a burr on the inside edge of the brass tube.

You can remove the sharp inside corner using an X-acto knife, a metal-worker's de-burring tool, a countersink drill bit ... putting a chamfer on the corner makes it easier to get the components lined up and started when you are pressing them in.

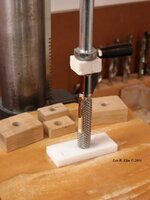
3) The component goes in crooked -- or -- the pressing tool twists while the component is being pressed in.

I started out using wooden screw clamps, but found the two parts would easily get out of alignment. Then I tried the squeeze-grip clamps, and I found they'd over-squeeze the components.

I used my drill press for a while -- that worked very well, but now I use my lathe. The great thing is I can let go of the crank handle and it doesn't spring open, it just stops exactly where I got to.

4) It went in too far -- applied too much pressure and it forced the component into the tube beyond where it was supposed to stop.

Again, I find the crank handle on the lathe gives much better fine control and lets me stop at exactly the point where the parts are "in" but not "in too far".

HTH
 

gtriever

Member
Joined
Apr 23, 2017
Messages
1,135
Location
Paducah, Kentucky
I tried a diy pen press for the first few I built, and was surprised by the amount of force needed. Having a Harbor Freight store 5 minutes from the house, I bought a 1 ton arbor press. Much better!
 

donstephan

Member
Joined
Jul 24, 2016
Messages
255
Location
Cincinnati Ohio
The earlier comment about using the pipe clamp vertically is inspired. You may want to buy an 18" length of the same diameter pipe, threaded at both ends, and a pipe flange with the same size threads. One end of the pipe clamp threads onto one end of the pipe, slide the other end of the clamp on the other end. Screw the pipe flange to a scrap piece of wood perhaps 12" square, then thread the other end of the pipe into the pipe clamp.

But I like the idea of wooden plugs in the lathe headstock and tailstock better, even though that would be horizontal clamping and the above would provide vertical clamping. If the ends of the wooden plugs are dimpled slightly when turned, the centers would be clearly marked and there would be less chance of the ends of the pen slipping off I think than the metal surfaces of the pipe clamp.
 

jennera

Member
Joined
Feb 12, 2017
Messages
236
Location
Texas
PM he your address. I have an old pen press I bought from woodcraft about 7 years ago. Does not get much use, prefer using my drill press for assembly. Been looking for a good home for it.
Just saw this! End of school year activites have been keeping us pretty busy. PM on the way! Thank you!

Sent from my SAMSUNG-SM-G890A using Tapatalk
 

Woodchipper

Member
Joined
Mar 15, 2017
Messages
5,207
Location
Cleveland, TN
I have the plastic pen set from Woodcraft. Can't justify the cost of their pen press at this time. I did make a nib "protector" from a piece of plywood with a small hole drilled in it for one pen.
 

jennera

Member
Joined
Feb 12, 2017
Messages
236
Location
Texas
I have the plastic pen set from Woodcraft. Can't justify the cost of their pen press at this time. I did make a nib "protector" from a piece of plywood with a small hole drilled in it for one pen.
We have thought about doing that for her pipe clamp and shortening the pipe to make it more manageable. Honestly, she is cracking fewer pens and not complaining. Plus, she goes through 5-10 kits a week so my money has been spent on kits.

With school out she might just end up with a large box of trimline kits if she spends as much time turning as she wants. Plus she is going to visit grandpa sometime who is going to teach her some more stuff. Bowl and spindle turning I think. Her grandma has requested some Christmas ornaments so I think I can pick up a lot of those kits fairly cheap too or she can just turn without kits after grandpa teaches her some more stuff. That is a topic for another thread!

Sent from my SAMSUNG-SM-G890A using Tapatalk
 

jennera

Member
Joined
Feb 12, 2017
Messages
236
Location
Texas
I have been using my drill press for the past 10 years with no issues.

Les
Thanks for the photo! That looks like something we can easily try. The bed on our drill press isnt exactly level though and is something her dad has been meaning to fix. It causes problems with drilling out the smaller blanks. She will have more time this summer to try different tools and tehniques!

Jennifer

Sent from my SAMSUNG-SM-G890A using Tapatalk
 

duncsuss

Member
Joined
Jun 29, 2012
Messages
2,160
Location
Wilmington, MA
The bed on our drill press isnt exactly level though and is something her dad has been meaning to fix

There's a trick I learned for testing if the table is level, it's really simple (once you have been told it!)

Get a piece of stiff wire -- an old wire coat hanger, for example -- just a little longer than the gap between the drill press chuck and the table.

Clamp one end in the chuck as you would a drill bit.

Bend the wire so the other end is just touching the table near its outside edge.

By hand, rotate the chuck ... if the tip of the wire remains "just touching" all the way around, the table is level. If it starts to dig in, that point of the table is high. If there's a gap, that point of the table is low.
 
Top Bottom