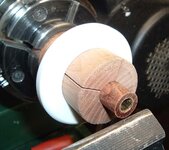
New way to trim the ends.

Signed-In Members Don't See This Ad

Dale Allen

Member
Joined
Oct 27, 2012
Messages
1,384
Location
Massillon, OH
Looks like I don't need to sharpen my pen mill or get a new one after all. :biggrin:
I had been messing around with these wooded chuck adapters and it turns out to be a great way to trim the ends. It just takes some time to set up but it works good. I checked all 4 ends by running the pen mill against them by hand and they are all good to go. :) The ultimate test will be when I get this pen finished and check. You know how you can hold it up to the light and look for a gap between the hardware and wood? Then I'll know.
I have several sizes made and I have been turning the blanks round prior to any cutting. What it does do is adds time to the whole process. However, I think I'm done trying to make a pen fast. I have dozens of those. Besides, it is the process that is fun and the result that is satisfying. And, I just cannot seem to stop so if they take longer now then so be it.
If more details are needed, just ask.
 

Attachments

  • clutch.jpg
    clutch.jpg
    61.9 KB · Views: 439
Signed-In Members Don't See This Ad

Dale Allen

Member
Joined
Oct 27, 2012
Messages
1,384
Location
Massillon, OH
Joe. Do you check the end in any way other then by sight?
I used a small machinist square and held the blade to the end. Looking at it through my lighted 4x magnifier, it seemed to be straight across. I'm thinking that is a good test.
 

sbell111

Member
Joined
Jan 16, 2008
Messages
3,465
Location
Franklin, TN
Cool idea. It wouldn't work for me as my blanks tend to be square or way off square.
Just round the blanks 1st then square them using this method. It does take a little more time, but it's really accurate.

I'm glad that it works for you, but my current method works for me. There's no reason for me to make a change, especially one that increases the number of steps.
 

flint

Member
Joined
Jun 26, 2004
Messages
5
Location
Kentucky
Good idea Dale. I would like a few tips on how to make the chuck
if you don't mind.
Thanks.
flint
 

watch_art

Member
Joined
Dec 21, 2011
Messages
1,819
Location
hot springs, ar
This is a similar chuck as what was in the Japanese pen maker's video - that was posted around here the other day...

There were three or four videos posted in the thread...

hmmmm...
 

Dale Allen

Member
Joined
Oct 27, 2012
Messages
1,384
Location
Massillon, OH
I watched several of those videos. Very interesting! They are changing the blank without stopping the chuck. I'm not that fast, nor do I want to be.
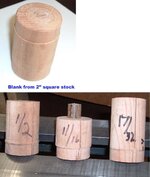
Flint. I attached another image that shows one of the blanks that I turned from a long piece of 2" x 2". Not sure what kind of wood it is.
Anyway, I cut a tennon to fit the jaws of my scroll chuck. I then mount it in the scroll chuck and mark where all 4 of the jaws go and mark #4 so I can position it exactly the same each time. I also mark the 4 places for cutting on the band saw.
Then, depending on the size needed, I drill the center hole. On the 1/2", I can go just a little each way from that size but not much. I have more wood so I can make more sizes. You can see I have 3 other ones.
The one in the chuck that I pictured at the beginning of this thread is the only one that I made a collar for. When I saw the videos mentioned, I wanted to do the same thing with a ring to tighten the chuck. I was using a worm drive clamp. I found that it put more pressure on the tangs where the drive mechanism was so I needed a more even and consistent method. What I did was sacrificed an old plastic cutting board. Marked a 3" circle and cut that out on the bandsaw. Then put that in the scroll chuck wuth a backing board the same size and cut out the center to fit the wood chuck. Oh yea, I also tapered the wood chuck about 1/8" from the end toward the scroll chuck. This way the ring tightens as I tap it toward the opening and gives a good tight consistant fit.
 

Attachments

  • chucks.jpg
    chucks.jpg
    35.4 KB · Views: 146

PenMan1

Member
Joined
Jul 8, 2009
Messages
6,380
Location
Eatonton, Georgia
Good job, Dale! The first step to becoming a serious pen maker is to eliminate the pen mill from your tool bag.

I SWEAR, I can look at the fit and finish of pens and sort them by which makers use pen mills and those who take the time to square and fit by hand.
 

PenMan1

Member
Joined
Jul 8, 2009
Messages
6,380
Location
Eatonton, Georgia
If you really want to see the accuracy of a pen mill, square a cheap laser pointer to your tool rest. Then, press fit one end of the hardware. Put the "other" bushing (or 60 degree point) on the open end and hand spin the lathe with the laser on.

That'll help you figure out that its time to "pitch" the pen mill.
 

Dale Allen

Member
Joined
Oct 27, 2012
Messages
1,384
Location
Massillon, OH
Randy, I used my 1/2" square end scraper.
Went real easy at moderate speed and did so while looking through my 4x lighted mag.
 
Top Bottom