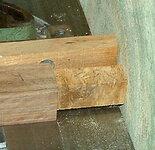
My homemade squaring jig

Signed-In Members Don't See This Ad

JimB

Member
Joined
Mar 18, 2008
Messages
4,683
Location
West Henrietta, NY, USA.
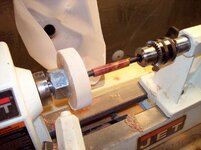
I know there have been several threads on squaring blanks and also cleaning up the ends of a finished blank to get the excess CA or other finish off the blank. I still use a pen mill when I have a lot of trimming to do but I use this home made set up for taking off just a little wood or for removing that annoying bit of CA on the ends after finishing the blank. I was to cheap to buy another gadget and didn't have the patience to make sure my disc sander table was square to the disc. So I made this. I already had everything except the hex nut (1 X 8 for my Jet). It is just like what many do on the disc sander but is on the lathe. I like this a lot because it is quickly removed and is always square when mounted again.

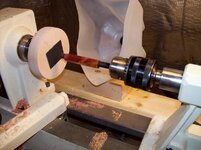
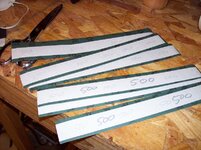
This was very easy to make. I roughed the hex nut with sandpaper and glued (thick CA) it to a scrap piece of wood. I also ran a bead of CA around the hex nut / wood joint and sprayed with accelerator (I didn't want to get it glued to my headstock). I mounted it on the lathe and knocked off the corners. Then I trued the surface using a fingernail bowl gouge in a scraper position. This was the most time consuming part but still only took a few minutes. I placed my Jacobs chuck in the tailstock with a punch from my HF set. The little black square on the wood is the sandpaper. It is held in place using turners tape. I make these in strips a little wider than the tape and cut them into squares. I make the strips in several different grits.

To use just slide a blank onto the punch and slide the tailstock up so the punch is close to the sandpaper. Turn on lathe and slide the blank into the sandpaper while holding it against the punch. It's so easy I don't bother locking the tailstock. I just hold it with one hand and slide the blank with the other. A few seconds and the excess CA is removed. The sandpaper peals right off and is quickly replaced.
 

Attachments

  • SquaringJig 030.jpg
    SquaringJig 030.jpg
    62.3 KB · Views: 2,548
  • SquaringJig 031.jpg
    SquaringJig 031.jpg
    63.4 KB · Views: 2,891
  • SquaringJig 034.jpg
    SquaringJig 034.jpg
    82.7 KB · Views: 1,566
Signed-In Members Don't See This Ad

ehickey

Member
Joined
Jun 14, 2008
Messages
64
Location
Cypress, Texas, USA.
That is very clever. I also use the lathe for most of my squaring. However, I chuck the blank into a 4-jaw and then face-cut using the skew. If I'm cleaning up the edges from finishing, I use the barrel trimmer. With the barrel trimmer, I never have the right sized center on it, so I'm sure it doesn't help me.

I think your idea is great for doing both effectively and quickly.
Great idea!
 

KenV

Member
Joined
Oct 28, 2005
Messages
4,720
Location
Juneau, Alaska.
One caution --

CA glue is brittle -- one sharp blow will cause it to crack/fail and it then could be a thrown object. That brittle nature is how some mount bowls on blocks and separate them with a sharp blow. Seen it happen -- S0- drill a recess for the nut and use epoxy to have a better mounting that will not be as likely to become a high speed thrown object.

One suggestion for improvement -- get the "nylock" nuts with a nylon locking ring. I heat the ring with a propane torch to soften the nylon and pull it out with a small dental pick. That space allows the nut to bear against the face of the headstock and not bottom out on the end of the threads. (also called relieving the threads) an will be a more lathe friendly mount. I will grab some photos.


Great Idea!!! The above are suggested improvement on a good practical approach.
 

JimB

Member
Joined
Mar 18, 2008
Messages
4,683
Location
West Henrietta, NY, USA.
Eric - You won't believe how fast and easy this is for cleaning up the edges after finishing. Literally about 1 or 2 seconds with a light touch on each end of the blank. For squaring a blank it doesn't remove much material since it is using such a small piece of sandpaper. However, i find it hard to use a barrel trimmer and remove just the right amount of material to get it exactly where it should be in relation to the tube. This is a great tool for removing that last 1/32" or 1/16" of wood to get it perfect to the brass tube.

Rob (or anyone else) - feel free to copy. You might want to use 2 part epoxy instead of CA. I think the epoxy will probably bond the hex nut and wood better. Also, if you plan to make a larger one for heavier sanding (like a disc sander on the lathe) you shouldn't just glue the hex nut to the surface. You should use a forstner bit and drill into the wood a little so about 1/2 the hex nut is into the wood. When you glue it you should also fill the gaps. This will give it added strength and still allow you to grab it with a wrench if you need to.
 

KenV

Member
Joined
Oct 28, 2005
Messages
4,720
Location
Juneau, Alaska.
Grabbed the camera and got some nut pictures

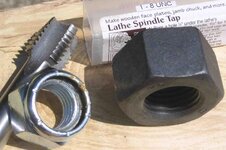
Black nut is 1 1/4 by 8 for the big lathe. These threads have not been releived and a 1/4 inch flat washer of spacer of hard board is needed to keep the threads from bottoming out on the nut leaving a gap between the end of the nut and the shoulder of the head stock. 1/4 inch disk of steel or aluminum works too.

The nylock nut in 1 by 8 for the jet midi (that one is in Arizona) is shown with the nylon ring removed. The space between the end of the nut an threads give the thread relief with that end towards the headstock.

Other choice is to use the thread tap shown -- Jerry Beall sells these theough several vendors - and I think I have one for the big lathe too.

The little lathes -- Taig/bonnie Klein have 3/4 ny 16 threads and there are nylock nuts that work slick on those headstocks too (Old Craftsman uses that thread on the headstock).
 

Attachments

  • NutsAndTaps.jpg
    NutsAndTaps.jpg
    61.5 KB · Views: 1,538

nava1uni

Member
Joined
Mar 30, 2008
Messages
4,936
Location
San Francisco, CA, USA.
I have several of these chucks made out of maple. I saw Bonnie Klein make this type of holder in Utah last year and you can glue bowl blanks to it and if you put paper between the pieces it will come off easily with a parting tool. I like the idea of using this type of set up for sanding blanks. I can also see using it for also squaring other things.
 

JimB

Member
Joined
Mar 18, 2008
Messages
4,683
Location
West Henrietta, NY, USA.
It's also a great way to make jam chucks for small projects. Most people mount a jam chuck into a scroll chuck but this will do the trick as well.
 

PenPal

Member
Joined
Nov 29, 2006
Messages
2,708
Location
Canberra, A.C.T., Australia.
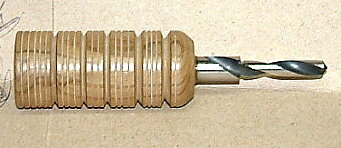
Squaring jig. Barrel Trimmer

About fifteen years or more ago certainly in the mists of time here in Australia the only Barrel Trimmer available was a Step Drill that cost me over 20.00 dollars. please find a pic of my orinal Step drill made for Slimline Pens. It has been used for a tremendous number of pens and since I have a percentage of Irish ancestry am currently getting one ground from a 12 mm drill in the USA to have a spare to be sure to be sure. Current pricing around double my original. people used to use them in hand drills but I feel you lose the sensitive feel needed for some timbers hence it is housed in a handle.
For a squaring jig I use a 1 1/2 inch square 4 inches long, centre drilled, fitted with a cut off mandrel pen blank slides on. The block of wood with the mandrel is at right angles to the disk sander gently faced.
 

Attachments

  • DSCF0003.JPG
    DSCF0003.JPG
    33.1 KB · Views: 495
  • DSCF0012.JPG
    DSCF0012.JPG
    23.8 KB · Views: 438
  • DSCF0001 [].JPG
    DSCF0001 [].JPG
    74.5 KB · Views: 490
Last edited:

BigguyZ

Member
Joined
Aug 8, 2007
Messages
764
Location
Minneapolis, Minnesota, USA.
This is brilliant. I think I'll use a block screwed into a faceplate instead, but the same principle will work. Also, the thing I don't like about the PSI jib that I bought, is the slop between the blank and the rod it rests on. Too much play, IMHO. So, using this method, I can mount one of the HF transfer punches that fits most tightly in the tube. That way, it'll be much more solid to use.

Thanks!
 
Top Bottom