Installing slim transmissions

Signed-In Members Don't See This Ad

Rick_G

Member
Joined
Nov 30, 2007
Messages
1,994
Location
Bothwell, Ontario, Canada.
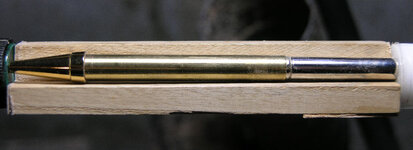
When I first started installing the transmissions for the slims there was always press it in, test for length, press a little farther, "Oh d...n I went to far". Watching utube video's I'm not the only one. Trying to figure a way around this I came up with this simple fix. I put my pens together with the lathe but it should work with any method you use. Get a transmission installed to the length you want and then cut a piece of scrap wood as shown in pic. 2 to the length of the section of pen. ie end of transmission to tip of nib.
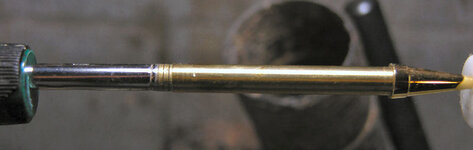
Pic. 1 install the nib and start the transmission as normal.
Pic. 2 Place the block of wood against the pen section and press the transmission in the rest of the way. It will stop when you hit the wood with your press.
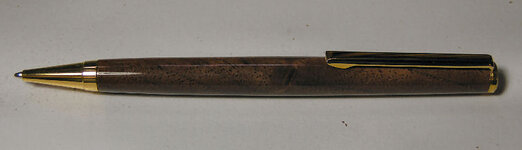
Pic. 3 Showing the tip extended the length I like.
Pic. 4 completed pen.
Saves me time and no more trial and error to get the transmission seated just right. Works for slim lines, 7mm euro and cartridge pens, basically anything using this transmission with the Cross refill.
 

Attachments

  • Image3.jpg
    Image3.jpg
    29 KB · Views: 250
  • Image2.jpg
    Image2.jpg
    45 KB · Views: 288
  • Image4.jpg
    Image4.jpg
    28.2 KB · Views: 249
  • Image5.jpg
    Image5.jpg
    24.9 KB · Views: 225
Signed-In Members Don't See This Ad

Edgar

New Member Advocate
Staff member
Joined
Feb 6, 2013
Messages
6,897
Location
Alvin, TX 77511
Thanks for posting this, Rick. I'm going to make one of those! :)

I'd like to see this as a tutorial for our library. Even though it would likely only be a short 1-page tutorial, that's a great place to put things like this so they can easily be found. (hint, hint) :biggrin:
 

KenV

Member
Joined
Oct 28, 2005
Messages
4,720
Location
Juneau, Alaska.
I have a couple blocks of wood marked 1.95 inches that fit next to the pen in the pen press. Think that came from Don Ward once upon a time.

Rick -- how long is your block?
 

chartle

Member
Joined
Mar 13, 2015
Messages
1,287
Location
Pgh, PA
Some people have posted that they can't rely on this method since not all transmissions are no the same. I guess if you get all your kits from one supplier it should work.
 

Sylvanite

Member
Joined
Jul 18, 2006
Messages
3,113
Location
Hillsborough, North Carolina, USA.
I see variation between transmissions even from the same manufacturer and manufacturing batch, so I don't rely on a single seating jig. I use multiple stop blocks in steps of 0.010", checking refill extension between each one. That way, I sneak up on a good fit without overshooting.

I hope that helps,
Eric
 

larryc

Member
Joined
Oct 2, 2009
Messages
1,135
Location
Mableton, GA (Near Atlanta)
Another thing frustrating about the transmissions is installing one and then finding there is an obstruction so the refill won't pass through. I've gotten where I test all before installing them.
 

Rick_G

Member
Joined
Nov 30, 2007
Messages
1,994
Location
Bothwell, Ontario, Canada.
I have a couple blocks of wood marked 1.95 inches that fit next to the pen in the pen press. Think that came from Don Ward once upon a time.

Rick -- how long is your block?

I just measured it with calipers 3.995"
chartle said:
Some people have posted that they can't rely on this method since not all transmissions are no the same. I guess if you get all your kits from one supplier it should work.

Maybe I've been lucky, I've been using this for several years now with no problems. At least not enough variation that it mattered. I think all my slim kits came from William Woodwrite. I'll keep using it and if I run into a problem on the odd pen it can be fixed.
 

Mr Vic

Member
Joined
Aug 11, 2008
Messages
1,865
Location
Falcon, CO
I use a piece of Angle Aluminum cut to length. Latest issue I've had is the differences in the threaded portion of the refills.
 

MTViper

Member
Joined
Jul 22, 2009
Messages
732
Location
Clyde, Texas
When I bought my first pen kit, my Woodcraft lathe instructor said to assemble the nib then press the transmission in until the top of the transmission is 10.1 cm from the tip of the nib. Works every time, but I think a V-block like this would mean I didn't have to measure any more and the pen would be supported so the transmission goes in straight. I like it.
 

randyrls

Member
Joined
Feb 2, 2006
Messages
4,829
Location
Harrisburg, PA 17112
I too have had differences in overall length when pressing in transmissions. I worked out a method of watching the point as the transmission is pressed in.

Works slick! I will post a photo or document after Easter...
 

dogcatcher

Member
Joined
Jul 4, 2007
Messages
2,361
Location
TX, NM or on the road
I use a piece of Angle Aluminum cut to length. Latest issue I've had is the differences in the threaded portion of the refills.

I solved that problem by using Cross refills. So far so good, but now my next batch of Cross will likely be a mess.

My system is a hole in a block of aluminum, drop the finished barrel in the hole, set the transmission in place and whack it with a mallet. The hole is just the right depth so that when the transmission is installed it is level with the top of the block of aluminum. At the bottom of the hole is an adjustment screw that I can shorten or lengthen the hole.

I also use an "eyeball system" that I lay the transmission with refill screwed in, barrel with nib together and then eyeball the depth comparing this to the depth of the hole in my aluminum block. This way I can adjust the hole deeper or shorter to fit irregular sized parts.
 
Top Bottom