robutacion
Member
Hi peoples,
Most of you folks, should be receiving some of the Australian old Cypress pen blanks that, I sent away in my first Mr. Anonymous game, the majority selected the "Cross" cut blanks and I felt that, I should bring your attention (for those less experienced) that, any angled cut wood blank, is more fragile/difficult to work with than the normal "strait/with the grain" cut.
Some wood species become more fragile than others and all cut in cross gain are always more fragile and any diagonal cut ones however, there is no other cut that can be as visually more attractive, than the cross cut blanks (exceptions do apply...!).
I don't think that is necessary for me to spend the time explaining why cross cut wood blanks become so fragile, if necessary, I can explain all that in one other opportunity but for now, I just want to make sure that, all those that will receive those cross cut Cypress blanks, know how to handle them and not getting frustrated because they snap so easily.
The very first thing, is to avoid to drop them in a hard surface, they will shatter, at least in 2 pieces. Most of my cross cut blanks are made from the same area of the medium size log, there are only 2 boards I can cut from each log that can provide the grain, the way I want and there is, with the pith/center of the log, going into opposite directions. Quite often the pith is at the blanks center but, not always.
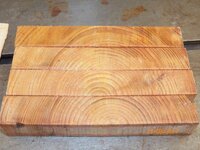
The second most important thing to do, is to remember that, any oily/resin woods, such as these, the very reason why they smell the way they do, makes the wood more fragile, each growth ring has a layer of oil/resin so, separation at those locations are a fact, if care is not taken.
Any diagonal wood cut pen blank that you are concerned about, before you start working it, should be treated the same way as these and many other cross cut pen wood blanks...!
It takes little time and effort, to strengthen these blanks in preparation to start making a pen, every step is important but, getting it to stay together to cut it into 2 pieces or keeping it together for drilling, regardless if they are 2 short pieces or one longer one, this small number of steps, will ensure that you are giving the fragile blank, every possibility to transform it into a magnificent pen, and not some bits and pieces of split/separated wood...!
All materials necessary are common materials and I'm sure, you will have no difficulty in putting together what you need...!
So, lets start this;
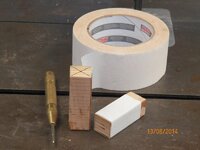
*-1) This is what you need.
- 4 x solid wood slices (I used dry Olive wood sapwood) at about 1 or 2mm thick (depending on the wood used) x 21mm (blank width and length)
- Thick CA (you don't want soaking, you need the CA to stay at the surface to bond the wood slices)
- Accelerator
- Masking tape
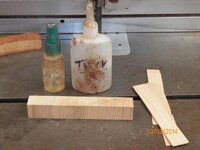
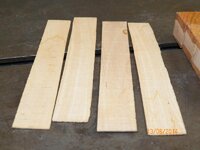
*-2) Clean any wax, paint or any other protective coating from the blanks surfaces (sander)
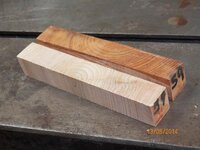
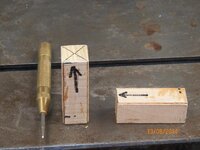
*-3) Start gluing the wood slices on the end-grain of the blank, first. Make sure you have position the blanks as you want to appear in the pen, mark it and then transfer those marks into the slice you just glued. Maintaining the same blank position on your work table (bandsaw table to me...!:biggrin .
.
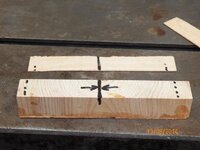
I spray the wood slice side that will be in contact with the CA, with some accelerator, the bond is instantaneous so, make sure you get it in the right position on contact...!
*-4) After the 2 end-grain side are done, take it to the sander and flat any wood slice overlap.
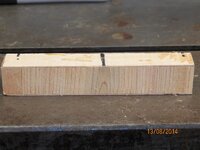
Glue the other 2 slices into the blanks' other sides
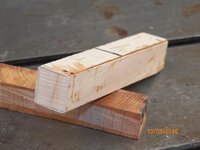
*-5) At this stage, you have to decide if you want to use the masking tape or not, I sure advise that you do, the glue can fail slightly on the oily wood, the tape will make sure, everything stays together, even though will not avoid the wood to separate, if the glue fails miserably and your drill bit gets a catch while drilling regardless if using a drill vice or the lathe, those sort of forces can only be stopped with a good adhesion from the wood slice to the blanks 4 surfaces...!
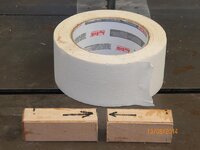
*-6) From here on, you proceed with the same steps as you would do in any "normal" blank
Well, this was a quick tutorial on this issue, I know of many fellow pen turners that, would not use anything than straight cut wood blanks, due to difficulties that were experienced in, making a pen out of a diagonal and particularly any cross cut wood blank however, and since I explain that to them , they were certainly missing out on some of the most beautiful wood blanks they could ever use, and explain to them these same steps, they are all of a certain, using more cross and diagonal cut wood blanks than, anything else. Something should have worked, huh...???:wink::biggrin:
Best of luck...!
Cheers
George
Most of you folks, should be receiving some of the Australian old Cypress pen blanks that, I sent away in my first Mr. Anonymous game, the majority selected the "Cross" cut blanks and I felt that, I should bring your attention (for those less experienced) that, any angled cut wood blank, is more fragile/difficult to work with than the normal "strait/with the grain" cut.
Some wood species become more fragile than others and all cut in cross gain are always more fragile and any diagonal cut ones however, there is no other cut that can be as visually more attractive, than the cross cut blanks (exceptions do apply...!).
I don't think that is necessary for me to spend the time explaining why cross cut wood blanks become so fragile, if necessary, I can explain all that in one other opportunity but for now, I just want to make sure that, all those that will receive those cross cut Cypress blanks, know how to handle them and not getting frustrated because they snap so easily.
The very first thing, is to avoid to drop them in a hard surface, they will shatter, at least in 2 pieces. Most of my cross cut blanks are made from the same area of the medium size log, there are only 2 boards I can cut from each log that can provide the grain, the way I want and there is, with the pith/center of the log, going into opposite directions. Quite often the pith is at the blanks center but, not always.

The second most important thing to do, is to remember that, any oily/resin woods, such as these, the very reason why they smell the way they do, makes the wood more fragile, each growth ring has a layer of oil/resin so, separation at those locations are a fact, if care is not taken.
Any diagonal wood cut pen blank that you are concerned about, before you start working it, should be treated the same way as these and many other cross cut pen wood blanks...!
It takes little time and effort, to strengthen these blanks in preparation to start making a pen, every step is important but, getting it to stay together to cut it into 2 pieces or keeping it together for drilling, regardless if they are 2 short pieces or one longer one, this small number of steps, will ensure that you are giving the fragile blank, every possibility to transform it into a magnificent pen, and not some bits and pieces of split/separated wood...!
All materials necessary are common materials and I'm sure, you will have no difficulty in putting together what you need...!
So, lets start this;
*-1) This is what you need.
- 4 x solid wood slices (I used dry Olive wood sapwood) at about 1 or 2mm thick (depending on the wood used) x 21mm (blank width and length)
- Thick CA (you don't want soaking, you need the CA to stay at the surface to bond the wood slices)
- Accelerator
- Masking tape


*-2) Clean any wax, paint or any other protective coating from the blanks surfaces (sander)

*-3) Start gluing the wood slices on the end-grain of the blank, first. Make sure you have position the blanks as you want to appear in the pen, mark it and then transfer those marks into the slice you just glued. Maintaining the same blank position on your work table (bandsaw table to me...!:biggrin

I spray the wood slice side that will be in contact with the CA, with some accelerator, the bond is instantaneous so, make sure you get it in the right position on contact...!
*-4) After the 2 end-grain side are done, take it to the sander and flat any wood slice overlap.

Glue the other 2 slices into the blanks' other sides

*-5) At this stage, you have to decide if you want to use the masking tape or not, I sure advise that you do, the glue can fail slightly on the oily wood, the tape will make sure, everything stays together, even though will not avoid the wood to separate, if the glue fails miserably and your drill bit gets a catch while drilling regardless if using a drill vice or the lathe, those sort of forces can only be stopped with a good adhesion from the wood slice to the blanks 4 surfaces...!


*-6) From here on, you proceed with the same steps as you would do in any "normal" blank

Well, this was a quick tutorial on this issue, I know of many fellow pen turners that, would not use anything than straight cut wood blanks, due to difficulties that were experienced in, making a pen out of a diagonal and particularly any cross cut wood blank however, and since I explain that to them , they were certainly missing out on some of the most beautiful wood blanks they could ever use, and explain to them these same steps, they are all of a certain, using more cross and diagonal cut wood blanks than, anything else. Something should have worked, huh...???:wink::biggrin:
Best of luck...!
Cheers
George
Last edited:
