BradG
Member
And so it begins...
The methods i will discuss in this thread are methods i use which work well for me. There are many scientific calculations which can be applied for calculating how much Ampre is required which is determined by the surface area of the work piece, to the temperature of the acid bath along with acid concentrations and voltages.
As all of the parts i anodise are small, i generally just use a 12V 2A power supply.. more on that when we get to it")
I would also like to point out you are using ACID... so be careful, and please if your not confident on what you are doing, you may want to take a pass on this. please read as much safety information as possible with regards to not only handling Acid but using it safely
THROUGHOUT THE WHOLE PROCEDURE YOU SHOULD BE WEARING CHEMICAL RATED GLOVES AND GOGGLES AT A MINIMUM.
You also need very good ventilation. what isnt shown in these pictures is the powerful fansucking the air straight outdoors
Try and avoid using water which has impurities such as tap water. buy alot of distilled water, you will get through alot of it. use it for rinsing and cleaning your parts, for making up your dye solution and your acid bath. I even use it for boiling the piece sealed at the end.

You will need a suitable material for making the Cathodes of the tank. (the negative plates) I use Lead flashing. I would advise this as many metals will react in the tank causing undesired results

Here i have a 3L container, with two pieces of lead flashing bent over either side.

I am using very strong Acid. This is 97% Sulphuric acid, and pretty nasty too. Hence why i am wearing chemical rated gauntlets, a gas mask, and overalls. I would not recommend using Acid this strong unless you are very confident on what you are doing. it needs to be heavily diluted to around 10 - 15% I have added 1800ml of distilled water, and 200ml of sulphuric acid

A piece of wire (i used a piece of 6A mains cable as thats what i had laying around) which connects the two pieces of lead together. As you can see in the picture on the right hand side another wire is attached which is the negative of the power supply, which happens to be 12V 2A. This then completes your Cathodes.
For safety, the acid bath is stodd within another container to prevent spillages etc

I have taken a piece of wood which is the width of the outer container, and drilled a hole through the middle of it.
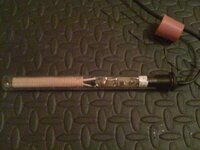
A piece of aluminium welding wire has been passed through and then bent into a V and pushed down the barrel of this pen piece to secure it.
An additional note
The part must be perfectly clean before anodising! Anodising will not hide a poor finish, it will enhance it. a finger print will also show up in the anodised layer from the grease on your fingers effecting the results. Always wear gloves not just for Acid protection, but to keep those prints off your pieces. Soak your pieces in caustic soda for a couple of minutes prior to anodising. this will strip off any dirt. after this place it into a container of distilled water for rinsing and scrub it with a tooth brush, still with your gloves on. when you are sure its perfectly clean, you may start to anodise

The top half of the aluminium wire is kinked over to prevent the part from slipping down, so that it is freely suspended not touching the sides or the bottom of the container.
I then connect the negative wire of the multi meter to this, and the positive wire of the multi meter to the postive of the power supply.

With the multi meter set to read amps, it will give you a reading of the current being drawn.
When you Anodise you are creating an insulating layer over the piece of aluminium. As this layer gets thicker and stronger the conductivity of the piece will decrease. A general rule of thumb for anodising for good results is about an hour. Alternatively doing it as i have, when the Ammeter shows 250mA, its hardly conducting compared to the value shown in the picture. At this point i would stop Anodising.

An image of the setup running.

After the part has finished anodising, rinse it off in distilled water, and place it into a pan of the dye colour of your choice. I personally prefer to use professional anodising dye as i find it has better lightfast properties and therefore is alot more resiliant to fading. Many however simply use clothes dye. At this point, you will most probably notice the piece has changed in the following pictures! and thats because i had a blunder. Always keep the temperature of the dye solution between 55'C and 60'C ... if it raises higher than this it will begin sealing the oxidised layer before taking up the dye. In my case, the phone rang and i didnt turn off the heat......... well, all's not lost as you can place the piece into Caustic soda for 10 minutes which will strip off anodising! this is also great if you have something you dont like the colour of and would like to reanodise it. simply scrub off after a soak in caustic, and you can start from scratch.

After the piece has been in the dye, drop it into some near boiling water (anything over 95'C) for half an hour, to seal the oxidised layer

After this, let the piece cool, and take pleasure in admiring your handy work
Now all whats left for me is to go back and fix the part i messed up in the making of this tutorial.
I hope this has been of use to you guys. I've certainly gained alot of knowledge from these forums and would like to return the favour if i may.
The methods i will discuss in this thread are methods i use which work well for me. There are many scientific calculations which can be applied for calculating how much Ampre is required which is determined by the surface area of the work piece, to the temperature of the acid bath along with acid concentrations and voltages.
As all of the parts i anodise are small, i generally just use a 12V 2A power supply.. more on that when we get to it
I would also like to point out you are using ACID... so be careful, and please if your not confident on what you are doing, you may want to take a pass on this. please read as much safety information as possible with regards to not only handling Acid but using it safely
THROUGHOUT THE WHOLE PROCEDURE YOU SHOULD BE WEARING CHEMICAL RATED GLOVES AND GOGGLES AT A MINIMUM.
You also need very good ventilation. what isnt shown in these pictures is the powerful fansucking the air straight outdoors
Try and avoid using water which has impurities such as tap water. buy alot of distilled water, you will get through alot of it. use it for rinsing and cleaning your parts, for making up your dye solution and your acid bath. I even use it for boiling the piece sealed at the end.
You will need a suitable material for making the Cathodes of the tank. (the negative plates) I use Lead flashing. I would advise this as many metals will react in the tank causing undesired results
Here i have a 3L container, with two pieces of lead flashing bent over either side.
I am using very strong Acid. This is 97% Sulphuric acid, and pretty nasty too. Hence why i am wearing chemical rated gauntlets, a gas mask, and overalls. I would not recommend using Acid this strong unless you are very confident on what you are doing. it needs to be heavily diluted to around 10 - 15% I have added 1800ml of distilled water, and 200ml of sulphuric acid
A piece of wire (i used a piece of 6A mains cable as thats what i had laying around) which connects the two pieces of lead together. As you can see in the picture on the right hand side another wire is attached which is the negative of the power supply, which happens to be 12V 2A. This then completes your Cathodes.
For safety, the acid bath is stodd within another container to prevent spillages etc
I have taken a piece of wood which is the width of the outer container, and drilled a hole through the middle of it.
A piece of aluminium welding wire has been passed through and then bent into a V and pushed down the barrel of this pen piece to secure it.
An additional note
The part must be perfectly clean before anodising! Anodising will not hide a poor finish, it will enhance it. a finger print will also show up in the anodised layer from the grease on your fingers effecting the results. Always wear gloves not just for Acid protection, but to keep those prints off your pieces. Soak your pieces in caustic soda for a couple of minutes prior to anodising. this will strip off any dirt. after this place it into a container of distilled water for rinsing and scrub it with a tooth brush, still with your gloves on. when you are sure its perfectly clean, you may start to anodise
The top half of the aluminium wire is kinked over to prevent the part from slipping down, so that it is freely suspended not touching the sides or the bottom of the container.
I then connect the negative wire of the multi meter to this, and the positive wire of the multi meter to the postive of the power supply.
With the multi meter set to read amps, it will give you a reading of the current being drawn.
When you Anodise you are creating an insulating layer over the piece of aluminium. As this layer gets thicker and stronger the conductivity of the piece will decrease. A general rule of thumb for anodising for good results is about an hour. Alternatively doing it as i have, when the Ammeter shows 250mA, its hardly conducting compared to the value shown in the picture. At this point i would stop Anodising.
An image of the setup running.
After the part has finished anodising, rinse it off in distilled water, and place it into a pan of the dye colour of your choice. I personally prefer to use professional anodising dye as i find it has better lightfast properties and therefore is alot more resiliant to fading. Many however simply use clothes dye. At this point, you will most probably notice the piece has changed in the following pictures! and thats because i had a blunder. Always keep the temperature of the dye solution between 55'C and 60'C ... if it raises higher than this it will begin sealing the oxidised layer before taking up the dye. In my case, the phone rang and i didnt turn off the heat......... well, all's not lost as you can place the piece into Caustic soda for 10 minutes which will strip off anodising! this is also great if you have something you dont like the colour of and would like to reanodise it. simply scrub off after a soak in caustic, and you can start from scratch.
After the piece has been in the dye, drop it into some near boiling water (anything over 95'C) for half an hour, to seal the oxidised layer
After this, let the piece cool, and take pleasure in admiring your handy work
Now all whats left for me is to go back and fix the part i messed up in the making of this tutorial.
I hope this has been of use to you guys. I've certainly gained alot of knowledge from these forums and would like to return the favour if i may.
Last edited: