Celtic Knot Squaring Jig

Signed-In Members Don't See This Ad

chartle

Member
Joined
Mar 13, 2015
Messages
1,287
Location
Pgh, PA
OK I'm trying to up my game with more complicated Celtic Knots.

I kind of realize that if the hole is not perfectly square and in the middle of the segmented blank that the knot will be off so I've been working out a way to re-square the blank in relation to the hole after its been drilled. I don't have a great setup to drill blanks but it works fine for pens where being off a 1/16 to an 1/8th at the other end doesn't make a difference.

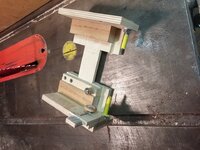
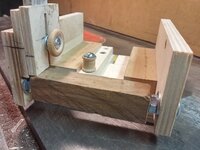
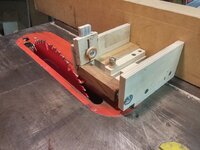
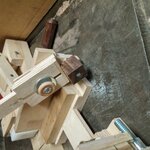
To Fix this I came up with this.

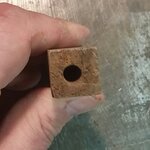
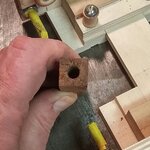
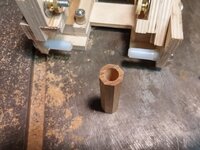
It reindexes the blank to the hole so it came be re run through the table saw. The first pic of the blank shows it being off and the second after I ran it through the jig. Not this is done before you glue in the tube.

To mount the blank you need to use short sections of your tube and your bushing that fit on the 1/4" bolts at each end. For this demo I didn't have my tubing cutter handy so I just wrapped a bit of tape around them to snug it up. If I do this a lot I would probably just turn some custom bushing for each hole size.

You index it with the upper "slide" and as you cut you rotate the blank a quarter turn indexing off the fresh cut.

It took off a 1/16th to nothing on all sides. The blank is from home milled lumber scraps from my Fathers stash and its a light 3/4" of an inch.

I'll try to do a video tonight if I can set it up. I finished late last night and the pics where the best I could do. With a perfectly square and centered blank I can see doing inlays with multiple strips of wood not laminated but side by side.

So I'm I just over engineering this (I started College as an Engineer and got one son through the program) or I'm I just crazy that I need this kind of precision. :befuddled:

Also if I modify the indexer you could use this to knock the corners off blanks. If I could come up with a way to add an indexing wheel to this you could make blanks of any number of sides.
 

Attachments

  • before other end.jpg
    before other end.jpg
    81.5 KB · Views: 534
  • jig 1.jpg
    jig 1.jpg
    250.8 KB · Views: 951
  • jig 2.jpg
    jig 2.jpg
    196.2 KB · Views: 836
  • jig 3.jpg
    jig 3.jpg
    209.5 KB · Views: 833
  • after.jpg
    after.jpg
    150.1 KB · Views: 624
Signed-In Members Don't See This Ad

Curly

Member
Joined
Nov 20, 2010
Messages
4,837
Location
Saskatoon SK., Canada.
Thanks for showing your jig. If you substituted tapered cones instead of the bolts it would fit any size hole you want to drill in the blank as long as the end of the blank is square to the hole.
 

chartle

Member
Joined
Mar 13, 2015
Messages
1,287
Location
Pgh, PA
Thanks for showing your jig. If you substituted tapered cones instead of the bolts it would fit any size hole you want to drill in the blank as long as the end of the blank is square to the hole.

Yea but the best way to square up the ends is if you have square sides, kind of a chicken and an egg thing.

Though I guess I could run the pen mill in the ends.

I also added a 45 degree angle stop so I can use it to knock off the corners or better yet make perfect 8 sided blanks for 8 sided celtic knots or just an octagonal pen. :good:

More pics tonight.
 

randyrls

Member
Joined
Feb 2, 2006
Messages
4,829
Location
Harrisburg, PA 17112
Cliff; It took me a few minutes to wrap my head around this. You drill the hole in the tube BEFORE you begin on the inlays. Correct?

This is an interesting approach. It might help reduce the chance of the blank exploding during drilling because on "final" drilling, only the inlays are drilled.
 

chartle

Member
Joined
Mar 13, 2015
Messages
1,287
Location
Pgh, PA
Cliff; It took me a few minutes to wrap my head around this. You drill the hole in the tube BEFORE you begin on the inlays. Correct?

This is an interesting approach. It might help reduce the chance of the blank exploding during drilling because on "final" drilling, only the inlays are drilled.

Yes and yes.

I had an inlay blank come apart on me at drilling time. My thought is to also reinforce the blank with popsicle sticks as I go around. It seems these can be fragile until you can get the brass tube in.

After re sawing I used a digital caliper to measure the distance between the hole and the sides and it was off only about .002.

Further enhancements.

Adding a 30 degree stop to make 6 sided blanks and adding something longer to run along the rip fence. Would make it a tad safer.
 

chartle

Member
Joined
Mar 13, 2015
Messages
1,287
Location
Pgh, PA
Another mod is I'm going to do is so I can trim closer to the tube. This is way too bulky.

132852d1431131972-continue-not-0508152025~2.jpg
 

Dale Allen

Member
Joined
Oct 27, 2012
Messages
1,384
Location
Massillon, OH
Maybe I'm not seeing this the same way as others.
Having said that, this seems to me to be a futile effort with regard to a celtic knot or other laminated pattern.
It is very important to keep the cuts and fillers evenly spaced when the glue-ups are made. That way the center of the blank is the reference to the center of the pattern. I've done some of these and have seen the result of not centering the pattern.
Then, when the pattern is centered withing the blank it is equally important to get the hole exactly in the center of the blank both at the start and at the exit point.
If the hole is off center, one side of the pattern will be longer then the other when it is turned round.
Trimming the side to even the distance from the hole to the outside of the blank is in effect the same as gluing in a tube and turning it round. Same end result but the blank is now round instead of square.
 

chartle

Member
Joined
Mar 13, 2015
Messages
1,287
Location
Pgh, PA
Maybe I'm not seeing this the same way as others.
Having said that, this seems to me to be a futile effort with regard to a celtic knot or other laminated pattern.
It is very important to keep the cuts and fillers evenly spaced when the glue-ups are made. That way the center of the blank is the reference to the center of the pattern. I've done some of these and have seen the result of not centering the pattern.
Then, when the pattern is centered withing the blank it is equally important to get the hole exactly in the center of the blank both at the start and at the exit point.
If the hole is off center, one side of the pattern will be longer then the other when it is turned round.
Trimming the side to even the distance from the hole to the outside of the blank is in effect the same as gluing in a tube and turning it round. Same end result but the blank is now round instead of square.

Its the getting the hole exactly in the middle from start to finish is why I made this. After you drill the hole you resquare the sides so now when you cut and insert the inlays they have to be perfectly placed. though I did have an idea of turning it round, without the tube and then gluing squares of wood on the ends And using those to index the sides as you cut the blank For the inlays.

I can also easily make an 8 sided blank that I can make an 8 sided celtic knot.
 

Dale Allen

Member
Joined
Oct 27, 2012
Messages
1,384
Location
Massillon, OH
OK, now I see what you are doing.
I tried this method once. Not with squaring the blank but drilling out the inlays.
The problem was that the drill bit grabs on one side when trying to cut through the inlay and it put a lot of pressure sideways on the blank. A thin piece of metal was even worse than wood or plastic. It did not go well for me. Hope you get this figured out.

Dale
 

chartle

Member
Joined
Mar 13, 2015
Messages
1,287
Location
Pgh, PA
Will detailed plans be available?

I've been asked to do a tutorial thing for the Jigs Library. Though you don't really need plans just the layout and other issues I've come across.

I've already removed the indexing stops due to a design oversight on my part and added a strip to the back to make it longer.

Changes were required after I almost sawed through some bushings and took out a tooth on my saw blade, wasn't pretty.

I'll be working on it this week end.
 

dogcatcher

Member
Joined
Jul 4, 2007
Messages
2,361
Location
TX, NM or on the road
I have something made similar to make 6 and 8 sided tool handles. I use mine on my bandsaw, I consider it safer that trying to use the table saw for such small pieces. I would also try to set it with the indexing system, there is a lot more potential for creativity when you have an indexer. As an idea with an indexer you can use a Dremel flex shat and cut flutes on it if you set up stops and guides on center plane of blank axis.
 

chartle

Member
Joined
Mar 13, 2015
Messages
1,287
Location
Pgh, PA
I have something made similar to make 6 and 8 sided tool handles. I use mine on my bandsaw, I consider it safer that trying to use the table saw for such small pieces.

Yes I found this out last night when after making some safety improvements it grabbed the blank and flung it across the room. :eek:

I still have all my fingers. It was the same piece of Bloodwood I had an issue with last time. I think its to hard and it had swirling grain. When I first used it I cut some walnut and was super surprised how well it worked.

This time I tried to make a larger blank with a larger hole so I used my bushings to hold the piece. Maybe that was the mistake.

I could modify it to use my band saw but its a cheap 3 wheel Craftsman with only a 1/4" blade and wouldn't give me a straight cut.

But as for now DON'T MAKE THIS.
 

chartle

Member
Joined
Mar 13, 2015
Messages
1,287
Location
Pgh, PA
Ok I think I'm back on track. I made some sleeves that go over the bolts and go into the hole on the blank.
 

Attachments

  • 0517151426a.jpg
    0517151426a.jpg
    195.6 KB · Views: 244

chartle

Member
Joined
Mar 13, 2015
Messages
1,287
Location
Pgh, PA
Thanks for showing your jig. If you substituted tapered cones instead of the bolts it would fit any size hole you want to drill in the blank as long as the end of the blank is square to the hole.

In looking back this probably wouldn't work. The blank just wouldn't be held securely.
 

chartle

Member
Joined
Mar 13, 2015
Messages
1,287
Location
Pgh, PA
I tried making an 8 sided celtic knot last night and its just not worth it. I made the inlay a tenth of an inch to match my saw blade and there was just too much inlay. It may work if I made a thinner inlay or a steeper angle. Also the more segments the more the knot can start to kind of "Unravel" because every cut and reglue up can add errors keeping things from lining up.

I'm going back to a 4 sided knot but have other tricks up my sleeve. I hope to have something tonight.
 

Curly

Member
Joined
Nov 20, 2010
Messages
4,837
Location
Saskatoon SK., Canada.
Thanks for showing your jig. If you substituted tapered cones instead of the bolts it would fit any size hole you want to drill in the blank as long as the end of the blank is square to the hole.

In looking back this probably wouldn't work. The blank just wouldn't be held securely.

Are you sure? I'm not suggesting 60 degree cones like for TBC, but longer cones more like a morse taper. You would need to be careful and not apply so much pressure that the blank would split. You might also need a few sizes to cover a range of hole sizes.
 

chartle

Member
Joined
Mar 13, 2015
Messages
1,287
Location
Pgh, PA
Thanks for showing your jig. If you substituted tapered cones instead of the bolts it would fit any size hole you want to drill in the blank as long as the end of the blank is square to the hole.

In looking back this probably wouldn't work. The blank just wouldn't be held securely.

Are you sure? I'm not suggesting 60 degree cones like for TBC, but longer cones more like a morse taper. You would need to be careful and not apply so much pressure that the blank would split. You might also need a few sizes to cover a range of hole sizes.

Before I made those sleeves I used the bushings for a sierra/manhattan/etc pen with some blood wood to hold the pen just like it was on the mandrel but just that the mandrel didn't go all the way through.

The first time the blank did something odd and it started to cut into the bushings. I beefed up the indexing stops to hold the blank more securely thinking it was spinning and it grabbed the blank and tore it from the holder. I haven't found any of the pieces or the one bushing and I still have all my fingers :eek: .

I just don't think the bushings kept the blank totally square to the blade and flat to the table and not sure tapered plugs would either. Just easier to make custom bushings/sleeves for each size pen hole.

I used some extra UHMW plastic I bought to make non stick CA bushings.

I just think the cones will only hold it at the ends and it could "flex" down into the blade.

Let me put it this way. I want this held as securely as possible I like having 10 fingers. :)
 
Last edited:
Top Bottom