Another dissassembly thingy for Long Clickers

Signed-In Members Don't See This Ad

skiprat

Passed Away Mar 22, 2022
In Memoriam
Joined
Oct 19, 2006
Messages
7,812
Location
In a Skip in Wales
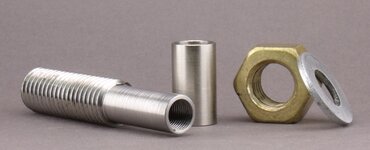
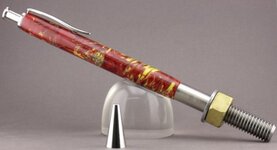
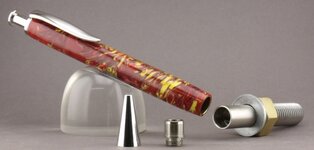
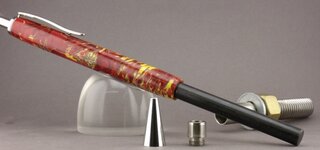
Here is a little tool for dismantling the front end of a Long Click pen.
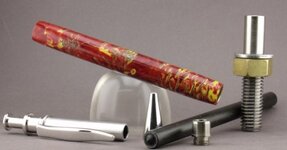
It consists simply of a 12mm stainless steel thread that has been drilled and tapped to fit the threads on the nib coupler.
Although a seperate piece could be made, I chose to use the assembly sleeve that comes with each kit. A section of the thread was turned off to fit inside the sleeve.
The procedure I use is;
1.Unscrew the nib and remove the refill.
2. Assemble the screw with 12mm nut,10mm washer and the sleeve.
3. Screw the assembly onto the coupler. Just so it bottoms out, not tight.
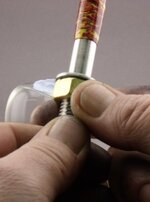
4. Hold the thread in one hand and turn the nut with the other. If it is too tight for hands then hold the thread in a chuck and use a spanner if needed. I managed by hand, but I do have strong fingers.
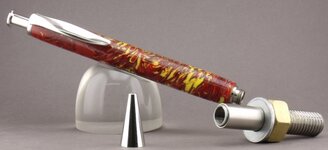
5. The coupler pulls out. Unscrew it from the tool.
6. Now you can use a full sized drift or transfer punch to knock out the mechanism. Do this over a cloth so you don't lose it or it gets scratched by hitting something. I use a Letter R punch.

They are easy to make and I'm thinking of making a bunch to give away.
What I was thinking of is to make say 10 of them and give them to the IAP chapter that has the most entries in the Bash Pen Contests. This way I only have to pay postage once and the Chapter spokesman can dish them out as he/she sees fit. ( if they want them of course ):biggrin:
I'll check with Cav if I'm not breaking any rules before confirming though.:wink:
 

Attachments

  • LCD1.jpg
    LCD1.jpg
    87.7 KB · Views: 264
  • LCD3.jpg
    LCD3.jpg
    19.4 KB · Views: 250
  • LCD4.jpg
    LCD4.jpg
    95.9 KB · Views: 211
  • LCD5.jpg
    LCD5.jpg
    20.5 KB · Views: 192
  • LCD6.jpg
    LCD6.jpg
    96.1 KB · Views: 236
  • LCD7.jpg
    LCD7.jpg
    96.5 KB · Views: 201
  • LCD8.jpg
    LCD8.jpg
    21.4 KB · Views: 220
Last edited:
Signed-In Members Don't See This Ad

Manny

Member
Joined
Jan 15, 2009
Messages
849
Location
Rancho Cucamonga, Ca.
Skippy I have been working on a very similar project but lack the tools and the skills you have to make such an elegant device. Thank you

I discovered that using the assembly tool for disassembly has some problems. For the process you outlined as I understand it the assembly tool will apply counter pressure directly onto the wood or acrylic wrapped around the copper tube. In doing this i have actually had my wood blank fail and collapse around tube near the nib section destroying my pen. Not sure if this was a gluing issue or a materials issue.

Have you had this issue at all?

I will PM you with my thoughts on a new approach

Manny
 

skiprat

Passed Away Mar 22, 2022
In Memoriam
Joined
Oct 19, 2006
Messages
7,812
Location
In a Skip in Wales
Manny, there needs to be a point to bear against and the use of the sleeve does two things. First it presses against the blank ( obviously:rolleyes: ) but it's primary use is for it to be stationary ( stationery, stationry? ) while the nut is turned. If I had used just a long nut or threaded sleeve instead of the kit sleeve and washer, then the force would not only be pressing but twisting against the blank. I figured that 'could' damage a really soft blank.
I did think about making it screw onto the coupler and then have a long thin threaded rod down the middle to press against the mech. One of them would come out first and the other could be punched out.
The problem with that is that anything that could fit inside the coupler would also fit inside the mech.
As this would ( hopefully ) be very rarely used, it didn't seem worth the effort to make anything any more complex.
But please send me, or post here what your idea is. I'm sure any design can be improved upon. LOL, even mine:redface::biggrin:
 

rjwolfe3

Member
Joined
Feb 12, 2008
Messages
8,352
Location
Mansfield, Ohio, USA.
Skip if you decide otherwise, I would love to get a bunch for our local chapter. I would be happy to pay for both the shipping and the product. Otherwise would there be a chance that we could see them for sale at exoticblanks.com?
 

skiprat

Passed Away Mar 22, 2022
In Memoriam
Joined
Oct 19, 2006
Messages
7,812
Location
In a Skip in Wales
OK, I got the green light:biggrin:

So if you are a member of a Chapter and think your bunch make so many mistakes that you might need one of these, :biggrin: then get as many members from your chapter to enter the pen contests as you can.
When the contests are over just get one member from your group to send me a note saying something like;
''Hey Skippy, we had 5 pen entries. 2 in the Cigar, 1 in the Beauty and 2 in the Freestyle''

I know there are not many ( if any? )Chapters outside the USA so I'll include any team ( eg UK, Oz etc ) as long as I only have to send to one address. You can hand them out when you have a meeting.

I'll supply the machined threaded rod, the washer and the nut. You'll need your own kit sleeve. (They come with the pen kits ):wink:

I won't be selling / sending these individually. Sorry
 

Manny

Member
Joined
Jan 15, 2009
Messages
849
Location
Rancho Cucamonga, Ca.
I did think about making it screw onto the coupler and then have a long thin threaded rod down the middle to press against the mech. One of them would come out first and the other could be punched out.
The problem with that is that anything that could fit inside the coupler would also fit inside the mech.

Now you're just freaking me out.

I was thinking about the way the closed end mandrels from AZ work. which allows you to expand the diameter of the screw by pulling a bolt up through the middle. This would allow a narrow entry but a wider seating.

Your way seems simpler...... suprise surprise

I am going to try it. what size tap did you use to thread the inner part of the screw?

Thanks again Skip

Manny
 

el_d

Member
Joined
Apr 26, 2007
Messages
3,368
Location
Lockhart, Tx, USA.
Thats exactly what I have been looking for Skip, Too bad you wont be selling them. If you change your mind please let me know.:wink:

You long click dissasembly tool tease you!!!:wink:
 
Top Bottom