Carl Fisher, The fisher of Pens, Started this thread about his 40w laser. This thread is informative and a quick guide on how to set up a laser engraving system with all the bell and whistle that most high end engraver has. This is an just a summation of the thread. I summarized it some, in the hopes that he would clean it up and submit it to the library.
The machine he started out with is
40W USB DIY Laser ENGRAVER Cutter Engraving Cutting Machine Laser Printer CO2 | eBay
I had a blast a couple years ago when I got my K40. The old Moshi software was junk and the control board was horrible. The thing would routinely just take off cutting a line at a 45 degree angle, destroying any piece I had positioned in the bed.
The newer version has a redesigned control board, has solved most of the software issues he encountered.
40W USB DIY Laser ENGRAVER Cutter Engraving Cutting Machine Laser Printer CO2 | eBay , "It is the newest 2015+ version with the upgraded M2 control board and such. It uses CorelDraw and CorelLaser instead of the old moshidraw software. I actually find this setup quite easy to use but still plan to do a smoothieboard upgrade at some point to do true gcode and color coded operations such as PWM power modulation to the laser, etc..."
Upgrades and recommendations:
- As for as work holding and such, I recommend ditching the included table and buying a honeycomb table or making your own table. lots of options out there in the DIY community. Then your next hurdle will be table height. Right now I'm just setting blocks of wood under the table to set my height, but will work on a table jack at some point in the near future along with a rotary of sorts.
- If you are going to cut anything you will want an air assist head. The bonus to that is that if you get the one from light object it will allow you to put in an 18mm focal lens which is an overall better quality lens than the included lens. A nice high quality ZnSe lens will make your machine happy.
- Oh, also note that the new lens will sit up further in the head. This matters when you are setting your work piece distance. So it's not ~50mm from the bottom of the head, it's ~50mm from the surface of the lens. Best thing is to do a calibration run on a piece of material that is slanted from low right to high left. So that as you run a horizontal line with the laser the focal point will get progressively closer to the lens. Then find the cleanest burn mark along the length of what was just burned and use that to make a height block from there to some point of reference on the machine. The laser head, the gantry, whatever. Just something that you can use to set the height of the work piece.
- [FONT="]o [/FONT]As for the head, it's straight forward. The two halves of the head are threaded together sandwiching the mounting plate. Just remove one, move your mirror over from the old head to the new, install your new 18mm lens into the new head and screw the two halves back together onto the plate. The hardest part is making sure you get all the mirrors aligned after as once you twist that head your final mirror is way out of alignment.
- [FONT="]o [/FONT]Also you'll be able to re-position the air nozzle on the head after it's mounted, so don't worry about that orientation right away.
- The exhaust port and fan that come with these units are pure garbage. Remove the port completely and then put a 4" boat bilge blower in line with your exhaust hose. Its 12v so allow for that but you'll be much happier and much healthier for both you and your machine.
- Next would be a targeting laser. I'm using a cross shaped laser that paints about a 2" cross hair mark on my target. I've also seen it with single dot lasers, laser pointers, combiners, etc... it's just about how much you want to spend.
- And eventually if you're into tinkering with the machine you can visit upgrades to a smoothie board or similar. These will bypass the need for the CorelLaser and allow you to use any g-code software. This allows things like color coded lines for cut vs engrave in one operation, PWM modulation of the laser to allow for gray scale style engraving and overall more control of the machine. With the base controller and software you have to manually dial in your power setting and you can't vary it during the job with any accuracy. However if you just want to do simple engraving and cutting, this is perfectly acceptable.
- I upgraded the control board and software, installed a motorized lift bed and all new wiring and guts. I must say, I certainly learned a lot with this project. Even though it cost me almost twice as much in the end, the results were fantastic and the lessons learned were very useful when I ventured into a Parana CNC router for small signs and pen box engraving. The only issue I have with a 30-40W CO2 is the number of passes it takes to cut 1/8" ply, but as long as you can avoid a fire... it will do the job. Crazy scorch marks and you'll get an appreciation for the focus of the laser when you examine the angle of the cuts.
- [FONT="]o [/FONT]And the new M2 board is an improvement over the old moshi draw board. I'm planning to stick with it for a while and use the heck out of it until I'm really ready for my stage 2 upgrades.
Here is a running total of what I've spent so far. Not all of this is required if all you want to do is engrave pens, but many are considered must have upgrades by the Chinese laser community.
Ok, a few must have upgrades.
Machine:
40W CO2 Chinese laser with the latest M2 Nano board and CorelDraw/CorelLaser compatible
40W USB DIY Laser ENGRAVER Cutter Engraving Cutting Machine Laser Printer CO2 | eBay
Exhaust upgrades
4" bilge blower (12v)
Amazon.com : Attwood Quiet Blower (White, 4-Inch) : Boat Blowers : Sports & Outdoors
4" vinyl flexible duct
http://www.amazon.com/Dundas-Jafine-.../dp/B001PQDUA0
4" dust collection port
http://www.amazon.com/POWERTEC-70150.../dp/B00M3JFNOO
Target Laser
http://www.amazon.com/Focusable-650n.../dp/B00S1EXW3Y
Laser Holder
K40 CO2 Laser Dual Head Laser Holder for 10mm or 12mm | eBay
LED Voltage Meter for setting the laser power
http://www.amazon.com/DROK-Digital-V.../dp/B00C58JGE6
Light Object water pressure sensor
http://www.amazon.com/Lightobject-LS.../dp/B00HUC5FC4
Air pump for air assist head
Amazon.com: EcoPlus 728450 1 to 18W Single Outlet Commercial Air Pump, 793 GPH: Patio, Lawn & Garden
18mm head with air assist
18mm Laser head w/ air assisted. Ideal for K40 machine
18mm ZnSe focus lens with 50.8mm focal length
Improved 18mm ZnSe Focus lens (F50.8mm)
300x200 honeycomb bed
300X200 Honeycomb. Fit K40 machine
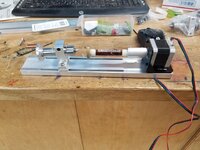
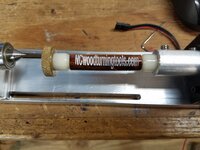
I put the motorized bed in. This was a game changer!!!
Power table/ bed kit for K40 small laser machine
Upgrade board for Moshi Engravers.
X7 DSP upgrade kit for D/K40 small CO2 laser machine
If you don't mind tinkering, know or are willing to learn basic electronics, and have some patience this can be a very rewarding project and a valuable tool. Once you gut and rebuild one of these, the mystery is removed and you'll be wanting to build larger lasers and CNC machines. This can start an addiction... you've been warned.
Now if you decide to swap out the Moshi board for one of the various upgrades such as a Smoothieboard, Ramps or Arduino/Grbl setup you can use any OS you want with the appropriate g-code sender. There are plugins for Inkscape and many others that will allow you to send directly to the laser if you go this route and if you get something that is PWM capable you'll even be able to engrave grayscale pretty well in addition to color coding your drawing for different operations. i.e. red lines for cut, various colors for engraving at different power levels, etc... Lots of fun to be had.
As for instructions, nothing formal and just takes a small degree of tinkering. These machines aren't that complex and once you understand the basics they are really easy to work with. The longest/hardest process is making sure all of the mirrors are properly aligned and then dealing with focal length issues for deep cuts as Ken mentioned above. Some of that can be mediated by upgrading to a powered Z-axis and a new control board, but now you're adding on about another $400 when all is said and done.
Legal version of CorelDraw X5 for $99
Get a legal copy of CorelDRAW Graphics Suite
This was the link provided to me by Corel after trying to use the version included with my laser. I consider it a good deal at $99 but it's crappy that you don't get a legal version when you purchase the machine.
X6 should work fine. Just don't plan on using the one included on the CD when you get the machine.
Supposedly another software chain would be to use any other application such as Inkscape, Sketchup, etc... and then use LaserDraw to import the drawing and lase it. I've not tried this and I'm not 100% up to speed on how LaserDraw works, but it's supposed purpose in life is to talk to the laser
Will these laser run on windows 10?
Yes or no. Vague enough answer for you?
I had to spin up an old laptop with Windows 7 so I could run CorelDraw without issue. When I try to run it on my Windows 10 laptop Corel can get a bit funny. The menu system is messed up and the layers go haywire once in a while. I didn't want that happening during a burn and messing up a work piece.
However some claim it's working fine. I'm using Corel X7 if I recall (I'll check tonight) and it works fine with the CorelLaser overlay that comes with the machine. The CorelDraw v12 that they include is complete junk and likely a counterfeit anyway.
Will this laser cut 1/8" rubber sheet? Also, what do you mean about raising the table? Is that to focus the laser?
[FONT="]
I don't see why not. It burns ebonite for engraving at about 1/5 of it's power setting. Just make sure you are not burning anything that will release toxic gas such as PVC based materials. They release chlorine gas among other nasties.[/FONT]
[FONT="]As for moving the table, yes. You want to keep the laser focus lens at a set distance from your work piece. Most are 50.1mm but there are some various others for shorter focus ranges.[/FONT]
[FONT="]So when I'm doing flat sheet acrylic I need to raise the table higher than if I'm doing a pen body in a v-block for work holding or a box lid, etc...[/FONT]
[FONT="]You make yourself a 50mm block or any number of other designs of focus distance checking jigs and bring your table up to that height. There are powered z-axis tables out there but I'm going to make my own lab jack with a small stepper to give a DIY powered Z. Until then I'm doing it the manual way with blocks of wood and shims under the table to get the height where I need it. [/FONT]
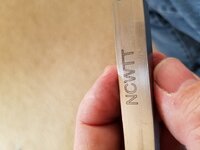
A note on metal. A 40W laser isn't nearly enough to engrave metal. So don't expect to engrave bands or clips or the like.
However there are some chemicals on the market such as Thermark (expensive) or you'll see moly lube (cheap but various degrees of success) used as well where when the laser hits it, the coating bonds to the metal leaving an embossed marking. This is on top of the surface of the metal, not engraved into it so it may wear eventually.
Yes a CO2 laser will cut through Mylar. It slices right through it like butter. I've used my CO2 laser to cut through Mylar to make templates and mock up flexible circuit boards for work.

 , I was wondering if you could talk a little more on the control board a laser should have. Most people, believe that we could go up a notch with a 50w or 60w laser that has the front and side doors, and include some of the extras you have installed on your unit. I understand your concern for the quality of the upgrades, but for the sake of the discussion lets say their satisfactory. The control unit is my primary concern.