Thickness of finish

Signed-In Members Don't See This Ad

watchman7

Member
Joined
Jan 3, 2004
Messages
199
Location
Cumming, GA
Have been reading almost everything on finishing in the library and recent posts and threads to get caught up on what I have missed over the past four years or so. Something started bugging me about the thickness of the finishes. Most everyone is putting on 2, 3, 4 or more coats of something, i.e. CA, Laquer. Enduro. How thick are these final finishes and how is the thickness being taken into account as far as the final measurement of the ends that match up to the components?

If you turn the material down to just a little proud, say .002", of the bushing and then sand down to the exact size of the bushing, and then add the thickness of the finish back on the material you have a mismatch in size with the components. What is an effective way to handle this potential problem?

Mike G
 
Signed-In Members Don't See This Ad

leehljp

Member Liaison
Joined
Feb 6, 2005
Messages
9,329
Location
Tunica, Mississippi,
I do as you mentioned - I sand down a few .005 inch below or so and then build back up. Below is an example of what I had to do to get a good "feel". (I use mm in sizing mine, but will refer to inches here.)

On the Elegant Beauty 
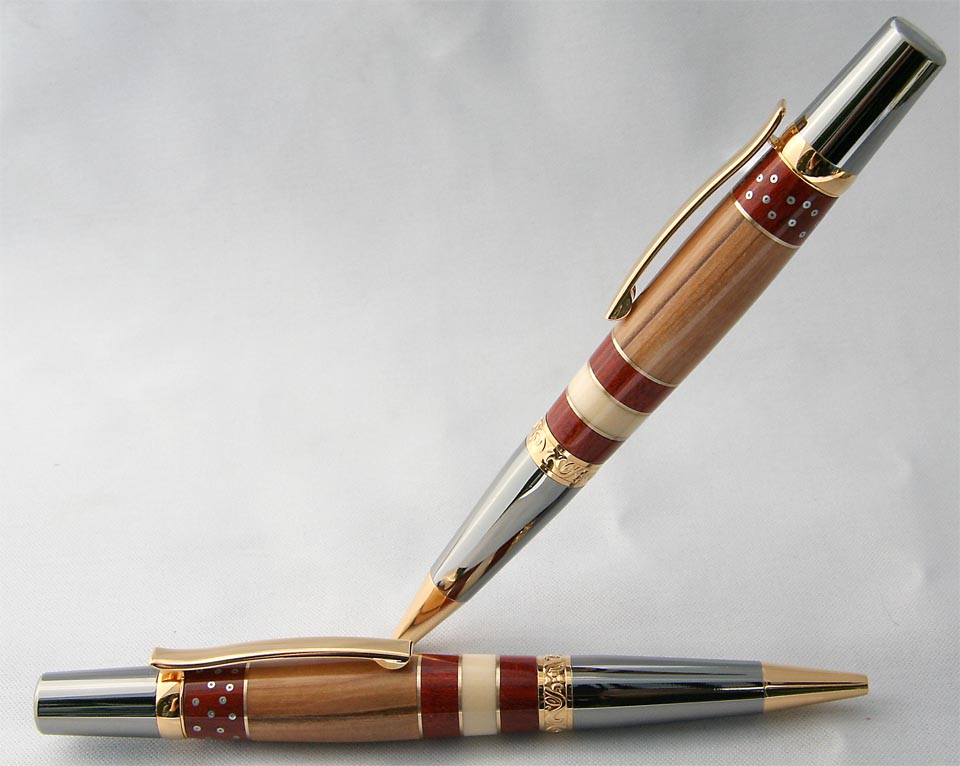
Sierra the nib end band has two levels. Click here for a view of the band with two diameters. Look at the band on the bottom pen. The "scroll design" level of the band is a few .00x inches larger than the immediate smooth part of the ring that is next to the blank.

I found that when I turned and finished a blank the exact size of the smooth part of the ring that it butts up against, - the "feel" is as though the blank end is turned undersized. So I now finish it oversize by almost .01 inch and slightly round over the end of the blank.

Rounding over the end of the blank with a very small radius does wonders for the "not quite" perfect fit, especially when the finished blank is .005 - .008 inches proud. Russ Fairfield discusses "tactile feel" on many occasions. To the untrained eye and where visual perception of size difference is not readily possible, (as in a few .00x inches) - tactile "feel" becomes the primary factor.

To me, the "rounding over" of the end is accomplished by putting a piece of 600 grit sand paper (or 2400 - 3200 MM) over the end and hand rubbing it for a second or two or three. The purpose is to round over the sharp edge without making it obvious to the eye that it has a round edge. After this, I put it back on the lathe and finish/polish the blank.


THICKNESS of finish: There is a huge difference in opinion and usage on this forum. It is up to the individual. In most cases I build up a level that Russ would say that the turned blank has been "encapsulated". :biggrin: (I say that with having the utmost respect for him.) Generally I find that beginners are usually focused on getting to the finished pen and over look the time and depth of finish needed. 3 to 5 layers of finish by an experienced person is often enough, but to the beginner, it usually is not enough. An experienced person is consistent in the thickness of each layer; a beginner's thickness layer will vary with each application, and this is only natural. I personally use 1 or 2 thin and 2 to 4 medium layers (or more if needed.)

On soft woods that have not been stabilized, I will almost encapsulate it with a thick layer to help protect it. I have had few pens with great finish on it dent easily when dropped or bumped on a desk. These pens had thin but fine coats and were soft woods. Thick coats (especially with CA) will increase its rigidity.
 
Last edited:

mdburn_em

Member
Joined
Mar 16, 2006
Messages
679
Location
Chesapeake, VA, USA
I agree with everything Lee said, but I still feel the need to add my .02

I take mine down to about .005 also. I will then take it up to about .004 proud. I do this because my sanding regimen will take off about .004.

Take a few minutes to turn and sand a barrel. When you're at the point where you would customarily add finish. Measure the barrel. Upper and lower ends. Give it your normal finish. How thick is it? If it's not close to .01, get it up to that thickness. Then Sand and MM (or whatever you use) to your normal finished/polished end. Measure again. How much finish did you take off? All questions that are good to answer for yourself. If in doubt, measure. Take notes. It will pay off.

Good luck.
 

george

Member
Joined
Jan 17, 2006
Messages
458
Location
Ljubljana, Slovenia.
I usualy make about 6 layers of CA (3 medium + 3 thick). After sanding it leaves about 0,1-0,2 mm thick CA layer.
I try to turn and sand blank to kit parts dimensiones, so the CA thickness assures that the wood is not smaller than the kit parts in the end.
 
Last edited:

RussFairfield

Passed Away 2011
In Memoriam
Joined
Feb 10, 2004
Messages
1,522
Location
Post Falls, Idaho.
I think we all worry about such things too much. We who make pens admire the "perfect fit" between the barrel and the fittings, but this is an elusive goal.

I have never had a customer who thought the finished barrel being a little LARGER than the fitting was a defect, so long as it wasn't a lot, the difference was even all the way around, and there wasn't a sharp edge. But, they will see the barrel being smaller than the fitting as a mistake every time. The secret to getting away with the larger barrel by a few 1/1000" is to round the end so there is not a sharp edge on the end of the barrel, and it is even all the way around. I think it was Mudder who mentioned this the last time the topic came up a couple years ago.

Kurt Hertzog (he writes the pen column in Woodturning Design) has a way of making a perfect fit AFTER the pen barrel is finished. That is the logical time to make the fit. The barrel is turned slightly larger than the fitting, and is tapered down to where it is just slightly smaller than the the fitting on the ends. The end of the barrel is then cut back on the ends with a SHARP barrel trimmer, used by hand, until the diameter of the barrel is an exact match with the fittings after it is finished. Something like 1/32" is removed from the tapered end. It is a rare pen kit that is sensitive to losing that little bit from the ends. If in doubt, make the barrels longer than the brass tubes by that amount on each end when trimming before putting them on the mandrel.

HINT: Leaving the wood slightly longer than the brass tubes by not cutting into the brass will insure that the bushings are bearing against the wood and not the brass, and a lot of the mandrel poroblems and spin-out will disappear. The old SlimLine instructions from HUT always said to trim to square BEFORE turning the pen without cutting into the brass, and to trim to length AFTER the pen was finished. I haven't seen this mentioned anywhere in any instructions for more than 10 years.
 
Last edited:

watchman7

Member
Joined
Jan 3, 2004
Messages
199
Location
Cumming, GA
What great feedback:

My primary reason for starting this thread was I have the feeling that the finishes being applied today are much thicker and deeper than what was generally being applied back in 2002-2003. You guys have all given some good suggestions. A few comments.

Hank - Beautiful pen in the example. The rounding over technique is what I used when I started first applying a CA finish. It seemed to work well.

Mark - Your suggestions is what I plan to do once I get up and running again. Basically figure out the actual thickness of a 2, 3, 4 coat or more finish and then check component and barrel sizes.

Ed - Resins? Resins? We don't need no stinking Resins! (Three Amigos)

Russ - What tremendous insight. You are perfectly correct in saying no one ever complained about a barrel being a little oversize. That technique about leaving the wood a litttle longer than the tube is real interesting. Will have to try it.

Thanks everyone.

Mike G
 
Top Bottom