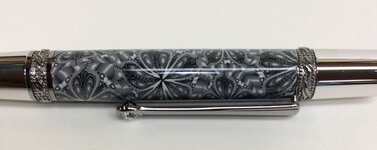
Polymer Clay Blank Finishing

Signed-In Members Don't See This Ad

lhowell

Member
Joined
Jun 24, 2015
Messages
335
Location
Apex, NC
I bought a set of polymer clay blanks from Toni and am getting ready to put it together for my mother-in-law and have researched a few youtube videos and the library here on IAP and am still not quite sure how to finish these.

Can you turn these down to final diameter? They were ordered based upon the Zen pen kit so I am assuming they are close to final bushing diameter or do I just need to start sanding with like 320 abranet to get down to final diameter and then go up through the micro mesh grits, apply some coats of CA and go back through the MM grits to get a good finish?
 
Signed-In Members Don't See This Ad

Skie_M

Member
Joined
Aug 7, 2015
Messages
2,737
Location
Lawton, Ok
I would SAND them down to final dimensions, get it up to around 600 grit or better, and then seal with CA after a good cleanup. I would then follow that up with wet-sanding, starting at 1000 grit or higher, up through the micromesh, and finish up by polishing with Plast-X and Turtle Wax Hard Coat.

Of course, feel free to use your own personal favorites for the final stages! :)
 

eharri446

Member
Joined
Mar 17, 2016
Messages
1,036
Location
Marietta, GA
I bought two and tried to turn them the traditional way and they both came apart. I would start with sand paper, I prefer the micro mesh sanding mesh, and go up to 600 grit and then see if you need to fill in voids with CA. Then wet sand using MM from 1500 to 12000 then polish with a quality plastic scratch remover.
 

lhowell

Member
Joined
Jun 24, 2015
Messages
335
Location
Apex, NC
If you go to Toni site I am sure she has instructions there for finishing.

I did and was still a bit perplexed as she discussed sanding laterally with abranet with the lathe off and then polishing....

I just didnt want to screw these blanks up since they were $50 and it's the only set I have!
 

jttheclockman

Member
Joined
Feb 22, 2005
Messages
19,132
Location
NJ, USA.
If you go to Toni site I am sure she has instructions there for finishing.

I did and was still a bit perplexed as she discussed sanding laterally with abranet with the lathe off and then polishing....

I just didnt want to screw these blanks up since they were $50 and it's the only set I have!

Having never done a clay blank, from what I have read through the years here it seems that sanding is the way to get to final dimentions. I believe her blanks are pretty close to final anyway so should not be much sanding. Being there is no grain sort to speak I still believe that sanding lengthwise means you do not get any dips as if you sanded the other way. You may also try using a stiff block behind the sandpaper to prevent that also. good luck and post your final pen.
 

Charlie_W

Member
Joined
Nov 16, 2011
Messages
5,918
Location
Sterling, VA USA
If the ends need trimming, do this by sanding....not a barrel trimmer.
I blot the ends with thin CA to seal them before mounting on the lathe.
I use a skew as a scraper and very lightly trim the blanks as needed before sanding.
I dry sand and do a regular built up CA finish.
I wet sand the CA, plastic polish and buff as I would on any other CA finished blank.

Good Luck!
 

Attachments

  • IMG_2553.jpg
    IMG_2553.jpg
    102.7 KB · Views: 316

Skie_M

Member
Joined
Aug 7, 2015
Messages
2,737
Location
Lawton, Ok
What you really have to understand about polyclay is that it is an ultra-light material that is BARELY bonded to the brass barrel. It has a light flex built into it, so it can take a certain amount of stress, but one single mistake with a TOOL and you've destroyed it. It's always best to just sand them down using LIGHT pressure.

Lateral sanding is meant to reduce the ridges or ripples you get from radial sanding (sanding with the lathe turned on leaves tiny rings around the barrel). By sanding directly across them, you break the radial rings, allowing the next progressively finer grit to remove them by making the blank more even, with no raised rings left behind of the previous grit. The result is a much smoother surface, and the smoother the surface before application of CA topcoat, the better.

I would sand starting from 220 grit, stopping the lathe to sand laterally at least every other grit (most recommend every single grit), till I reached at least 600 grit (I usually go to 1000 grit on my wood pens). Once I reached the last grit, I do my cleanup ... wipe the blank down with the lathe turned on, using rubbing alcohol. The alcohol dries very fast, and picks up fine particles quickly. I always use a paper towel applicator at my lathe.

After cleanup, one coat with Minwax Stain'n'Seal (this contains Boiled Linseed Oil for the CA to react to) and then the first coat of CA while it's still wet. This helps the CA to go on much smoother. I follow up with 5 - 8 more coats of just CA, sometimes sitting down at my computer for 20 - 60 minutes, watching anime, letting the CA set.

Once my CA coats are done, if the surface even LOOKS a little wavy, I start my wet sanding at 1000 grit, sanding laterally with the lathe off, and then every other grit on the way up through micromesh to 12,000 grit. This is followed by Meguair's Plast-X and Turtle Wax Hard Coat.

The Plast-X gives it a glass-like smooth surface shine, the Turtle Wax helps repel dust, dirt, moisture, and fingerprints. (You can feel free to use your own preferred products at the end in place of these, but you'll want SOMETHING rather than nothing!)

The CA protects the blank from dings and dents that it normally wouldn't survive, and gives it that beautiful crystal clear coating that sets it apart from plain sanding up to 1000 grit ... all the details are magnified for the world to see (this includes mistakes!!), so always examine your blank BEFORE finishing as well as after. (The brand you use generally doesn't matter, so long as your resulting clear coat is strong and not stress cracking due to misuse of accelerator or shifting moisture content.)


I hope this explanation was easier for you to understand than Edstreet's and Toni's articles. They are both awesome in their fields... While Edstreet makes the pens, for the most part, and Toni makes the polyclay art, she does occasionally take the time to turn a pen herself, and the results are always stunning!

Edstreet does take a condescending tone, at times, but he's a very intelligent and helpful person. He's been here a while, so he keeps seeing the exact same questions over and over and over, month after month, from new people who don't know how to use the resources at their fingertips. Please don't blame him for being cryptic and hard to understand, at times. He's really good at what he's done, and has made great contributions for us all in his articles.
 

edstreet

Member
Joined
Aug 12, 2007
Messages
3,684
Location
No longer confused....
Ok,

First things first. Ignore *ALL* other post above as there are many misleading and wrong info listed when it comes to the blanks in question.

Second. I do not have a big head nor dictating or a know it all but I do have extensive knowledge, first hand, in the polymer clay finishing arena and with these specific blanks.


The blanks that you have received needs no sanding. Sanding pre-ca is *OPTIONAL* if you wish. On the site I have described how to do this. Some (names withheld here) have ruined the blanks by sanding. The #1 reason for ruining blanks is OVER SANDING. That is when people use 100, 200 etc grit to sand the raw clay and they end up sanding off the cane slices from the blank resulting in partial seriously broken images .

I have detailed how to sand and that is with 800-1000 grit or finer, using solely finger pressure. The biggest reason to do that is to remove any blemishes that may be in the blank. The ends will need some trimming and I have an article here on IAP on how to do just that via lapping. Please do *NOT* use a barrel trimmer on Toni's work, barrel trimmers are evil vile disgusting tools that will easily mess up clay, however it's good for some marterials.

I noted to sand left to right with the lathe OFF. This is 100% hand sanding and the reason for that is you can do a technique which is called SPOT SANDING. That is just sand a very specific area in a very specific pattern/direction (think Japanese sand garden here ) with a very very very fine grit paper, i.e. 1,000 grit. This is also a very advanced topic and one that can be skipped with no problems at all to the end results.

That aside I would like to say that you can always PM, email or even call Toni or myself and we will be very glad to cover the process with you, or if you like you can send them to me and I will CA finish it for you and ship them back.

The easy pleasey method is as follows. ....

Step 1) Put the blank on the lathe (be it TBC, mandrel or any other method that YOU are comfie with.

Step 2) Proceed with your normal CA finishing method, be it wax the bushings, using the stick-fast coat method, the modernized CA formula's dump and smooth method or whatever.

Step 3) Remove the blank from the lathe and LAP the ends with sandpaper on the bed of the lathe or any other flat surface.

Step 4) Check the finish for imperfections as you may need to add more CA or remove some CA in some areas. The blanks as you receive them are a good 100% flush finished to the bushings with absolutely *NO* need to remove any clay.

Step 5) Assemble and enjoy your new pen.


The blanks are thin laminate polymer clay cane slices, read 0.20mm thickness, yes I put that correct, that is 0.007 inches thick clay slices. Toni is world renowned for her super thin slices.

I hope this helped you greatly and please reply back with any questions, comments or concerns.


Article entry listing:

http://www.penturners.org/forum/member.php?u=10157


http://www.penturners.org/forum/f211/precision-end-trimming-tonis-blanks-k-lapping-116258/

http://www.penturners.org/forum/f14/poly-clay-testing-pen-disassembly-clay-vs-anvil-116707/

http://www.penturners.org/forum/f56/dragon-sceptre;-gent-tube-conversion-114232/

http://www.penturners.org/forum/f30/trimming-lathe-no-endmill-sandpaper-117347/
 
Last edited:

thrustmonkey

Member
Joined
Jan 21, 2010
Messages
113
Location
Illinois
Thank you Ed!!!! I've ruined a few of Toni's blanks trying to turn them to size. I was probably measuring against the hardware wrong. The next time I get some of her blanks, I'll try your method.

It kills me when I ruin one of her blanks. Not just because of the cost and me being on a (low) fixed income, but because I've destroyed what I feel is a true work of art.

Thanks for all your help, to all of us.

Ross Stewart
 

Steve Shastay

Member
Joined
Oct 10, 2016
Messages
2
Actual Pen Kit Dimensions don't Match the Bushings

There is always a reason to sand. Unless your blank is already too small.
 

edstreet

Member
Joined
Aug 12, 2007
Messages
3,684
Location
No longer confused....
Even if the blank is to small, undersized if you will, you can still sand :) There are plenty of products that allows you to build up to the level you need.
 
Top Bottom