how do you stop clear plastic blanks?

Signed-In Members Don't See This Ad

Ric

Member
Joined
Feb 10, 2014
Messages
88
Location
Chilliwack British Columbia CANADA
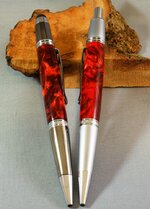
You're asking yourself what is he talking about? quite often when I have built pens in the softer pearl colours for the ladies & it calls from the diameter of the blanks to become quite thin I have an occasional problem of the clear translucent blanks showing up the tubes under them. Now before you start suggesting that I paint the tubes to prevent the brass colour from showing, I already do that, in fact I think I carry it a bit too far by applying a primer first, then painting the tubes the appropriate colours according to the blanks..eg: pink pearls get pink paint according to the right tint or shade, the same for blue, yellow,,, On some of the blanks where there is very little "meat" left on them after turning, I will paint the inside of the drilled blank before glueing in the brass tube.
Now I hate to think that perhaps some of these blanks might be considered warranty issue due to the lack of colour in the blank, but I do get a bit perplexed on thinking of new solutions on how to remedy this...
So are there any others out there that are encountering this situation, & what is your solution......
Thanx agin'..."Always look on the bright side of life."Monty Python"

"IF LIFE GIVES YOU LEMONS, MAKE MOJITOS"
 
Signed-In Members Don't See This Ad

jttheclockman

Member
Joined
Feb 22, 2005
Messages
19,132
Location
NJ, USA.
What you are witnessing is normal and no there is no way to stop it except change to a thicker kit or use materials that are more opaque and not so translucent. The thinner you make a blank the more you turn away the colors and they become more transparent. Painting the inside of the blank is about the best you can do but you still will see the subtle differences.
 

Dalecamino

Local Chapter Leader
Joined
Jan 2, 2008
Messages
14,572
Location
Indianapolis, In.
I think it has much to do with the way you paint the inside of the blank and what kind of paint you are using. Krylon paint for plastics is my choice. Two coats and let it harden so you don't scrape it off when you insert the tube. On larger size pens you can drill the blank with a bit larger drill to allow for the paint and glue but I'm not sure about the slim kits. Now after saying all of this, if your blank is translucent you will still see a difference but, the paint for plastics should have been somewhat absorbed by the blank. It's just my opinion and , I hope you get your problem resolved.
 

TonyL

Member
Joined
Mar 9, 2014
Messages
8,915
Location
Georgia
I have not found a fool-proof way around this "issue". Even using very sharp bits and a fine rats tail file to (removing the rifling that the drill bit leaves behind), I find the paint, primer, etc. to "highlight" the rifling of the drilled semi-translucent or translucent barrels. I have made under-turned some to think the barrel, and then turn the ends to a radius to meet the hardware with better outcomes.

With respect to paints and primers, I have used:
Testors enamel paint
Ceramcoat
Testors Model Master
Tamiya weatherine
Rustoluem primer
Rustoluem primer + paint
Rustoluem paint, including their 2X line
Dupli-color auto paint
Wal-Mart brand acrlylic

I have allowed the blanks to air dry as well as bake them for 20 minutes at 150 degrees.

And probably another 3 or 4 brands and types that I can't remember. I have also apply the paint with everything under the sun. I have experience the best results to simply spray the paint inside the barrel. I used to use Q-tips, paint brushes, etc., but was not getting the results that others appear to get. I don't event try anything but spraying the tube when turn a 7mm pen (which is very rare that I turn).

I have not found any to hide the rifled interior surface of the barrel. They hide the tube (I also paint the tube and use epoxy), but it just doesn't look good (to me) with a relatively thin walled, translucent (even semi-translucent) barrel. I have sold many where the customer was happy, but I wasn't as happy with it. I have not found a way to make this work to my satisfaction.

So, I basically stopped translucent blanks. I bought some Italian Lucite that I did not know where that way and I will love to find a way to use them.

Good question...thanks for posting :).
 
Last edited:

SteveG

Member
Joined
Dec 21, 2009
Messages
2,988
Location
Eugene, Oregon 97404
If one is going to make a totally transparent (or near transparent) blank, they will go through much the same steps for sanding, buffing, etc., the inside of the hole as is done for the outer surface, with much, much greater degree of difficulty. That is the extreme case. If you want to just 'clean up' the inside of the hole to remove visual texture from drilling, do use sharp drill bits. Following that, you can smooth the inner surface with a round file, and follow up with fine grit sandpaper wrapped on a dowel or punch that you mount in a hand drill. Then use whatever painting regimen you desire. The sanding step will go a long way to avoiding unwanted appearance of the drilled hole when viewing the finished pen.
 

mredburn

IAP Activities Manager
Staff member
Joined
Jul 5, 2009
Messages
8,753
Location
Fort Myers FL
Tony you might try taking a 1/4 rod. about 4 inches long or so. Cut a slit in it 1 to 1 1/2 indes deep and use sand paper to clean up the inside of the blanks. Use it in a drill.
Here is a link that show some for sale but you can make one from a straight rod from HD or Lowes etc.
split mandrel
 

Brian G

Member
Joined
Jul 2, 2013
Messages
1,571
Location
Bloomington, MN
A small slice of adhesive-backed sandpaper on a small dowel works, too. Just don't be too aggressive and end up with a hole that's too big.
 

ribanett

Member
Joined
Dec 15, 2007
Messages
381
Location
Kenner, LA, USA.
Try Acetone

After sanding with 1500 W/D paper. I rub down the bore with a Q-Tip dipped in acetone. The acetone is a solvent of the resin I use and smooths the surface to a gloss.
 

ed4copies

Local Chapter Manager
Joined
Mar 25, 2005
Messages
24,527
Location
Racine, WI, USA.
Cast your own "plastic" blanks, using only opaque dyes, and lots of them.

Your pens will have no "depth", but the tubes will not be visible.
 
Joined
May 14, 2012
Messages
667
Location
Rapid City,SD
If you have enough leeway on the ends Curtis Seebeck showed us at arrowmont how to use a bit that was 1/32 bigger than needed, cast the drilled hole in an opaque alumalite color, then redrill. Using a complementary color it looks pretty good.
 

Ric

Member
Joined
Feb 10, 2014
Messages
88
Location
Chilliwack British Columbia CANADA
I take it Ed that you make your own "plastic" blanks I have tried fooling around with a kit that you buy & make up blanks that way, but I had disastrous results with huge respiratory issues Both my wife & I are handicapped & we both have breathing problems (COPD & Asthma) I have a friend near by who has offered to do it at their place, but I don't want to impose too much, so aside from some of the very simple pours, I must rely on purchasing my blanks. The good thing about that is I don't have to account for as many mistakes. I would dearly love to investigate the process more by being in contact with someone who uses different systems on a regular basis, or several people who use different systems, that way I can compare. Then perhaps I could record it all so that others will be able to see our findings & then they can refine the process even more, with the ultimate goal of achieving ....was going to say perfection here but I know that's mathematically impossible. One of the most impressive " mixing magicians I have come across so far is a girl called Marla at Marla's Fine turnings, she incorporates bird feathers into her silicone blanks. Sorry, but I have to sign off now, fading fast...there is more I wanted to say, but it will just have to wait. Perhaps you can start the ball rolling by telling me of your process for pen blank making?
Thank yo for listening.
 

TonyL

Member
Joined
Mar 9, 2014
Messages
8,915
Location
Georgia
Great ideas and feedback from all. Looking forward to trying many of the suggestions!
 

Chasper

Member
Joined
Mar 22, 2007
Messages
1,987
Location
Indiana
The solution is always to paint the inside of the hole. Painting the tube is a waste of time if the inside of the drilled hole is not painted. Getting the inside surface of the hole smooth is important; sharp drill bits help, I use a chain saw file as a final effort to get the painting surface smooth.
 
Joined
May 14, 2012
Messages
667
Location
Rapid City,SD
I take it Ed that you make your own "plastic" blanks I have tried fooling around with a kit that you buy & make up blanks that way, but I had disastrous results with huge respiratory issues Both my wife & I are handicapped & we both have breathing problems (COPD & Asthma) I have a friend near by who has offered to do it at their place, but I don't want to impose too much, so aside from some of the very simple pours, I must rely on purchasing my blanks. The good thing about that is I don't have to account for as many mistakes. I would dearly love to investigate the process more by being in contact with someone who uses different systems on a regular basis, or several people who use different systems, that way I can compare. Then perhaps I could record it all so that others will be able to see our findings & then they can refine the process even more, with the ultimate goal of achieving ....was going to say perfection here but I know that's mathematically impossible. One of the most impressive " mixing magicians I have come across so far is a girl called Marla at Marla's Fine turnings, she incorporates bird feathers into her silicone blanks. Sorry, but I have to sign off now, fading fast...there is more I wanted to say, but it will just have to wait. Perhaps you can start the ball rolling by telling me of your process for pen blank making?
Thank yo for listening.

The kit you used was polyester resin, you want to use alumalite, little smell indoor casting with no issue from fumes. Search alumalite on YouTube and you will find some casting videos.
 

Ric

Member
Joined
Feb 10, 2014
Messages
88
Location
Chilliwack British Columbia CANADA
Well thanks kindly there "Leatherman." I shall do just that, as soon as I investigate Facebook. This social networking concept is a bit new to me, but I will check out "alumilite."
Thanks again Levi.
"ALWAYS LOOK ON THE BRIGHT SIDE OF LIFE"-
Erik Idyl- from Monty Python's "The Life of Brian"
 
Joined
May 14, 2012
Messages
667
Location
Rapid City,SD
Well thanks kindly there "Leatherman." I shall do just that, as soon as I investigate Facebook. This social networking concept is a bit new to me, but I will check out "alumilite."
Thanks again Levi.
"ALWAYS LOOK ON THE BRIGHT SIDE OF LIFE"-
Erik Idyl- from Monty Python's "The Life of Brian"


Look for Curtis Seebeck (TurnTex) on YouTube. He has a few videos on casting.
 

Kiwiturner

Member
Joined
Jun 26, 2015
Messages
18
Interesting thoughts. I use the brass tube standard for thicker blanks, Sierra & Bullet kits and a white enamel tube with a really good coating of CA on the tube and in the blank. I also use a very sharp/new drill bit and drill at a uniform speed. The CA will cover any striations and act as a clear and transparent filler.

Works like a charm for those thin slimelines.
 

raar25

Member
Joined
Mar 29, 2011
Messages
770
Location
Glastonbury CT
Just to add a little more to the mix I typically paint the inside of the blank and put a drop or two of paint into the epoxy (don't put too much or you will interfere with the curing) as well so the color of the glue covers the tube and any spots which may get scratched off during insertions. This pretty much hides the tube for most every plastic type material I use.
 

lwalper

Member
Joined
Mar 16, 2014
Messages
492
Location
Lancaster, TN
For sanding the inside of the hole I've not gotten so creative as hunting for a correct sized dowel. I use a drill bit mounted in a 3-jaw chuck in the lathe. For a 7mm hole use a 3/16 bit. The sharp edges of the bit will grab a wrap of 240 grit sandpaper and slide right down the inside of the hole. If you want a tighter / looser fit you can always experiment with how many wraps of paper to add. Go on up with the grits and end with a bit of plastic polish on a little paper toweling if you really want the inside to be smooth.
 

BSea

Member
Joined
Dec 28, 2009
Messages
4,628
Location
Little Rock, Arkansas
Now I hate to think that perhaps some of these blanks might be considered warranty issue due to the lack of colour in the blank, but I do get a bit perplexed on thinking of new solutions on how to remedy this...
So are there any others out there that are encountering this situation, & what is your solution......
Thanx agin'..."Always look on the bright side of life."Monty Python"

"IF LIFE GIVES YOU LEMONS, MAKE MOJITOS"
Sometimes there isn't enough pearl color in blanks. This can almost always be remedied by painting the inside of the blank. That may or may not fall into a warranty issue. Personally, I'd replace the blank if I thought there wasn't enough pearl in the mix. But that's me. I will say that some colors are just more translucent. Even with plenty of pigment, the brass can show through, or change the color.

If the blank was almost clear with other colors that are more dense, that's another issue entirely. Some blanks are just more clear by design, and have to be reverse painted. In those instances, the blanks should be marked as requiring to be painted for best results.

I don't think you have to go overboard trying to match color. Something close almost always gives a good result. Sometimes adding a darker or lighter shade will enhance the original blank even more (I realize this is subjective).

Attached is a picture of two pens made from the same blank that I cut in half. One I painted the inside of the blank red, and the other black. The blank is clear red mixed with a pearl red, so painting the blank was required.
 

Attachments

  • Twins 1.jpg
    Twins 1.jpg
    295.4 KB · Views: 205

KCW

Member
Joined
Dec 18, 2014
Messages
382
Location
Lincoln, NE
Now I hate to think that perhaps some of these blanks might be considered warranty issue due to the lack of colour in the blank, but I do get a bit perplexed on thinking of new solutions on how to remedy this...
So are there any others out there that are encountering this situation, & what is your solution......
Thanx agin'..."Always look on the bright side of life."Monty Python"

"IF LIFE GIVES YOU LEMONS, MAKE MOJITOS"
Sometimes there isn't enough pearl color in blanks. This can almost always be remedied by painting the inside of the blank. That may or may not fall into a warranty issue. Personally, I'd replace the blank if I thought there wasn't enough pearl in the mix. But that's me. I will say that some colors are just more translucent. Even with plenty of pigment, the brass can show through, or change the color.

If the blank was almost clear with other colors that are more dense, that's another issue entirely. Some blanks are just more clear by design, and have to be reverse painted. In those instances, the blanks should be marked as requiring to be painted for best results.

I don't think you have to go overboard trying to match color. Something close almost always gives a good result. Sometimes adding a darker or lighter shade will enhance the original blank even more (I realize this is subjective).

Attached is a picture of two pens made from the same blank that I cut in half. One I painted the inside of the blank red, and the other black. The blank is clear red mixed with a pearl red, so painting the blank was required.

I know it is a bit off subject, but can I ask you Bob, where do you get that red pearl pigment? I have been trying to find that color, and cannot.
 

BSea

Member
Joined
Dec 28, 2009
Messages
4,628
Location
Little Rock, Arkansas
I know it is a bit off subject, but can I ask you Bob, where do you get that red pearl pigment? I have been trying to find that color, and cannot.
The color is called metallic pearl red raisin. It was sold by Coastal Scents. But you may or may not know Coastal no longer sells mica powder. I will tell you that the red pearl is a little darker than it looks in the picture. I think the translucent red dye helps lighten it up.

You're probably looking for a bright pearl red. The best way I know is to reverse paint the plank a color closer to what you want. I know the pen on the right was painted with a bright red paint.

Hope this helps.
 

Wood Butcher

Local Chapter Leader
Joined
Jun 8, 2005
Messages
970
Location
Westfield, IN, USA.
This is an interesting topic and one that I have had to address when turning acrylic acetate, Inlace isn't as much of a problem due to the increased opacity. What if we take a different approach. I've painted the tubes and painted the drilled hole and I have painted both. I have tried a lot of different paints both swabbed and sprayed and it has never come out as good as I wanted. The idea that's rolling around in my mind is, what if I drill a hole 1/16" bigger than required and then turn and insert a solid color rod. If the blank is cut to almost net length and the rod is glued only at the ends with a minimal amount of thin or medium CA (the solvent used to assemble Plexiglas may work here too) to hold it while the required size hole is drilled, it may be possible to manufacture a "liner" for the hole that is controllable as far as the color and visibility of the adhesive and or sanding scratches. I suppose one could use patterned acrylic for the rod and get an interesting affect too. Does this make any sense? Yeah, it's more work but may be fun to play around with. What say you folks?
WB
 
Top Bottom