Help a newbie finish

Signed-In Members Don't See This Ad

kentonjm

Member
Joined
Jul 12, 2016
Messages
149
Location
Phoenix, AZ
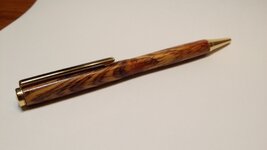
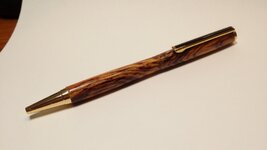
I am new to the whole pen making thing and am reasonably ok with the turning part but am really struggling with finishing. I was working on a pen yesterday to submit to the Turning Challenged Contest as I know I qualify and I just can not enter it as the fit and finish are just horrible. This is only my 8th pen and some of those came out perfect, I just dont know what I am doing right or wrong.

I have posted a couple of pics below and you can see that one of the issues is with the CA finish chipping on the edges. I guess this is due to the way the CA also goes onto the bushing and then snaps off when you separate the blank from the bushings.

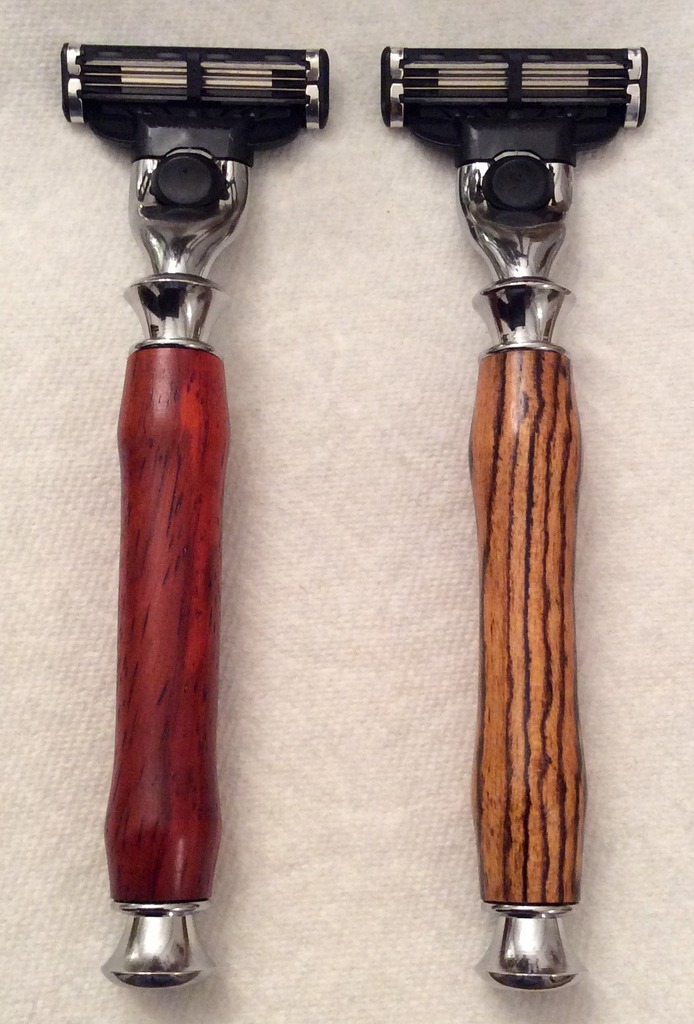
I did previously try with some of those little silicon cones and the issue then was the CA getting on the ends. When I tried to sand the ends clean it also broke some of the CA off the edges.

FYI I have been trying either straight CA or the BLO/CA method. I find the BLO/CA easier and like the look but they issue I have then is that when I sand/polish with those little colored micromesh pads it seems I am sometimes going through the finish. The results are really inconsistent and I would love to know why sometimes its fine and others not.

As far as fit is concerned I believe I am turning to the bushings but then I sand and some more comes off and when you add the CA finish it does build up somewhat so how does one make sure you end up with the appropriate diameter to have a perfect fit with the kit parts.

I know I am new to this but would love to figure out a process that I can work on learning and get reliable results.

Thanks in advance for your help.
 

Attachments

  • 2016-08-15 11.54.49.jpg
    2016-08-15 11.54.49.jpg
    76.2 KB · Views: 264
  • 2016-08-15 11.53.46.jpg
    2016-08-15 11.53.46.jpg
    76 KB · Views: 235
Signed-In Members Don't See This Ad

Jonlane71

Member
Joined
Oct 12, 2015
Messages
28
Location
Georgia
--------------------------------------------------------------------------------

My method is pretty simple for CA and it seems to work. I sand as normal and use DNA to clean the blank before application of the CA. I use non stick bushings and use the Blue shop paper towels from WalMart cut into 9 strips. I only use the thin CA and apply it to the paper towels and smooth evenly at 500 RPM, with each coat I switch directions and apply the opposite way than the previous, spraying with an accelerator between each coat. When all 9 coats have been applied I will take the blank off of the non stick bushings and clean up the ends with a little bit of sandpaper usually 600 grit laying flat on the table and moving the blank in a circular motion until it is flat. I then place the blank back on the original bushings and use "0000" Steel Wool to sand it down lightly. That's if there are not any bad spots. I then use a buffing compound from CA to polish up the blank until you reach the desired shine. This works for me, and if you ask 5 different people you will get 10 different answers. Hope this helps and is not confusing. Also you can do a search for CA finishing and you will find lots of answers. Good Luck!

__________________
 

Edgar

New Member Advocate
Staff member
Joined
Feb 6, 2013
Messages
6,897
Location
Alvin, TX 77511
Hi Jon,
Developing a good finishing technique can be one of the most difficult parts of pen making. There are many options & techniques and my best suggestion is to read about and study other's techniques, find one or more that you like, then practice, practice, practice. There are many threads here and even library articles on various techniqes and there are lots of YouTube videos on the subject.

One thing you might try is to turn some scrap wood to a round shape between centers (don't even bother drilling a hole), then practice applying a finish. If you don't like the results, just turn it down a little farther & try again. You can make many trial & error efforts on one piece of wood this way.

As far as what you are experiencing, my guess is that your CA coats might be a little thick, so you might try reducing the amount that you use on each layer.

For what it's worth, here's my CA technique.
I turn, sand and finish all at high speed - about 2000-2500 RPM.
I sand to at least 600 grit (sometimes up to 2500 or 3200 depending on the wood). Then I burnish the wood with a pinch of the turning shavings. Then I wipe the whole thing really well with denatured alcohol & let it spin for 15-30 seconds to let it evaporate well.
At this point the wood is quite smooth and I can go several routes -- sometimes I just give it a carnauba wax finish with a white HUT bar, sometimes I use friction polish & sometimes I use CA or some other kind of finish like CraftCoat.

When I go with CA, I simply fold a piece of white Bounty select-a-size paper towel twice, with the back side exposed and apply just a couple of drops of thin CA to the towel. I then wipe it back and forth over the blank, rapidly, 3 or 4 times. I let it spin for about 15 seconds, then repeat with another coat. I usually repeat this 4-6 times, depending on how it looks.

Once I decide to quit applying CA, I let it spin for another minute or two, then I hit it with a white HUT bar, then buff that off with a wad of paper towel.

This is not a high-build CA finish that some people like. It looks more like a friction polish finish, but usually a little shinier and (so far) it appears to be a little more durable.

Personally, I don't particularly care for the "encased in glass" CA finishes. I like the look & feel of wood and if I want a blank that looks & feels like plastic, I'll just start with an acrylic blank in the first place. That's just me though - other folks have different opinions and that's fine too.

The thing that I do like about my technique is that it is extremely easy and quick and almost foolproof. Just get the wood nice and smooth to begin with and you don't have to do any further sanding after applying the CA finish. Applying and buffing the carnauba wax topping while the CA is still a little soft helps to smooth things out and enhance the shine.

This is just one technique and I don't necessarily recommend it over any other. It's just one that I've stumbled onto by trial & error that I find easy to do and gives me consistent results that I'm happy with.
 
Last edited:

kentonjm

Member
Joined
Jul 12, 2016
Messages
149
Location
Phoenix, AZ
Thanks Jon and Edgar.

Edgar, I like the idea of some of your alternate finishes as I am not a particular fan of the 'plastic' like finish that CA produces. I am at heart a woodworker not necessarily a pen maker so all my work is wood based and I love the feel of a natural wood finish.

I have looked much online about pen finishing and most folks seem to say that due to the amount of touching that pens get a regular wood/wax finish just wont hold up to the wear which is why the CA approaches seems so popular.

I did just get some friction polish so will give that a go and for CA I think I will try again with the non stick bushings/cones and see how that works.

Thanks again for the help thus far.
 

robertkulp

Member
Joined
Mar 26, 2014
Messages
286
Location
Murfreesboro, TN
If you're using a good quality CA, you can go from a satin to high gloss finish. The satin still feels and looks like wood, while the high gloss is more like polished glass. Again, if you're using a good quality CA, you won't need much. I've found that most people apply far too much at a time and end up with lots of swirls and ridges that have to be sanded down.

Once you get to medium CA, just use a tiny amount - 2-3 small drops are all that's needed per pass and just a few coats. Globbing it on will only cause problems. Once you're done with the CA you should need very little follow-up sanding. For that sanding, I've found that Abranet blows away regular sandpaper. Then, just some light polishing to whatever level of luster you desire.
 

farmer

Member
Joined
Jun 16, 2012
Messages
807
Location
NV
Wood

Thanks Jon and Edgar.

Edgar, I like the idea of some of your alternate finishes as I am not a particular fan of the 'plastic' like finish that CA produces. I am at heart a woodworker not necessarily a pen maker so all my work is wood based and I love the feel of a natural wood finish.

I have looked much online about pen finishing and most folks seem to say that due to the amount of touching that pens get a regular wood/wax finish just wont hold up to the wear which is why the CA approaches seems so popular.

I did just get some friction polish so will give that a go and for CA I think I will try again with the non stick bushings/cones and see how that works.

Thanks again for the help thus far.

I use Lighter fluid and synthetic car wax to temporary seal maple pool cue shafts.
Players with hot sweaty hands is really tough to keep their cue shafts clean smooth and not sticky .

Seal and burnish with lighter light fluid and use synthetic car wax ..
Lots of lighter fluid, soak the towel or squirt the lighter fluid directly on the wood .
With your lathe as fast as it will go. and burnish the wood .

My first time around I tried this technic I didn't use enough lighter fluid and it was a fail .

My mentor had to get pushy with me to get me to use enough lighter fluid ..
I figured this idea was bat $hit insane and I wasn't going to screw up a expensive cue shaft , and I was worried about the scent .
I was wrong, Lighter fluid works on the cue shafts and after its waxed there is no scent of the lighter fluid .

On a pen I think it would take 5 or10 minutes to apply the lighter fluid and to burnish it ..

Use a test piece of wood and try it .
Lighter fluid is cheap and easy to buy, I use Meguiars Ultimate pure polymer synthetic car past wax ..from the local auto parts store .
Put the wax on micro thin as in like there is no wax film at all .
THEN IT WILL DRY , then I buff .
The wax will wear off in about 40 hrs of use ...and them will need to be waxed again .

You could try wood hardener !
Put some wood hardener on, it will seal the wood .then synthetic wax over that .

Synthetic wax has a much higher melting point then the 3 known natural waxes use commercially .

Synthetic waxes have a harder surface the natural waxes do too.

.
Lighter fluid contains paraffin oil....... that helps seal the wood grain from dirt and grim and moisture .
I also use meguairs Show Gaze wax ( Liquid ) mainly used in auto body paint shops . Good stuff .

I haven't made many pens and wouldn't use lighter fluid once the pen is assembled .

There is also Orange oil and bees wax that can be bought at your local hardware store .

The Wood hardener is not temporary .
 

corgicoupe

Member
Joined
Mar 9, 2016
Messages
237
Location
Smoke Rise, GA
Thanks Jon and Edgar.

Edgar, I like the idea of some of your alternate finishes as I am not a particular fan of the 'plastic' like finish that CA produces. I am at heart a woodworker not necessarily a pen maker so all my work is wood based and I love the feel of a natural wood finish.

I have looked much online about pen finishing and most folks seem to say that due to the amount of touching that pens get a regular wood/wax finish just wont hold up to the wear which is why the CA approaches seems so popular.

I did just get some friction polish so will give that a go and for CA I think I will try again with the non stick bushings/cones and see how that works.

Thanks again for the help thus far.

I, too, came to pens from hand tool woodworking, and was most familiar with oil/varnish finishes, or rubbed shellac. The former is too slow drying to be convenient for pens, but a mix of walnut oil & shellac will dry quickly. A very nice wood finish can be had with tripoli, white diamond, & wax, but it is not as durable as CA, but if it gets dirty it can be cleaned and waxed again.
 

donstephan

Member
Joined
Jul 24, 2016
Messages
255
Location
Cincinnati Ohio
Jon

Look for a wood turning group in your area. I've been told there is a chapters list somewhere on the national site. You might also inquire at area woodworking supply and equipment retail sales stores. It's almost a certainly there will be some members in the local group that turn pens, and you will be able to discuss in person, watch and try your hand with a mentor over your shoulder.
 

farmer

Member
Joined
Jun 16, 2012
Messages
807
Location
NV
Wood

Thanks Jon and Edgar.

Edgar, I like the idea of some of your alternate finishes as I am not a particular fan of the 'plastic' like finish that CA produces. I am at heart a woodworker not necessarily a pen maker so all my work is wood based and I love the feel of a natural wood finish.

I have looked much online about pen finishing and most folks seem to say that due to the amount of touching that pens get a regular wood/wax finish just wont hold up to the wear which is why the CA approaches seems so popular.

I did just get some friction polish so will give that a go and for CA I think I will try again with the non stick bushings/cones and see how that works.

Thanks again for the help thus far.

I, too, came to pens from hand tool woodworking, and was most familiar with oil/varnish finishes, or rubbed shellac. The former is too slow drying to be convenient for pens, but a mix of walnut oil & shellac will dry quickly. A very nice wood finish can be had with tripoli, white diamond, & wax, but it is not as durable as CA, but if it gets dirty it can be cleaned and waxed again.

Hi
I will have to debate the fact that open grained wood can be cleaned .
Open grained maple cannot be cleaned ......
Dirt and grim actually stain's the wood, once the dirt and grim gets into the tinny micro water pores in the wood , its in there until its sanded or cut out ..

Everytime I get a maple cue shaft in for a new tip I clean and wax the maple shafts.
Once the blue cue tip chalk gets into the unprotected open grained hard rock maple cue shafts, its in there for life...

You can make maple look dirty just handling it with clean hands.
 

mmayo

Member
Joined
Jan 12, 2013
Messages
2,959
Location
Tehachapi, CA
Try BLO/CA too

You might try using BLO (boiled linseed oil), apply it to the blank spinning on the lathe and while the paper towel is still wet add a couple drops of thin CA and rub it back and forth quickly to even it out. Careful the towel will get hot. YOU NEED GLOVES! This is called BLO/CA finish. It is not new and I learned about it on this and other sites. Try 6-10 coats and it should only take 5-10 minutes to complete a blank. It will look like wood, retain the grain and pores yet be protective. The shine is somewhat soft luster which can be very nice.

I did this to five razor sets with brush, razor and stand today and they look and feel great. My personal razor is two years old, gets used a lot and still looks and feels great. One of today's shaving sets and a couple of razors.

0A2E48FD-260D-459B-99FB-32C199700AE2_zpsahffwcax.jpg


CB48CC0F-CF5D-47A7-951E-A6AD58C6AD95_zpsd0jgkoqm.jpg


Add it to your set of techniques.
 
Last edited:

kentonjm

Member
Joined
Jul 12, 2016
Messages
149
Location
Phoenix, AZ
I did an experiment this afternoon. I turned some blanks round and applied 3 different finishes. Straight CA, BLO/CA and EEE Ultrashine + Hut Crystal Coat Friction polish.

The one I linked the best was actually the EEE+Hut, it was the easiest and quickest to apply and has the most natural look and feel. Not sure how it will hold up over time compared to the CA though.

2nd was the BLO/CA which had a nice soft shine and I dont think it will need much of any polishing with micromesh.

the CA alone came out rather rough and will need sanding and micromesh to improve it so much more work.

I did notice that the CA seemed to be taking longer than I would expect to go off. I am using the StickFast CA Wood finish, it says thin but it seems thicker than I would think and not nearly as runny as regular stick fast CA.

What is different about the Wood Finish CA is this what it is supposed to be like or might it be getting old?
 

nativewooder

Member
Joined
Feb 26, 2009
Messages
1,193
Location
Fort Pierce, Fl 34982
Before I retired I switched from CA glue to thinned Lacquer. Used Satin Lacquer and Lacquer Thinner 50/50. I used it as a grain sealer, sanding after each coat, moving through all the grits, sanding after each grit. You determine the shine by the number of coats, all the way up to a high shine. Fast-drying and easy to work with and you don't ever have to lose the "wood feel".
 

randyrls

Member
Joined
Feb 2, 2006
Messages
4,829
Location
Harrisburg, PA 17112
If you are having problems with the CA breaking off, score the joint with an exacto or utility knife while turning the lathe by hand.

Hi Jon, One thing you might try is to turn some scrap wood to a round shape between centers (don't even bother drilling a hole), then practice applying a finish. If you don't like the results, just turn it down a little farther & try again. You can make many trial & error efforts on one piece of wood this way.

Spot on Edgar! I started with a 2" diameter piece about 6" long. Apply a finish to half the blank. Now change one thing on the other half of the blank. Compare the two halves. Better or worse? Turn off the worse one and try to vary something else. Write down at each step what you changed.

Personally, I don't particularly care for the "encased in glass" CA finishes. I like the look & feel of wood and if I want a blank that looks & feels like plastic, I'll just start with an acrylic blank in the first place. That's just me though - other folks have different opinions and that's fine too.

Me too! After I have the CA finished, I use 0000 steel wool. It gives a satin/matte finish that looks like nothing at all!
 
Last edited:

wouldentu2?

Member
Joined
Jan 27, 2011
Messages
899
Location
Oak Creek WI
If you do not like the look of highly polished CA, polish to 12000 with MM and then work your way back down the MM until you get to a level of polish you like. You will still have the protection of CA. All the friction, oil or wax finishes are not durable enough for regular use.
Why put all that time and effort to make something nice that is not going to last.

As far as the fit, are you using a caliper ( Dial or Digital) to accurately measure the diameters of the pen parts and the blank as you turn it and finish it? If not get one.
You cannot turn the blank to match the pen and then expect to add more than a couple coats of CA and have a good fit you need to turn the blank at the business end to slightly less and then add the CA, hence the need for a caliper.

Thin craft foam works fantastic for applying THIN CA to the blank one drop at a time. This will keep you from applying too much CA at a time. After 5 coats lightly sand it to see your coverage, add 5 more coats sand and polish.

Use a razor blade to score near the end of the pen before removing blank or remove the blank every five coats of CA stand the blank on end on 320 sandpaper moving it lightly in a circle to remove the CA hanging off the end of the blank.
 

kentonjm

Member
Joined
Jul 12, 2016
Messages
149
Location
Phoenix, AZ
Thats an interesting new one to me. I have used thinned lacquer as a sanding sealer before but never thought to keep going to get a final finish.

How many coats do you usually apply to get the high shine and if the wood is already sanded to 600 what sanding do you do after each coat?

The one issue I have had with this mix is even thinned lacquer has pretty horrible fumes.

Before I retired I switched from CA glue to thinned Lacquer. Used Satin Lacquer and Lacquer Thinner 50/50. I used it as a grain sealer, sanding after each coat, moving through all the grits, sanding after each grit. You determine the shine by the number of coats, all the way up to a high shine. Fast-drying and easy to work with and you don't ever have to lose the "wood feel".
 

kentonjm

Member
Joined
Jul 12, 2016
Messages
149
Location
Phoenix, AZ
Thanks Dave, a couple of questions.

Do you have any guide as to how many coats equals what thickness?

What process do you use i.e Measure as you turn to check the dia is XX thous below the bushings and then measure again as you add the CA to see when it is at the right size?

As far as the fit, are you using a caliper ( Dial or Digital) to accurately measure the diameters of the pen parts and the blank as you turn it and finish it?

You cannot turn the blank to match the pen and then expect to add more than a couple coats of CA and have a good fit you need to turn the blank at the business end to slightly less and then add the CA, hence the need for a caliper.
 

wouldentu2?

Member
Joined
Jan 27, 2011
Messages
899
Location
Oak Creek WI
"Do you have any guide as to how many coats equals what thickness?"

This would depend on the CA, thin vs medium vs thick and how much you apply.

"What process do you use i.e Measure as you turn to check the die is XX thous below the bushings and then measure again as you add the CA to see when it is at the right size?"

A few thousandths under is usually adequate at the ends because I find the best looking pens are not straight but slightly larger in the middle so more CA ends up there.

After 5 coats lightly sand the blank to see if the CA is going on smoothly and measure. Add another 5 coats of CA sand and check your dimensions, if it is too large at the ends sand a little off there. Polish when your dimensions are there rarely does any polishing affect size.
 
Top Bottom