Bad CA Finish(er)

Signed-In Members Don't See This Ad

mikefoye

Member
Joined
Nov 19, 2015
Messages
36
Location
Lago Vista, Texas 78645
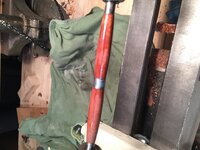
I keep having a problem getting a good finish with CA. I turned the blank (bubinga). Sanded it to 600 and it looked fine. All smooth and no visible scratches. I had lathe on very low speed and applied Super-T Orange CA with paper towel then gave it a spritz of accelerator, waited a couple minutes then repeated this 4 times. At this point the blank looked fine with the exception of swirl marks from the CA application. I then sanded it with 600 to bring some of the swirls out then used micro wet/dry sanding pads to 12,000 and this is what I get. The blanks feel smooth and pass the fingernail test but there are huge blotch areas that remain "unpolished". I have absolutely no problem with acrylics. Can anyone tell me where I am going wrong with wood?
 

Attachments

  • IMG_5008.jpg
    IMG_5008.jpg
    220.9 KB · Views: 669
Signed-In Members Don't See This Ad

CREID

Member
Joined
Jul 23, 2008
Messages
3,009
Location
Vancouver, wa
Yep, I remember that same look when I first started doing a CA finish. Like Sylvanite said. looks like your sanding through the CA.
 

williaty

Member
Joined
Feb 9, 2016
Messages
31
I just *fingers*crossed* stopped doing that myself. At first, I was causing big enough lumps in the CA application that, by the time I'd sanded them down, I'd burnt through to bare wood somewhere else. What really helped me was turning the lathe speed up. Initially, I was applying the CA at 700RPM. By switching up to 1600RPM, I'm applying the CA MUCH more smoothly which turns into less sanding and no burn-through.
 

mikefoye

Member
Joined
Nov 19, 2015
Messages
36
Location
Lago Vista, Texas 78645
Thanks very much to all of you. In looking closer at the blank I am sure that you are all right on. One of the Youtube vidoes I saw had a guy applying the CA by hand turning the lathe. I am going to opt for higher speed and a little more CA. Thanks again.
 

williaty

Member
Joined
Feb 9, 2016
Messages
31
I would hold off on the "little more". Try to apply too much at once and it doesn't set fast enough and becomes a snot ball. I did that one too.

I use a single drop of CA about 1/8" in diameter to do the full length of a long-ish blank like the Rollester. One drop wiped on at 1600RPM, short shot of accelerator, 30 second (using a timer because I always guessed wrong) pause to let it set, then repeat. 3 coats of thin followed by 10 coats of medium. So far, that's working reliably.
 

JimB

Member
Joined
Mar 18, 2008
Messages
4,682
Location
West Henrietta, NY, USA.
Thanks very much to all of you. In looking closer at the blank I am sure that you are all right on. One of the Youtube vidoes I saw had a guy applying the CA by hand turning the lathe. I am going to opt for higher speed and a little more CA. Thanks again.

Do more coats, not more ca for each coat. Many people go through the same thing when starting with ca. As you get more practice you will get the coats to go on smoother and therefore will require less sanding and you won't go through the finish.
 

Dan Masshardt

Member
Joined
Jan 30, 2013
Messages
4,806
Location
Mechanicsburg, PA
You still never said how many coats.

Is the ca you're using thin or medium?

I can't see how really fast speeds would help anything. Anywhere between 300-700 has always worked well for me. Good smooth application is what's most important.

I've actually done the turn by hand method in the past as well with medium ca. It works well too but I found that it was absolutely essential to sand between each coat.
 

mikefoye

Member
Joined
Nov 19, 2015
Messages
36
Location
Lago Vista, Texas 78645
I have been using Super-T Orange (Medium). After reading all of your helpful responses - I have been applying too much at a time (a 6 to 8 drop puddle on a towel) and only 3 or 4 coats. Yesterday I purchased some slower setting Stick-Fast thin and medium. Now all I need to do is practice what you all have said. You folks have done some really beautiful work.
Thanks Much
 

SnazzyPenz

Member
Joined
Mar 21, 2016
Messages
61
Location
Charleston, SC
I also had the same problem until just recently. I started using a medium CA instead of thin and applying about 8-10 coats spraying with an accelerator in between each coat. The trick is to get a nice even coat, so I usually go across the pen twice in each direction with each coat of CA so it smooths it out well. After my last coat, I wet-sand using Acrylic Polishing Pads, I skip the first one and start with 1800 grit and work down to 12000... this has worked great for me so far. Best of luck!
 

budnder

Member
Joined
Dec 28, 2015
Messages
527
Location
Chicago/Tucson
I had an issue with some cracking in my finishes after several weeks, which I eventually attributed to my use of acetone based accelerator, so I was looking for a CA finish that didn't require one... but was running into issues to your picture. This video did the trick for me:

William Young BLO/CA Technique

It uses BLO and medium CA, so not CA only finish, but to me the finish I get is as good as what I get with pure CA, except I don't have any wrinkles/swirls to sand out, so less sanding means less chance that I'll go through the finish.
 

mikefoye

Member
Joined
Nov 19, 2015
Messages
36
Location
Lago Vista, Texas 78645
I tried what was suggested in applying three coats of thin and the 6 coats of medium on a cocobolo blank. I sanded one time to 1800 and then put on diamond buffing wheel. At that point it looked great. Upon disassembly I notice that the finish was trying to flake off so I scratched it lightly with my fingernail and the finish easily flaked off. I happened to be going to my local Woodcraft Store and one of the pen turning guys told me that the problem is not uncommon with cocobolo and other woods from the rosewood family because of the oils in the wood trying to leach out. What I would have to do is when I am thru turning the blank and sand it to 400 that I should wipe it down with acetone and IMMEDIATELY put the first coat of CA down. This will seal it off. I went home and peeled the rest of the CA off, sanded it to 400 and followed his suggestion and the exact same thing happened. I got so frustrated that I made a different beautiful pen with an acrylic blank! I have not tried SnazzyPenz suggestion although I have tried BLO before on Spetraply with some success. Right now exotic wood does not seem to be my friend and I have a lot of beautiful blanks that I would like to be able to use.
 

jttheclockman

Member
Joined
Feb 22, 2005
Messages
19,148
Location
NJ, USA.
I tried what was suggested in applying three coats of thin and the 6 coats of medium on a cocobolo blank. I sanded one time to 1800 and then put on diamond buffing wheel. At that point it looked great. Upon disassembly I notice that the finish was trying to flake off so I scratched it lightly with my fingernail and the finish easily flaked off. I happened to be going to my local Woodcraft Store and one of the pen turning guys told me that the problem is not uncommon with cocobolo and other woods from the rosewood family because of the oils in the wood trying to leach out. What I would have to do is when I am thru turning the blank and sand it to 400 that I should wipe it down with acetone and IMMEDIATELY put the first coat of CA down. This will seal it off. I went home and peeled the rest of the CA off, sanded it to 400 and followed his suggestion and the exact same thing happened. I got so frustrated that I made a different beautiful pen with an acrylic blank! I have not tried SnazzyPenz suggestion although I have tried BLO before on Spetraply with some success. Right now exotic wood does not seem to be my friend and I have a lot of beautiful blanks that I would like to be able to use.


What brand of CA are you using and how old is it??? When you wipe down the blank with acetone you still need to let it dry. It may feel dry to the touch but it will leach on you. Acetone is a product that will dissolve CA so be careful. It is the right product to get rid of the oils in the wood though.
 

williaty

Member
Joined
Feb 9, 2016
Messages
31
I made a bunch of bocote pens recently, which is pretty much as oily as cocobolo. I'd spend at least 45 seconds wiping the blank with acetone. The oil from the wood would actually discolor the paper towel. I'd keep wiping with acetone until the blank quit making the towel turn colors. Once the acetone flashed off, the wood would have a sort of dry and almost chalky appearance, indicating the lack of oil. Once I stopped cleaning, I'd let the blank dry for the amount of time that it took me to cut and fold up a paper towel to apply the CA, find the CA and uncap it, clean the spout if necessary, get my timer set (I do a 30 second timer from after the accelerator to before I put the next drop of CA on the paper towel), etc. I would guess that's probably in the 45 second range.

My bet is that you didn't keep cleaning the blank until the towel stopped showing more oil. Sometimes, it's even taken 2 trips back to the acetone can to keep the paper towel wet before I was done.
 

Arbetlam

Member
Joined
Apr 20, 2013
Messages
118
Location
Auburn Hills Mich.
For what is worth. I sand from 400 to 800 grit until all scratches are gone. Then apply 6 coats of Med.CA. Then use 600 grit to sand off all the shine so that I have a completely dull finish, no shiny spots. Then use the micro mesh 1500-12000 to take out the scratches and polish to a glossy finish.
 

conandy

Member
Joined
Feb 18, 2015
Messages
102
Location
Denver, CO
For what it is worth, I went through the same process finding what worked for me with CA finishing. Sanded through a few finishes while trying to find the happy medium between "enough coats" and "too many coats". Here is my process;

When applying CA, I have the lathe on minimum speed (for me that is like 600 rpm, wish it would go slower, but this speed does not sling off the CA), I dribble it on the turning blank while smoothing back and forth with open-cell foam pads and very light touch (same material used in the foam paint brushes). This smooths out the CA very nicely and I get more consistent layers than I ever did with paper towels. The foam does tend to react with the thin CA though (hasn't been a factor with medium), so if you are doing a two-piece pen, switch pads between pen halves, or it will flash and bond to the second piece.

1. Sand to 600 or 1000 grit.

2. 2 coats thin CA. (haven't done the acetone on oily woods to date, but that sounds like great advice from the other posters).

3. 2 coats medium CA. These build up thickness nicely. Accelerator after 40 seconds of drying, then wait another 30 seconds before applying next coat. Otherwise you will get a surprise when that odd bit of accelerator welds your foam pad to the work-piece on the next coat.

4. 1 or 2 coats of thin CA. This will really fill in the roughness of the medium CA coats and reduce the amount of leveling required. Never apply accelerator to the very last coat. Let it dry at least a couple of minutes normally to keep from "fogging" up the finish with the accelerator.

5. Level with 400 grit wet sandpaper. Sand until the entire blank has the same dull sheen to show you have leveled all the high spots. Any glossy spots left are low spots and you need to keep going. With the process above, I have yet to sand all the way through the finish with 400 grit at this stage. Any rougher grit and I think the risk is too great.

6. Gently sand with 600 wet then 1000 wet.

7. Micromesh to 12,000. Since I sand to 1000 with sandpaper, I can usually skip the first 2 grits of micromesh. I found that quality wet/dry sandpaper seems to be a little more predictable on removing and leveling than the rougher micromesh pads, but I haven't done a side by side test with a magnifying glass to verify.

I do know my process needs to improve by adding a buffing system in place of the micro-mesh if I want truly glass clear finishes, but so far this has worked very well for me. Definitely get better polishing results if you let the CA finish cure overnight (after step 4 or 5) before leveling and polishing out.

Also, your mileage may vary depending on the CA glue you use. I found StickFast medium CA to be a touch too thick to flow out nicely for finishing, but the Satellite City medium CA seems to flow pretty well, at least until the bottle has been open a few months. The foam pads help for sure.
 

sschering

Member
Joined
Dec 23, 2009
Messages
382
Location
Eugene, OR
Also, your mileage may vary depending on the CA glue you use. I found StickFast medium CA to be a touch too thick to flow out nicely for finishing, but the Satellite City medium CA seems to flow pretty well, at least until the bottle has been open a few months. The foam pads help for sure.

I'm having the same experience.. I'm having a hell of a time getting stickfast down smooth. I've head great results with Mercury CA and Bob Smith CA as long as it's fresh.
 

campzeke

Member
Joined
Jun 28, 2015
Messages
577
Location
Tampa, FL
Ahhhh .... So I am not alone. I see there are some good tips in the suggestion box that I too must try.
 

robertkulp

Member
Joined
Mar 26, 2014
Messages
286
Location
Murfreesboro, TN
I found StickFast medium CA to be a touch too thick to flow out nicely for finishing, but the Satellite City medium CA seems to flow pretty well, at least until the bottle has been open a few months.

I'm having a hell of a time getting stickfast down smooth. I've head great results with Mercury CA and Bob Smith CA as long as it's fresh.

Stick Fast's medium is 600 cps, which is borderline being classified as "thick". Mercury's M300M is 300 cps, BSI's Insta-Cure+ is 250-300 cps, and Satellite City's Super T is 200-300 cps.

I've never used Stick Fast, so I can't directly speak for it, but I know a lot of people who have switched from Stick Fast to Mercury. Certainly everyone has their favorites, but I've never heard anyone really claiming that SF is theirs.
 
Last edited:

williaty

Member
Joined
Feb 9, 2016
Messages
31
Huh, I wonder if the high SF Medium viscosity is why I had trouble getting it to level until I turned the lathe speed up to 3600RPM?
 

efrulla

Member
Joined
Oct 15, 2014
Messages
84
Location
Warrensburg, NY USA
I have only been doing this for a year but I get my best results applying a coat of thin CA and letting that set on its own (no accelerator). I then give it another coat of thin CA and once again no accelerator. After that I switch to medium CA and give it at a minimum of 9 coats with an accelerator shot between each coat. I find that if I get the accelerator too close it will sometimes screw up the finish so I stay at least 18 inches away and just give it a couple of spritzes.

Like I said, I have only been doing this for a year but this process works for me
 

mikefoye

Member
Joined
Nov 19, 2015
Messages
36
Location
Lago Vista, Texas 78645
I have followed the advice with good success until yesterday. I just turned a blank of red dyed aussie maple burl to a real good finish prior to sanding. I gave it a light sanding at 600 prior to CA. All looked good when ready to finish. I waxed the bushings. I cleaned blanks with alcohol and allowed to dry then I applied 4 coats of thin with accelerator allowing a minute to dry between coats then applied 6 coats of medium and allowed each coat to dry. I light sanded to 600 then buffed them with a Tripoli wheel then a diamond wheel and polished. After taking blanks off lathe I notice a tiny bit of flaking at the end. When I scratched it a little it flaked off and with a little more pressure it came off in small chunks. I put them back on the lathe, turned them down below the CA, resanded to 600 then cleaned with Acetone then put on plastic bushings and repeated what I did before. At the end of each process described above I let the completely coated blanks dry for hours before I lightly sanded to 800 then put on buffing wheels. In all cases they looked beautiful but in both cases there is flaking of the CA. It appears that the base coat is not adhering to the wood.
Me? Bad Wood? Bad CA? (I have had it for a few months and have had no problems to date)
 

jttheclockman

Member
Joined
Feb 22, 2005
Messages
19,148
Location
NJ, USA.
I have followed the advice with good success until yesterday. I just turned a blank of red dyed aussie maple burl to a real good finish prior to sanding. I gave it a light sanding at 600 prior to CA. All looked good when ready to finish. I waxed the bushings. I cleaned blanks with alcohol and allowed to dry then I applied 4 coats of thin with accelerator allowing a minute to dry between coats then applied 6 coats of medium and allowed each coat to dry. I light sanded to 600 then buffed them with a Tripoli wheel then a diamond wheel and polished. After taking blanks off lathe I notice a tiny bit of flaking at the end. When I scratched it a little it flaked off and with a little more pressure it came off in small chunks. I put them back on the lathe, turned them down below the CA, resanded to 600 then cleaned with Acetone then put on plastic bushings and repeated what I did before. At the end of each process described above I let the completely coated blanks dry for hours before I lightly sanded to 800 then put on buffing wheels. In all cases they looked beautiful but in both cases there is flaking of the CA. It appears that the base coat is not adhering to the wood.
Me? Bad Wood? Bad CA? (I have had it for a few months and have had no problems to date)


I do not believe you are telling us everything:). Did you sand the ends after you did your CA dance. ??? Did the blank come loose of the bushings easily??? Why do you sand with 800 grit??? Where is the flaking happening??? Your CA maybe bad. CA will stick to any wood provided you clean with acetone which you say you did. It is a glue. Skip the accelerator especially on thin CA it dries fast enough.
 
Top Bottom