Anodising Titanium

Signed-In Members Don't See This Ad

BradG

Member
Joined
Jul 10, 2011
Messages
1,733
Location
Blackpool -UK
Anodising titanium is similar to anodising aluminium, wherein the same equipment can be used, albeit with a slightly different procedure.

No dyes are required, the beautiful colour spectrum is locked within the metal and is brought out depending on what voltage is flowed through the piece in the anodising tank. 25 Volts will yield a dark purple, whereas 35 volts will bring out an electric blue as pictured. different colours can be produced by increasing the voltages up to around 110 volts. needless to say special precautions need to be taken while using higher voltages such as these, oppose to the typical 12-18V threshold you may be familiar with anodising aluminium.
This piece i have anodised to show Skiprat what can be done with one of his favourite metals. at a later date i will expand upon this practice and do a tutorial series on how to do this safely at home.

580333_346923242066015_43081127_n.jpg


I have attached a colour chart which will give you a rough idea as to what colours can be acheived with different voltages.
 

Attachments

  • colour chart.jpg
    colour chart.jpg
    56.9 KB · Views: 33,044
Last edited:
Signed-In Members Don't See This Ad

skiprat

Passed Away Mar 22, 2022
In Memoriam
Joined
Oct 19, 2006
Messages
7,812
Location
In a Skip in Wales
Saaaa weeeet!! :biggrin:

So Brad, can you mask and or use different voltages to get different colours on the same workpiece?

How durable is the colouring? Is it practical for something that will be handled often?
 

D.Oliver

Member
Joined
May 10, 2011
Messages
3,531
Location
Faith SD
I'm worried that if you and Steven start collaborating on things my computer won't be able to handle it. It will give me the "awesome capacity has been exceeded" message and then will start smoking.
 

BradG

Member
Joined
Jul 10, 2011
Messages
1,733
Location
Blackpool -UK
not that i want to make you explode with excitement....... but you can do a little bit more than just mask and apply a second colour with the right skills

utamaro1.JPG


prince15.JPG


Credits to Jean for the artwork. This is not my work but does give you a good idea what you can accomplish. il go into details in the tutorials on how this is done.

As for durability, yes its very durable. not something which will simply rub off by being handled. though the good thing with anodised Ti is its easier to strip than sealed aluminium if you dont like the look of it, and want to change it somewhat.
 

skiprat

Passed Away Mar 22, 2022
In Memoriam
Joined
Oct 19, 2006
Messages
7,812
Location
In a Skip in Wales
Very impressive stuff there Brad.....

LOL....all we need to do now is find someone with the 'right skills' !!:biggrin:

Somewhere in my little rat cave I have a power supply unit that has a fully variable volt and current output so one of these fine days I'm going to have to dust it off and have a go too.

The volt/colour chart is very interesting. How does 'Time' and 'Material thickness' effect the process?
 

BradG

Member
Joined
Jul 10, 2011
Messages
1,733
Location
Blackpool -UK
The colour takes seconds to appear. literally 2-3 seconds. the images you see above are alot easier than you think. the skilled part is outlining the pieces. Jean does this by hand using a press engraver which is the tool you can see in the picture with the two pendants.

Once the outline is there you then colour in between the lines.. you do this using a tooth pick with a strand of wire placed towards the tip with the electrolyte soaked up in the toothpick. you then treat it like a paint brush and vary the "paints colour" by tweaking the voltage as you go.

Il be manufacturing the tools for doing this soon, maybe you would like to demo one ;)

Material thickness is irrelevant as you are actually building an oxidised layer on top of the surface of the Ti. the only variation it would cause is the surface area of the titanium which would have an effect on the ampere, though with dealing with the size of the pieces we are using its negligable, at around 0.07A per square inch
 

skiprat

Passed Away Mar 22, 2022
In Memoriam
Joined
Oct 19, 2006
Messages
7,812
Location
In a Skip in Wales
Il be manufacturing the tools for doing this soon, maybe you would like to demo one ;)


Well, the rest of the clevery stuff sound like a piece of cake !!:rolleyes: ( Yeah right!!! :biggrin: )

The hard bit is me ever demo'ing anything!!! :redface:I have ten thumbs and hams for hands, so I'll just watch, learn and chirp in from the background now and then, till I get time, money and courage enough to have a go myself. !!:wink:
 

PenPal

Member
Joined
Nov 29, 2006
Messages
2,708
Location
Canberra, A.C.T., Australia.
Brad,

On viewing my first thought I would like to give that a whorl as you have, find this fascinating. Years ago I was told the chemicals are carcionogenic is this so?

Completely intrigued by the process look forward to further instalments.


Kind regards Peter.
 

BradG

Member
Joined
Jul 10, 2011
Messages
1,733
Location
Blackpool -UK
Hi Peter
Ive put the following post together for reference on the main chemicals i use for you. The MSDS (Material safety data sheets) cover absolutely everything and can be quite intimidating to read. I would sum up that you are at risk of irritating your respiratory tract, eyes, burning skin with anodising. Much more care should be taken with plating.

Please read all MSDS's on the topic you are interested in to be familiar of the risks.

Anodising Aluminium & titanium
Elements used:
Sulphuric Acid (used in anodising tank)
559544_347131315378541_1506830627_n.jpg

corrosive.gif
poison.gif

Potential Acute Health Effects:
Very hazardous in case of skin contact (corrosive, irritant, permeator), of eye contact (irritant, corrosive), of ingestion,
of inhalation. Liquid or spray mist may produce tissue damage particularly on mucous membranes of eyes, mouth and
respiratory tract. Skin contact may produce burns. Inhalation of the spray mist may produce severe irritation of respiratory
tract, characterized by coughing, choking, or shortness of breath. Severe over-exposure can result in death. Inflammation of
the eye is characterized by redness, watering, and itching. Skin inflammation is characterized by itching, scaling, reddening,
or, occasionally, blistering.


Caustic Soda (used for etching /matte finishing / desmutting)
189311_347131272045212_1794466776_n.jpg

corrosive.gif

Potential Acute Health Effects:
Very hazardous in case of skin contact (corrosive, irritant, permeator), of eye contact (irritant, corrosive), of ingestion,
of inhalation. The amount of tissue damage depends on length of contact. Eye contact can result in corneal damage or
blindness. Skin contact can produce inflammation and blistering. Inhalation of dust will produce irritation to gastro-intestinal or
respiratory tract, characterized by burning, sneezing and coughing. Severe over-exposure can produce lung damage, choking,
unconsciousness or death. Inflammation of the eye is characterized by redness, watering, and itching. Skin inflammation is

characterized by itching, scaling, reddening, or, occasionally, blistering.

Full MSDS:
http://www.sciencelab.com/msds.php?msdsId=9924998


Distilled water
Harmless unless breathed in quantity.

Dyes:
Each dye will come with its own MSDS which should be studied before use.


Gold plating
Elements used:
Potassium Cyanide (used for plating the gold)
199885_347131335378539_673848880_n.jpg

poison.gif

Potential Acute Health Effects:
Extremely hazardous in case of skin contact (irritant), of eye contact (irritant), of ingestion, of inhalation. Very hazardous in
case of skin contact (corrosive). The amount of tissue damage depends on length of contact. Eye contact can result in corneal
damage or blindness. Skin contact can produce inflammation and blistering. Inhalation of dust will produce irritation to gastrointestinal
or respiratory tract, characterized by burning, sneezing and coughing. Severe over-exposure can produce lung
damage, choking, unconsciousness or death. Inflammation of the eye is characterized by redness, watering, and itching. Skin

inflammation is characterized by itching, scaling, reddening, or, occasionally, blistering.

Full MSDS:
http://www.sciencelab.com/msds.php?msdsId=9924192


Hydrochloric acid (used for activating)
189311_347131272045212_1794466776_n.jpg

corrosive.gif

Potential Acute Health Effects:
Very hazardous in case of skin contact (corrosive, irritant, permeator), of eye contact (irritant, corrosive), of ingestion, . Slightly
hazardous in case of inhalation (lung sensitizer). Non-corrosive for lungs. Liquid or spray mist may produce tissue damage
particularly on mucous membranes of eyes, mouth and respiratory tract. Skin contact may produce burns. Inhalation of the
spray mist may produce severe irritation of respiratory tract, characterized by coughing, choking, or shortness of breath.
Severe over-exposure can result in death. Inflammation of the eye is characterized by redness, watering, and itching. Skin

inflammation is characterized by itching, scaling, reddening, or, occasionally, blistering.

Full MSDS:
http://www.sciencelab.com/msds.php?msdsId=9924285


Etching (Copper alloys, stainless steel, aluminium)
Elements used:
Ferric Chloride
60278_347134762044863_2029762802_n.jpg

corrosive.gif

Potential Acute Health Effects:​
Extremely hazardous in case of skin contact (irritant), of eye contact (irritant), of ingestion, of inhalation. Very hazardous in
case of skin contact (corrosive). Liquid or spray mist may produce tissue damage particularly on mucous membranes of eyes,
mouth and respiratory tract. Skin contact may produce burns. Inhalation of the spray mist may produce severe irritation of
respiratory tract, characterized by coughing, choking, or shortness of breath. Inflammation of the eye is characterized by​
redness, watering, and itching. Skin inflammation is characterized by itching, scaling, reddening, or, occasionally, blistering.

Full MSDS:
http://www.sciencelab.com/msds.php?msdsId=9925888

 
Last edited:

junosdad

Member
Joined
Aug 8, 2008
Messages
71
Location
La Conner, WA
I know I'm not alone when I say that I CAN'T WAIT for the tutorial.

That stuff is AMAZING!


Sam
(Patiently waiting)
 

BradG

Member
Joined
Jul 10, 2011
Messages
1,733
Location
Blackpool -UK
I thought i would share this with you.

This is my anodising power supply.
189244_347201498704856_1668731131_n.jpg


This is a highly accurate laboratory grade power supply, manufactured by Elektro Automatik which i couldnt recommend highly enough.

There are several different models in the 6000 range, offering different voltages and currents.

The model i have, is the EA-PSI 6072-03 which gives me 0-72V and up to 3A.

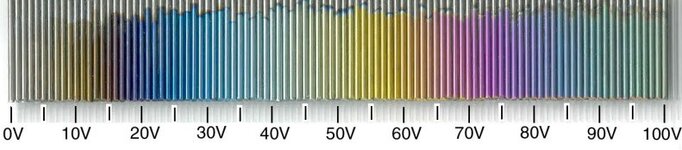
This is great for anodising moderate sized pieces of aluminium, it could easily handle the surface area of a few pens at the same time. The problem however, is that it only goes upto 72V. for anodising aluminium this isnt an issue as i rarely go past 18V. however with the colour spectrum of titanium going up to around 110V's, there are some colours i simply cant reach. how often would i want pink or green? well thats not the point it still winds me up :biggrin: With this in mind i intend on buying thePSI 6150-01 too, which will give me 0 - 150V @ 1.2A which is perfect for titanium. Needless to say i would strictly use this PSU for titanium work, and the other for anodising.

so other than getting these useful voltages... whats so good about it?

Well, other than getting pin point accuracy which you really need if you want a specific colour anodising titanium, and avoiding many headaches, they have some advanced bells and whistles:

CC & CV
These are modes you will commonly find on a good power supply, and it stands for Constant Current, & Constant voltage. Let me give you an example of why this is a useful feature.

The electrolyte which you anodise in, conducts electricity far more efficiently when it is warmer. so much so that when your acid bath heats up a fair bit, say half ay through your process, its such an efficient conductor it can burn and pit your piece of aluminium. While the solution is cold, its a poor conductor, meaning its barely even creating an oxidised layer on your piece because there is not enough current flowing through it - Despite that you calculated you needed 1.2A and set the power supply to 1.2A, to anodise the surface area of the piece of aluminium you have in the bath. If you were to use a ammeter, you would see its not actually using 1.2A, because the solution hasn't warmed up yet and its conducting poorly.

So what do we do other than wait for the solution to warm up? well, we crank up the voltage. Turning up the voltage gives it more power to push its way through the poor conducting electrolyte, so it can in fact then deliver the 1.2A as you were intending. this may be that instead of using the expected 12Volts, you are now driving it at 18V so it can deliver the 1.2A. Great! so we are now actually getting a good anodised layer.... for now....

the draw back here, is that we are creating more heat. Like i said earlier, a warmer solution will conduct more efficiently. so... now we have too many volts flowing through it! infact we only need for example, 16V's to deliver the 1.2A ... lets say five minutes went by before we realised this... you could have just spoiled the surface of the anodised layer with pitting. so now we turn the voltage down until it can give the 1.2A we were after..

Some more time passes, the solution warms up, and now it only needs 14V ... and so on and so forth.

When you set your power supply in CC mode, you tell it to maintain a current of 1.2A. It now goes into auto pilot mode and adjusts the voltage for you instantly, giving it just enough voltage that it needs. As the electrolyte warms up, it turns the voltage down for you.

So in summary, CC gives you an even, near perfect anodised layer from the very start of your process, right til the very end. Weheras before you may have been running your system for an hour, but only actually creating an optimal layer for 20 minutes of that time.

Constant voltage isnt alot of use to us in anodising aluminium, but its fantastic for anodising titanium! it behaves in the same manner as CC, but varying the current to provide a stable voltage. As its voltages which provide us with certain colours with titanium, its that value we want to lock on to.

Presets
if you are doing the same style of pen over and over you will know how much current you will need for the job etc.. then why not set each pen style as a preset. then your good to go at the push of a button


What else? RS232
This allows me to control the power supply by the workshop computer instead of the buttons on the front. I find this easier than fiddling with the buttons on the front, having to press them in the right order to get the setting you want etc. It also gives you greater control with real time read outs on your computer screen, and a plot graph showing how it has performed and what it has delivered to your tank throughout the entire process.

643968_347201528704853_751592931_n.jpg


Timers can be set on the software telling the power supply to run for an hour etc, voltage sweeps can be set to cascade through different voltages.. good for creating rainbow effects on titanium

These power supplies are not cheap.... but then again.. neither was your lathe.

Expect to pay in the region of £400 for these ($645)
(now to make you a little bit sick.. i paid £50.00 ...... because a courier cracked the plastic 10mm on the top of the bezel.. A dab of CA glue and its good as new... can barely see the crack line )


For those which are interested, theres a full spec sheet here which lists the specs of each of the models too.
http://www.elektroautomatik.de/fileadmin/pdf/datasheets/datasheet_psi6000.pdf
 
Last edited:

switch62

Member
Joined
Jan 26, 2012
Messages
99
Location
Adelaide, Australia
Just some general comments on the chemicals used in anodising and etching. Though they are dangerous, especially in concentrated form, the concentrations used for anodising are, I think, relativley safe.

The only one that scares me is Potasium Cyanide, I won't be going near that one. Not sure if it can be absorbed through the skin but cyanide is a deadly poison. Others can correct me on this one.

Obviously getting any of these chemicals in your eyes is never good, you should wash the eye with lots of water, immediately!!! On your skin you can wash them off or netralise them with sodium bicarbonate solution for the acids and vinegar for the caustic soda. Don't mix the netralisers into containers of respective chemicals the reactions will cause foaming or boiling and spread chemicals every where.

When mixing with water always add these chemicals a little at a time to the water never the other way round. The saying is "Add Acid" to water. Caustic soda should also be added to water a little at a time, especially in powder form.

Don't use metal containers or tools with these chemicals, as they will react with and corode them. Plastic or glass should be used (though I have seen strong caustic soda melt plastic bristles on a paint brush).

I've used ferric chloride in etching copper circuit boards and it seems fairly harmless, except it permanently stains clothes, skin and some plastics yellow/brown which won't wash out.

With some general safety, eye goggles or face shield, gloves, good ventilation, keep kids and pets away, etc, it should be as safe as using a lathe. :)

If I have got anything wrong please correct me, I don't want some hurting themselves because I got it wrong.
 

BradG

Member
Joined
Jul 10, 2011
Messages
1,733
Location
Blackpool -UK
Hi Pete
It has no impact on the colour

Infact, there is no colour - if we are talking about pigment. The colour you see is just like when you stare at oil on the ground.. You know the oil has no colour but yet you still see the blues the greens, the yellows shimmering through in a rainbow like effect.

the colour you see is caused by reflection and refraction, and the alloy composition of the titanium has no bearing on how the light travels.

If you think of how a mirror is made, its a piece of glass with a reflective material applied to the other side of it. Light passes through the glass, reflects off the backing, reflects off the glass again (changing its angle), off the backing, and back out. Generally, due to the thickness of the glass of a mirror any effect this causes is cancelled out due to the thickness being several wavelengths of light thick or more.

What we want is the insulating layer (this is the glass, and its correct name is the dialetric) to be thin enough so that it is only a couple of wavelengths in thickness, or less. Depending on how thick this layer is, it will shift the angle of light, causing the colour. So in laymans terms, we are creating a very thin piece of glass around the piece, such as a skim of oil on the floor.

The higher we turn up the voltage, the more the oxygen ions vibrate, slamming into the dialetric harder, therefore building a thicker layer. It is this thickness, which varies the colour.


Ive simplified this as much as i can without going into physics, which i feel is beyond the scope of this post :)
 
Last edited:
Top Bottom