Skie_M
Member
So ... I recently bought a new rice cooker, cuz my old one ended up with a hole worn through the bottom after all these years ...
I saved the box because it looked about the right size (just a bit smaller than a milk crate).
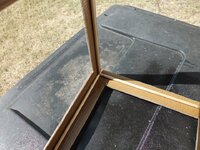
I cut the flaps off to give it an open top (for product placement and arrangements), and cut the sides out, leaving about an inch of cardboard around all the edges for strength.
I just finished spray-painting the entire interior and exterior of the box (minus the bottom, I'll get that later) to seal moisture out of it and give a little extra strength to the cardboard ... I used clear spray because that's all I have that has no color to it. I do have cherry red laying around, but that would affect my pictures pretty badly ... I'll have to pick some white paint up before I finish my project. For now, it's being protected from moisture, and the white will adhere to the clear quite nicely later.
My next steps will be to wrap the box in a light white cloth (some type of sheer fabric that will let light through while diffusing it). This will go around all 4 sides, and I will have a flap that will secure around the top that I can remove for accessing the inside.
Photography will take place through one of the sides that I will deem the "front" of my box, later ... I will cut a small access panel in that side just large enough for the camera lens, or perhaps a tad bit larger.
I also need to pick up some lights to affix to the sides and back as well as a removable hood that will sit on top and provide top-lighting. My plan, for now, is cheap incandescent style bulb holders with reflectors, using the spiral twist florescent light bulbs.
As I happen to be out of money to buy the fabric and lighting fixtures, you guys and gals have a chance to weigh in on my proposed design and suggest features...")
End result will be: A tabletop lightbox, painted white inside and out, wrapped and topped with sheer white fabric .... moveable and adjustable on the surface of the table, with lights secured to the table from left, right, and behind ... with a hood that will sit on top of the box to provide lighting from above.
The bottom interior of the box will be a foam insert, gently curved away from the middle to avoid shadow lines and blending up into the corners, covered with a heavier white fabric or another fabric color of my choice, later. It will be heavy enough to support additional props inside the box.
I will build an exterior stand mount to hold the camera steady for photography ... I do not have a camera yet. This project will probably take me the next several months before it is completed and I have a real camera to use it with. I hope to have it done before Christmas.
I saved the box because it looked about the right size (just a bit smaller than a milk crate).
I cut the flaps off to give it an open top (for product placement and arrangements), and cut the sides out, leaving about an inch of cardboard around all the edges for strength.
I just finished spray-painting the entire interior and exterior of the box (minus the bottom, I'll get that later) to seal moisture out of it and give a little extra strength to the cardboard ... I used clear spray because that's all I have that has no color to it. I do have cherry red laying around, but that would affect my pictures pretty badly ... I'll have to pick some white paint up before I finish my project. For now, it's being protected from moisture, and the white will adhere to the clear quite nicely later.
My next steps will be to wrap the box in a light white cloth (some type of sheer fabric that will let light through while diffusing it). This will go around all 4 sides, and I will have a flap that will secure around the top that I can remove for accessing the inside.
Photography will take place through one of the sides that I will deem the "front" of my box, later ... I will cut a small access panel in that side just large enough for the camera lens, or perhaps a tad bit larger.
I also need to pick up some lights to affix to the sides and back as well as a removable hood that will sit on top and provide top-lighting. My plan, for now, is cheap incandescent style bulb holders with reflectors, using the spiral twist florescent light bulbs.
As I happen to be out of money to buy the fabric and lighting fixtures, you guys and gals have a chance to weigh in on my proposed design and suggest features...
End result will be: A tabletop lightbox, painted white inside and out, wrapped and topped with sheer white fabric .... moveable and adjustable on the surface of the table, with lights secured to the table from left, right, and behind ... with a hood that will sit on top of the box to provide lighting from above.
The bottom interior of the box will be a foam insert, gently curved away from the middle to avoid shadow lines and blending up into the corners, covered with a heavier white fabric or another fabric color of my choice, later. It will be heavy enough to support additional props inside the box.
I will build an exterior stand mount to hold the camera steady for photography ... I do not have a camera yet. This project will probably take me the next several months before it is completed and I have a real camera to use it with. I hope to have it done before Christmas.