Sylvanite
Member
When the White Rabbit was reading evidence against the Knave of Hearts, the King instructed him to "Begin at the beginning, and go on until you come to the end".
Well, I've always looked at things a little differently than most people, so I'm going to start at the end instead. This mini-tutorial is about saving a photo for display on the world-wide-web. All the other photo editing tips I could give don't come to anything if you can't save your final image appropriately. This is a very simple and basic tip, but then much of using Photoshop is just knowing where to look.
For the most part, I take pictures of pens so that I can post them here, or put them on my website. For those purposes, you want an image that:
Ok, let's say we have edited a photograph using Photoshop Elements, and want to save a version for posting on the web

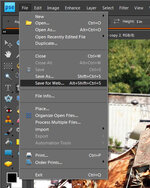
From the Photoshop main menu bar, select "File->Save for Web". This will bring up a large dialog window.

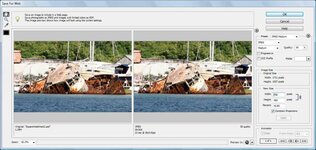
This dialog shows two images, one in the current format (on the left), and one how it will look after saving (on the right). When you compress a photograph, you will typically reduce picture quality. This preview helps you control the tradeoff between file size and image degredation. If you look closely, you can see the picture file type and size below each version.

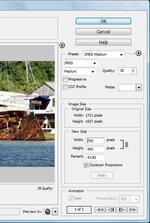
The right side of the dialog contains the controls. In the middle, you will see that the original image is 1171 pixels wide by 1027 pixels high. The version I'm saving will be 750 by 450 - a size more appropriate for websites. Note that the "Constrain Proportions" box is checked. That way, when I change one dimension, the other changes to maintain the aspect ratio of the original picture.
At the top, see that I've chosen the JPEG image type. This is the most common file format for photographs, and is supported by web browsers. I've selected "Medium" compression as a reasonable balance between image quality and file size. Note that the original image was in PSD format (which is not web-friendly) and was well over a megabyte in size. The output image will be in JPEG format and only 60 kilobytes. Increasing or decreasing the image quality will increase or decrease the file size.
When you get the results you want, click [Ok], enter the filename, and save the file. That's it!
I hope that was helpful,
Eric
Well, I've always looked at things a little differently than most people, so I'm going to start at the end instead. This mini-tutorial is about saving a photo for display on the world-wide-web. All the other photo editing tips I could give don't come to anything if you can't save your final image appropriately. This is a very simple and basic tip, but then much of using Photoshop is just knowing where to look.
For the most part, I take pictures of pens so that I can post them here, or put them on my website. For those purposes, you want an image that:
- Is in a suitable web-displayable format.
- Has reasonable dimensions to display on the viewer's screen.
- Is compressed to a size that will download quickly.
Ok, let's say we have edited a photograph using Photoshop Elements, and want to save a version for posting on the web

From the Photoshop main menu bar, select "File->Save for Web". This will bring up a large dialog window.

This dialog shows two images, one in the current format (on the left), and one how it will look after saving (on the right). When you compress a photograph, you will typically reduce picture quality. This preview helps you control the tradeoff between file size and image degredation. If you look closely, you can see the picture file type and size below each version.

The right side of the dialog contains the controls. In the middle, you will see that the original image is 1171 pixels wide by 1027 pixels high. The version I'm saving will be 750 by 450 - a size more appropriate for websites. Note that the "Constrain Proportions" box is checked. That way, when I change one dimension, the other changes to maintain the aspect ratio of the original picture.
At the top, see that I've chosen the JPEG image type. This is the most common file format for photographs, and is supported by web browsers. I've selected "Medium" compression as a reasonable balance between image quality and file size. Note that the original image was in PSD format (which is not web-friendly) and was well over a megabyte in size. The output image will be in JPEG format and only 60 kilobytes. Increasing or decreasing the image quality will increase or decrease the file size.
When you get the results you want, click [Ok], enter the filename, and save the file. That's it!
I hope that was helpful,
Eric
