Photograph critique... and help

Signed-In Members Don't See This Ad

SuperDave

Member
Joined
Jun 15, 2007
Messages
682
Location
Sherwood, Oregon - 97140, USA.
I finally got around to taking some pictures with the camera we got over the summer. It is a Canon Rebel XT with the standard 18:55 lens.

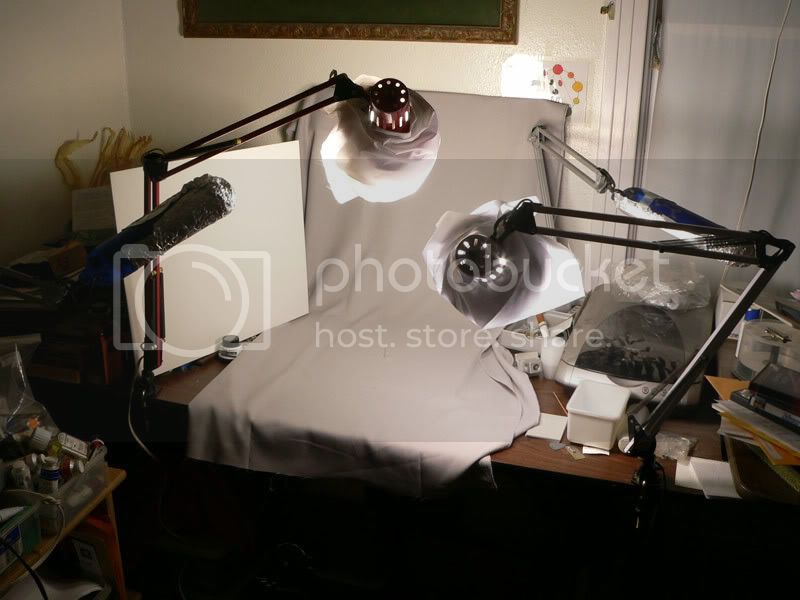
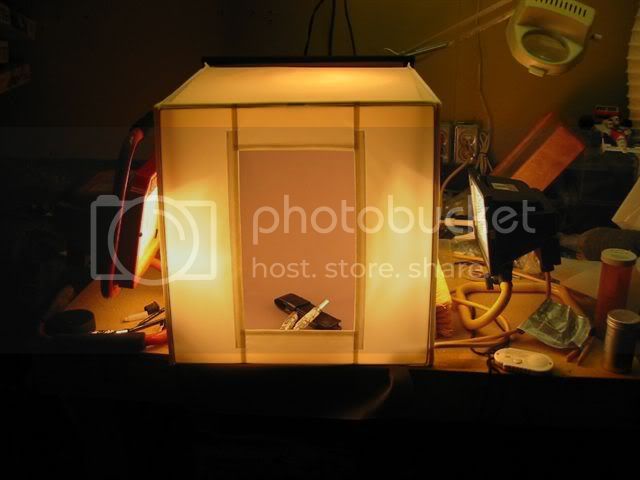
I am using a photo tent with two daylight fluorescent 5600K 100 watt bulbs in aluminum reflectors.

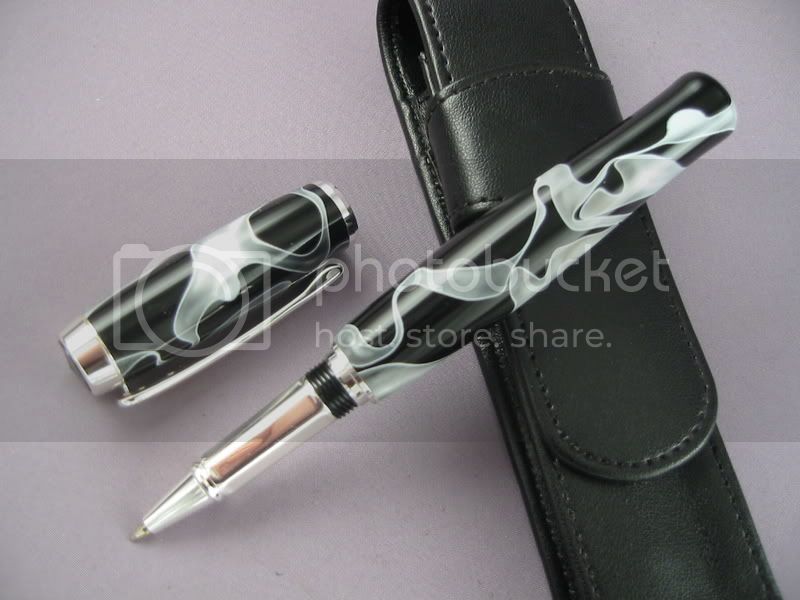
I have shot in JPEG and RAW formats. This picture of a Red Acrylic with Black Chrome was shot in RAW and edited a little bit and resized.

I have a gray card and tried to shoot a picture of it in the tent but the flipping camera would not take the shot of the card by itself, even in full manual... I had to put an object in the picture and then crop it out. I cannot find anything in the software regarding how to use the gray card picture to adjust the RAW pictures... HELP on this is appreciated.

Depth of Field is obviously out of whack. I had the zones focused on the pen but it actually caught the rock... which was a down and dirty quick prop that will be replaced or eliminated.

Anyway, this is a starting point for me and I would covet help from those of you that are pro's or experienced amateurs.

Thanks in advance,

Dave

20071226221342_Red%20Acrylic%20w-Black%20Chrome.jpg
 
Signed-In Members Don't See This Ad

Daniel

Member
Joined
Jan 1, 2004
Messages
5,921
Location
Reno, NV, USA.
Not sure how you have your reflectors set up, but the reflection is really strong. This is great for showing off the finish but bad for seeing the material.
It looks like you have both light coming from behind the camera. You might want to experiment with moving them farther apart and more to the sides of the pen. Unless you like the light you are getting. It does not look like the aluminum reflectors are breaking up the light enough either. On my screen it looks like the pen was not in focus. maybe not but the rock looks good to me while the pen gets a bit fuzzy. You have plenty of light, the pen is well lit all around, if anything the light is to strong. Different defussers would fix that. it would also help bring out the black areas in the fittings better also.
 

stevers

Member
Joined
Dec 18, 2005
Messages
2,991
Location
Bullhead City, Az., USA.
The glare can be cool sometimes, but can also take away from the product. Background could be a little busy for some also. Nice shot over all. Nib is slightly out of focus. Very good start Dave.
It took me a while and a lot of test shots to get to where I am and I'm not up with lots of folks here. You should get some great advice from the folks.
 

SuperDave

Member
Joined
Jun 15, 2007
Messages
682
Location
Sherwood, Oregon - 97140, USA.
Originally posted by Daniel

Not sure how you have your reflectors set up, but the reflection is really strong. It looks like you have both light coming from behind the camera. You might want to experiment with moving them farther apart and more to the sides of the pen. On my screen it looks like the pen was not in focus, maybe not but the rock looks good to me while the pen gets a bit fuzzy. You have plenty of light, the pen is well lit all around, if anything the light is to strong. Different defussers would fix that. it would also help bring out the black areas in the fittings better also.

Yeah, the reflectors were right beside the camera, maybe a tad ahead, pointed at the objects.

I set the focus on the pen but the rock is sharper... I think because the depth of field is not correct for the foreground.

I need to try bouncing the light.

I REALLY need to figure out to use the gray card.

Looks like I will be spending more time getting on top of this photography than turning...

Dave
 

SuperDave

Member
Joined
Jun 15, 2007
Messages
682
Location
Sherwood, Oregon - 97140, USA.
Originally posted by stevers

The glare can be cool sometimes, but can also take away from the product. Background could be a little busy for some also. Nice shot over all. Nib is slightly out of focus. Very good start Dave.
It took me a while and a lot of test shots to get to where I am and I'm not up with lots of folks here. You should get some great advice from the folks.

I agree on the "busy" part. I have shot another 200+ shots without the prop and the results were disastrous. I even removed the photo tent and the results were UUUUGLY!

I am also wondering if 100 Watt 5600K bulbs are enough, especially without the tent?

So, it's back to square one. I still think the focus problem might have some relationship with the depth of field...?

My mind is going numb and I need a break from the camera.

Maybe those of you that are shooting great photographs can chime in and help me. Also, some pictures of your setups might help as well.

Dave
 

stevers

Member
Joined
Dec 18, 2005
Messages
2,991
Location
Bullhead City, Az., USA.
I have a tutorial on my site from when I built my tent. It's on the page titled "For Fellow Pen Crafters". It was free and works pretty good for me. Like I said, I'm by no means an expert. My shots are fair and sometimes I hit a good one.
I let the camera set the focus. I only set the F-stop and aperture myself. That has a lot to do with depth of field. My camera has a "My Settings" feature that allows me to save several sets of settings for diff colors and light levels. I will usually take 3 or 4 shots at diff settings to make sure and cover my bases. Then pick my fave. The shots can be altered with the proper programs afterwords too.
 

tseger

Member
Joined
Nov 27, 2005
Messages
613
Location
New Albany, MS, USA.
Originally posted by stevers

Don't be discouraged. It takes some time unless you are a photography student.

Heck,Steve, I am (I mean I was) a photography student and I still cant make good pen photographs. Now, you give me a mountain, or waterfall and I can do pretty good. Put a little 5" pen in front of me and I am lost.
Tim
 

beck3906

Member
Joined
Aug 13, 2005
Messages
2,138
Location
Belton, TX 76513
Adjust the f/stop manually for f/16 or so or set the camera to aperature value readings.

Can you take your camera off auto focus and go to manual focus?

If so, you can then place a sheet of paper with lines drawn across it so you can focus on that. Remove that sheet and lay the gray card in front of the camera and take your reading. Adjust the white balance settings accordingly.

Then lay your pen on the surface and manually adjust the focus.

Try bracketing your exposure for +/- 1/3 stops to see how that helps.

You'll eventually get the setting you like.

Rick
 

SuperDave

Member
Joined
Jun 15, 2007
Messages
682
Location
Sherwood, Oregon - 97140, USA.
Originally posted by beck3906

Adjust the f/stop manually for f/16 or so or set the camera to aperture value readings.

Can you take your camera off auto focus and go to manual focus?

If so, you can then place a sheet of paper with lines drawn across it so you can focus on that. Remove that sheet and lay the gray card in front of the camera and take your reading. Adjust the white balance settings accordingly.

Then lay your pen on the surface and manually adjust the focus.

Try bracketing your exposure for +/- 1/3 stops to see how that helps.

You'll eventually get the setting you like.

Rick

Rick,

Thanks for the advice. I will take a run at it. I especially want to try the bracketing.

Yes, I can run full manual on all aspects of the camera. My "problem" is being a complete SLR Boob. I will spend an inordinate amount of time trying different features and settings (many of which have absolutely nothing to do with what I want to achieve) and get horrible results. In short order, my brain is a jumbled mass of quivering synapses on the verge of a qualude moment[:p]

That's why I am hoping to narrow down my experiments with some directions from those that have gone before me:D

I did try putting the gray card in front of the pen (without the rock...)and pressing the shutter button half-way, hold the setting and then remove the gray card. The camera retained the exposure readings and refocused the lens and I was able to take the shot. However, I had removed the light tent, so the picture still came out DARK, even though the pen was covered in bright daylight from two 100 watt 5600K lights! Maybe not enough wattage for a dark shop?

The picture at the beginning is from inside the tent. So, I am going to take a run at your suggestions with the tent in place. I will post some setup pictures and the results so y'all can critique my efforts.

Dave
 

stevers

Member
Joined
Dec 18, 2005
Messages
2,991
Location
Bullhead City, Az., USA.
As for me, I set the shutter and allow the camera to set the F-stop. If they look dark, I just open the shutter a little and the F-stop speeds up some. Some times my shutter shows in red, telling me it's to tight, but I take it and it will come out anyway. Other wise, the F-stop compensates and evens it out. If I do need a little depth of field, I tighten up the shutter and force the F-stop to stay open a little longer to obtain a little more exposure time on the shot. Helps the depth. I also like to use auto focus. It works well for me and I always have the subject in the center frame anyway. And even if I don't, I can choose where to have my focus box aimed.
I am only an amateur at this, severe amateur. All of this stuff I remember from when I used to shoot with my 35mm, which is in a closet in a bag. Which reminds me, I should take out the batteries.
 

SuperDave

Member
Joined
Jun 15, 2007
Messages
682
Location
Sherwood, Oregon - 97140, USA.
Okay... after two days of frustration and experimentation... and online tutorials... this is what I have been able to achieve. Not the best I feel I can do but getting there. I see light at the end of the tunnel and I don't think it's a train[:p]

The focus could be a bit sharper and the lighting needs a little work. I want to swap out the white background in the tent for a graduated background... maybe try a mirrored black or bronze Plexiglas under the pen... but feel kand'a good about the progress.

Critiques welcome!


2007122865811_IMG_0540-1050.jpg


2007122865828_IMG_0541-1050.jpg


2007122865845_IMG_0542-1050.jpg


200712286591_IMG_0543-1050.jpg
 

avbill

Member
Joined
Oct 18, 2007
Messages
1,973
Location
San Bruno, CA, USA.
the reason you could not photograph the gray card is because the camera auto focusing is set up to see contrast. Without contrast between the subject and background the camera in auto focus will never receive and focus on any point. In my camera it will total lock me out of taking a photograph.

If you are using a photo tent place both lights 45 degree to the subject(pen) and make sure they are the same distance to the subject. This will give to better lighting for the subject. The lights will be the same intense balancing the uneven lighting pattern I see in the original photograph.

I have never use a auto focus with table top photography. using manual setting and controlling the depth of field with the f-stop will allow you excellent control I also use a tripod.

hope this helps

BD
 

SuperDave

Member
Joined
Jun 15, 2007
Messages
682
Location
Sherwood, Oregon - 97140, USA.
Originally posted by avbill

the reason you could not photograph the gray card is because the camera auto focusing is set up to see contrast. Without contrast between the subject and background the camera in auto focus will never receive and focus on any point. In my camera it will total lock me out of taking a photograph.

If you are using a photo tent place both lights 45 degree to the subject(pen) and make sure they are the same distance to the subject. This will give to better lighting for the subject. The lights will be the same intense balancing the uneven lighting pattern I see in the original photograph.

I have never use a auto focus with table top photography. using manual setting and controlling the depth of field with the f-stop will allow you excellent control I also use a tripod.

hope this helps

BD

BD,

I discovered what you said about the gray card during my on-line searching... The Canon Tutorial site mentioned taking a picture with the subject in front of the gray card in RAW format and then use the RAW editor eyedropper to correct the white balance. I was able to load all the RAW pictures and one with the gray card and adjust the white balance and it did a good job.

My lighting is more like 20° to 30° to the pen because the opening in the tent is not wide enough and I can't get the reflectors inside. The reflectors are aimed at the same angle but one is a bit lower than the other. Their distances from the pen are not exactly equal and I think it shows when you look at the clip end of the pens.

I tried to use the manual focus but my eyesight up close is so bad, I go back to the Auto Focus. I have tried the diopter adjustment for the viewfinder, but have had limited success (should spend more time on that feature). I have used both the manual and program settings to try and control the aperture and shutter speed, but I cannot seem to get the camera to let me lock in the aperture and shutter speed individually... for instance, if I want 1/125 at 5.3 for all my shots, the camera will let me adjust the aperture and shutter speed but sometimes all it lets me do is get 1/100 at 7.1 for one shot and then 1/90 at 6.3 for the next one... gets really frustrating, so I find an "acceptable range" of between 1/125-1/60 at 5.3-7.1 and set the white balance with the gray card...

Are you able to individually set your aperture and shutter speeds? If so, how are you doing that?

I am getting close, but I know the quality can be better... and yes, I am a bit obsessive about it, but that drives me to get better not only at photographing them but also at making them. An accomplished wood-turner once said "if you settle for 'that's good enough', it never is. You should always strive for 'that's as good as I can do' and then find ways to improve." For instance, all these pens were turned without using a barrel trimmer to square the ends of the blanks, and it shows on some of the joints... which is why I still have these pens in my possession (I can't settle for "good enough".) My next step for improvement on the pens is getting some of the B2B Bushings to increase my success rate for not under/over turning the barrels... ( I am trying not to use my digital calipers on every pen:D)

Dave
 

Fred

Member
Joined
Feb 18, 2007
Messages
3,557
Location
N.E. Atlanta, Georgia U.S.A.
DO NOT CRAMP your area for a photograph workspace. Heck, I use a 4'x8' piece of white laminate and do not understand these small light tents than many here have. If space is an issue maybe then. However I have always needed to be able to move around and make changes easily without having to hassle with re-building the entire set-up.

The use of a full sized tripod is very DEFINITELY and HIGHLY recommended. It will also free up your hands for other uses. A cable release is ANOTHER great tool to use as well.

Use fresh lights of the SAME BRAND. YES, they vary from one to the next. Be sure to get all you need from the SAME CASE. Open a new one to be sure there are from the same batch. Spares are a must have item.

Use daylight balanced lighting for truer colors. 6000 K is the lighting range for daylight photographs.

Another tool to consider is a POLARIZING FILTER. This will enhance the color and cut back on some types of reflections. Expensive for a filter, but very nice to use.

Stay away from auto focus IF you are comfortable with using your own eye. If not, then focus on the center of the product and manipulate the 'depth of field' with aperture changes.

Take several photographs at one shutter speed BUT vary the F stop and look at all the pictures and choose the best one.

THEN, use one F stop - let's say F11 - and change the shutter speeds. Be sure to use the tripod.

Compare the pictures and see what worked best for you. DON"T change the lights as that will cause you to have to start all over. Don't even move them at all. What you are looking for is CONSISTENCY. It's there but hiding.

When you change the item being photographed you will have to start over as all subjects do not photograph alike ... a white pen will be completely different than a black pen. A reflective surface will show different results than a satin finish, etc.

With the advent of digital photography and the various photo editing software available it is all up to you the photographer to get the shot. It ain't quite like nuclear power plant design, but it sure as heck can be as nit-picky.

Take your time, COMPOSE IN THE VIEWFINDER - level the product, get the top/bottom/left/right margins set and then look at the product again. Take the picture! POST Here again for further assistance. :D
 

SuperDave

Member
Joined
Jun 15, 2007
Messages
682
Location
Sherwood, Oregon - 97140, USA.
Originally posted by Fred_erick

DO NOT CRAMP your area for a photograph workspace. Heck, I use a 4'x8' piece of white laminate and do not understand these small light tents than many here have. If space is an issue maybe then. However I have always needed to be able to move around and make changes easily without having to hassle with re-building the entire set-up.

The use of a full sized tripod is very DEFINITELY and HIGHLY recommended. It will also free up your hands for other uses. A cable release is ANOTHER great tool to use as well.

Use fresh lights of the SAME BRAND. YES, they vary from one to the next. Be sure to get all you need from the SAME CASE. Open a new one to be sure there are from the same batch. Spares are a must have item.

Use daylight balanced lighting for truer colors. 6000 K is the lighting range for daylight photographs.

Another tool to consider is a POLARIZING FILTER. This will enhance the color and cut back on some types of reflections. Expensive for a filter, but very nice to use.

Stay away from auto focus IF you are comfortable with using your own eye. If not, then focus on the center of the product and manipulate the 'depth of field' with aperture changes.

Take several photographs at one shutter speed BUT vary the F stop and look at all the pictures and choose the best one.

THEN, use one F stop - let's say F11 - and change the shutter speeds. Be sure to use the tripod.

Compare the pictures and see what worked best for you. DON"T change the lights as that will cause you to have to start all over. Don't even move them at all. What you are looking for is CONSISTENCY. It's there but hiding.

When you change the item being photographed you will have to start over as all subjects do not photograph alike ... a white pen will be completely different than a black pen. A reflective surface will show different results than a satin finish, etc.

With the advent of digital photography and the various photo editing software available it is all up to you the photographer to get the shot. It ain't quite like nuclear power plant design, but it sure as heck can be as nit-picky.

Take your time, COMPOSE IN THE VIEWFINDER - level the product, get the top/bottom/left/right margins set and then look at the product again. Take the picture! POST Here again for further assistance. :D

Fred,

I agree on the work space. The light tent has always presented as many issues as it solved. I am going to go back to my PVC frame and a graduated background. Except this time, I am not going to use the entire frame, just two sides.

I am using a full size tripod and 5500K daylight bulbs. They are 100 watt equivalents but I am going to get some 250 watt equivalents, as once they are used without a tent, the 100 watts seem to struggle lighting the objects.

I like the idea of the cable release, because I am always trying to manipulate the object and having to reach over or around the camera way too much. Canning the light tent will also make composing the setting measurably easier.

I had not thought about a polarizing filter but will look into it. I have seen the results from others using one and it does have a dramatic effect if used correctly.

The last pictures I posted I did try to take them all with as close to the same setting as I could and then compare... many trips back and forth to the computer but at least I felt like I was getting someplace.

The biggest challenge I am having right now, is getting the full pen into focus... seems I lose the cap end sometimes. And if you look close, the center band is focused sharply but the outer edges of the nib and pen body seem to lose sharpness.

Thanks for the advice!
 

Dan_F

Member
Joined
Nov 8, 2007
Messages
959
Location
Spokane, WA, USA.
Dave,

I think your focus problem is due to using too wide an aperture (f-stop--low number such as 2.8 is wide, 16 is narrow) Try setting your f-stop at 8 or above, then let the camera select the shutter speed, or going fully manual. This is usually called f-stop priority mode, or some thing similar. Take a pic, and if it's too bright, then compensate by raising the shutter speed by one notch if your camera will let you over-ride, and try again. You may have to learn to use the "exposure compensation" feature, which is another way to override the camera's control. The higher f-stop number will give you greater depth of field, and your pens will come into focus over their whole length. I was using the same lighting as you, and with an f-stop of 8, my shutter speed was 1/6 second. A tripod is absolutely necessary. I also used the self timer set for ten seconds, so that I wouldn't be touching the camera during the exposure.

Two 100 watt bulbs should be enough. I just started playing around at this myself tonight, and found two such bulbs to be plenty adequate, with no other light source on in the room, and it was dark outside. I ended up putting some white cloth over my lights, instead of making a tent. You can see the results in this thread: http://www.penturners.org/forum/forum.asp?FORUM_ID=21

The last few pics you took looked much better, get your depth of field issue sorted out and you will be well on your way. The toughest part for me seems to be getting just the right amount of reflection to enhance, but not get in the way. That takes some doing. You might also experiment with different backgrounds other than white. I have better luck with something slightly greyed so that the contrast isn't so stark. I hit a bunch of fabric stores today, and went through the remenants bins, picked up a few different light but non-white pieces of material. I'll be doing a lot of experimenting in the next few weeks looking for the best combinations.

By the way, what kind of wood is that last pen made of, the one that looks like alligator skin? That's sweet!

Dan
 

SuperDave

Member
Joined
Jun 15, 2007
Messages
682
Location
Sherwood, Oregon - 97140, USA.
Dan,

I will try the self-timer, as I have not gotten a remote release cable yet.

I have tried an f-stop as high as 16 and gotten a very blurry and washed out picture. The current set-up seems to want to settle in at 5.6-11.

I have used the exposure compensation and +2/3 to +1 seems to be the best currently.

I am setting my camera for ISO 100 currently, so I don't get noise in the pictures when they are enlarged. I need to double check my shutter speed. I think I am usually in the 1/60 to 1/125 range.

I have 7 focus zones that I can set independently. I think this is also an area I need to work out, as I might be setting the focus zone incorrectly. What do you use to set your focus point?

Since the 5500K CF Bulbs are not nearly as hot a halogen or incandescent, I like your idea of baffling the light by placing the fabric over the reflectors. This way you end up with a Soft-Box type set-up and can eliminate the tent altogether, which will create a lot of room to compose the shots.

I am going to get a matte gray graduated background to replace the white. I think that the halos around the edges of the pen might be from all the light bouncing around off the white fabric. I also think that the graduated gray background will allow me to back off on the exposure compensation and achieve more natural looking photos. Some use a matte colored roll-up shade from the BORG and mount it on a shop built frame. I will be checking out the shades today.

I am working on focusing the light to control dispersion, especially without a tent. I will post the results here.

I checked out your latest pictures. They turned out great!

We should all post our progress, in this thread, including pictures of set-ups and results. If we can achieve the results we are looking for, then I can create a tutorial for others to follow so they do not have to till the same soil all over again.

Thanks again, Dan,

Dave
 

Dan_F

Member
Joined
Nov 8, 2007
Messages
959
Location
Spokane, WA, USA.
Dave---I use a center weighted, but not pinpoint auto-focus. On my film camera, I usually went manual focus, but this digital has a pretty poor focusing screen, so it's difficult to do with any confidence, especially indoors. Since compositions will be tightly cropped, I just center the pen in the viewfinder so that it will register as the item of interest. If you are using an f-stop of around 8, I can't understand why only some areas of your pen would be out of focus, particularly that last group, which were parallel to the back of the camera.

I've heard that some cameras don't work very well in the extreme aperture settings, which probably explains why you got bad results at f 16. Mine only goes up to 8, I'm sure for that reason, but it works well within the range.

Another thing you might try, if not mentioned yet, is to use your macro function, if you have one.

I just thought of something else. If your camera has a vibration reducing lens, the VR should be turned off when using a tripod, otherwise it can cause focusing problems, sort of over compensating.

Here is a pic of my hastily erected setup.
P1010765.jpg


Dan
 

SuperDave

Member
Joined
Jun 15, 2007
Messages
682
Location
Sherwood, Oregon - 97140, USA.
Dan,

I think you hit on something in your previous post that might be contributing to most of my concerns. I need to swap out the white backdrop for a graduated gray backdrop. I am almost convinced that the drastic changes in contrast between the pens and the white fabric is contributing to my issues. I am getting a ton of light (see attached photo) Besides, I will be wasting valuable time trying to achieve the level of photographs using a set-up I will not be using to take final pictures, so I just need to make the switch.

I have a Macro setting and did a couple of pictures on that setting but should explore it more thoroughly. I do not have any IS (Image Stabilizing) lenses, so if my shutter speed with an ISO of 100 is too slow, I am getting blurring from moving the camera. I try to hold the camera steady with the tripod pivot handle while snapping the picture, but know that I move it a tad... gotta get the remote release cable:D Need to try upping the ISO to maybe 200 or 400 but no higher.

I like the arms you are using. My clamp on reflectors are always wanting to move because the clamps are not as strong as you would think. They are clamped to a couple of microphone stands I got from a church rummage sale for $5.00 but I only have vertical adjustment... need to fab a boom to use for overhead lighting.


2007123191039_Setup.jpg
 
Joined
Aug 9, 2004
Messages
2,195
Location
Oakville, Ontario, Canada.
Hi,

I like your last set of pictures.

To me placing the lights inside the photo booth defeats why you have the booth. The lights I use are set up out side the booth so the light falling on my work is diffused.

IMG_7246.jpg


Results directly from the camera:)
IMG_9029.jpg
 

karlkuehn

Banned
Joined
Aug 7, 2007
Messages
1,848
Location
Lancaster, Pennsylvania, USA.
Here's my setup:

PhotoTentSetup.jpg


It's just a simple wooden frame supporting those translucent acrylic panels you get from Home Depot for light fixtures in drop ceilings, which gives me the option of setting up multiple outside lights.

Currently I'm just using two double 150w halogen worklights shining down from the top and two 60w bulbs for specular highlights. I'll eventually get it all cleaned up, but it's working pretty good for me.

Here's one of my recent pictures:
EasternRedCedar1_2.jpg


For the background colors, I just bought a tablet of cheap, multi-colored construction paper from Walmart for a couple of dollars. The mirror on the bottom reflects the color, and by focusing on the pen, the reflected construction paper blurs out enough to get rid of all the rough texture, leaving only the colored 'floaty' background. I use Paint Shop Pro to 'clone brush' out the dark junction line between the mirror and the construction paper if it ends up in the frame.

I'm looking around now to get some different colored plexiglas to use where the mirror is to diffuse and 'watermark' the pen reflection a bit. I found a good site for plexiglas chunks (http://www.usplastic.com/catalog/pr...USPlastic&category_name=21314&product_id=9792, pipe up anyone with a cheaper source! :)
 

karlkuehn

Banned
Joined
Aug 7, 2007
Messages
1,848
Location
Lancaster, Pennsylvania, USA.
Originally posted by SuperDave

...My clamp on reflectors are always wanting to move because the clamps are not as strong as you would think...
2007123191039_Setup.jpg

Superdave, you could always just use a couple of small, cheap c-clamps to help strengthen the hold on the microphone stands. :)
 

SuperDave

Member
Joined
Jun 15, 2007
Messages
682
Location
Sherwood, Oregon - 97140, USA.
Jim and Karl,

Thanks for the posts of your set-ups. I started with the lights on the outside of the tent with the two 5500K lights. It seemed as though I could not get enough light inside the tent to adequately highlight the pens. So, I moved them around to the "inside" so as to "contain" the light and capture a decent picture.

However, after seeing your pictures, I am going to re-visit my outside set-up. If I can get it to work, it sure would free up the opening to compose my shots. Maybe I need to use my 500 watt halogen work lights and shelve the daylight CF's and adjust the white balance via my gray card to correct the "yellow" halogen glow....

Do either of you adjust your white balance since you are using halogens? Your pictures sure don't look like the "typical" halogen lit photo.

I too am looking for some different colored mirrored Plexiglas. I almost bought a piece of Bronze Plexi off EBay but passed and have not seen another one since.

There is hope!;)
 

karlkuehn

Banned
Joined
Aug 7, 2007
Messages
1,848
Location
Lancaster, Pennsylvania, USA.
Originally posted by SuperDave

Jim and Karl, ...However, after seeing your pictures, I am going to re-visit my outside set-up. If I can get it to work, it sure would free up the opening to compose my shots. Maybe I need to use my 500 watt halogen work lights and shelve the daylight CF's and adjust the white balance via my gray card to correct the "yellow" halogen glow...
Do either of you adjust your white balance since you are using halogens? Your pictures sure don't look like the "typical" halogen lit photo.

I too am looking for some different colored mirrored Plexiglas. I almost bought a piece of Bronze Plexi off EBay but passed and have not seen another one since.

There is hope!;)

I set the white balance on my camera for 'tungsten' which is Nikon speak for incandescent, I guess. That one setting changed my whole life, it was like night and day difference. What shows up on my LCD viewfinder is what I'm pulling up in PSP now. The colors are borderline perfect.

I've not noticed any difference between the haologens and the regular light bulbs, but I've also got my halogens filtered through the drop ceiling light panels. One of the upsides to running 600w of halogens is that they also help heat my shop! heh

With them pointed downward, I'm also getting a lot of light source coming up from the bottom, which may change once I get my plexi, but I'll work with it at that point. Also, I need to prop up or drape something white on the face, around my camera. You'll notice in several of my recent pictures, the foreground reflection in the hardware on the pen kit has too much busy things happening because of the open light tent on the forward 'plane'. I just need to hang a sheet or whatever to reduce noise and clarify the reflection. Damn, I sure sound like I know what I'm doing don't I?! You'd never guess that most of the time I'm just winging it. heh...

The link in my above post has a pretty good price on 1'x2' plexi pieces, around $6 if I remember right, so that might be a good start. I just hope that I figure out a good way to remove scratches once I start using it, I'm sure I'll screw something up and make a mark or two. [:p]
 

SuperDave

Member
Joined
Jun 15, 2007
Messages
682
Location
Sherwood, Oregon - 97140, USA.
Karl,

Have you ever considered a light box... where the object sits on the opaque cover and is lit from the underside? I recall a couple years ago, reading an on-line article about photographing jewelry using this type of set-up.
 

karlkuehn

Banned
Joined
Aug 7, 2007
Messages
1,848
Location
Lancaster, Pennsylvania, USA.
I actually have a light box, but I've never thought about using it for photography, I keep it around for drawing and graphics and such. Might look kind of cool shining through the translucent plexiglass. Hmmmm!
:)
 

Dan_F

Member
Joined
Nov 8, 2007
Messages
959
Location
Spokane, WA, USA.
Karl,

That's a nice setup, and great pic. Which Nikon are you using? I'm thinking about upgrading to a digital SLR, and already have a macro lens for my Nikon film camera. With current digital, (Lumix), it's difficult to get a true white balance.

Dan
 

karlkuehn

Banned
Joined
Aug 7, 2007
Messages
1,848
Location
Lancaster, Pennsylvania, USA.
Originally posted by Dan_F

Karl,

That's a nice setup, and great pic. Which Nikon are you using? I'm thinking about upgrading to a digital SLR, and already have a macro lens for my Nikon film camera. With current digital, (Lumix), it's difficult to get a true white balance.

Dan

It's just my old Nikon Coolpix 995 (3.2 MP), all stock. I've had it for 6 years. Seems to be working great on close up stuff. My nephew just got his girlfriend a new Nikon that's about the size of a tic tac. It's like 8 MP or something insane, and I can't even hold it in my meathooks and try to take a picture without pressing 14 buttons at once. I like my clunky old cameras that I can actually manhandle a little bit. heh

Most people don't need more than 3 or 4, but it's like the world of CPUs. They just keep getting bigger and people think they need them, so it's easy to get a good used camera (or computer, for that matter) from someone who felt the need to upgrade, even though they only use those giant cameras for taking pictures on camping trips and family picnics. :) You gotta love American progress, right? heh
 

follow3

Member
Joined
May 30, 2006
Messages
358
Location
Hampton, VA
Originally posted by karlkuehn

Here's my setup:

PhotoTentSetup.jpg


It's just a simple wooden frame supporting those translucent acrylic panels you get from Home Depot for light fixtures in drop ceilings, which gives me the option of setting up multiple outside lights.

Currently I'm just using two double 150w halogen worklights shining down from the top and two 60w bulbs for specular highlights. I'll eventually get it all cleaned up, but it's working pretty good for me.

Here's one of my recent pictures:
EasternRedCedar1_2.jpg


For the background colors, I just bought a tablet of cheap, multi-colored construction paper from Walmart for a couple of dollars. The mirror on the bottom reflects the color, and by focusing on the pen, the reflected construction paper blurs out enough to get rid of all the rough texture, leaving only the colored 'floaty' background. I use Paint Shop Pro to 'clone brush' out the dark junction line between the mirror and the construction paper if it ends up in the frame.

I'm looking around now to get some different colored plexiglas to use where the mirror is to diffuse and 'watermark' the pen reflection a bit. I found a good site for plexiglas chunks (http://www.usplastic.com/catalog/pr...USPlastic&category_name=21314&product_id=9792, pipe up anyone with a cheaper source! :)

Hey Karl,

Great pics!!!

Are you planning to replace the mirror or the colored backdrop with colored plexiglass?

If you are talking about replacing the mirror with the plexi, will you still need a colored backdrop?

Will the plexi just be colored, or mirrored also?

Here is a link I have to some acrylic sheet goods, solid colors, translucent colors and colored mirror as well: http://www.sloanswoodshop.com/acrylic%20sheets.htm

I don't know if this is cheaper or not, but they have a pretty good selection.

Steve
 

karlkuehn

Banned
Joined
Aug 7, 2007
Messages
1,848
Location
Lancaster, Pennsylvania, USA.
Originally posted by follow3
Hey Karl,

Great pics!!!

Are you planning to replace the mirror or the colored backdrop with colored plexiglass?

If you are talking about replacing the mirror with the plexi, will you still need a colored backdrop?

Will the plexi just be colored, or mirrored also?

Here is a link I have to some acrylic sheet goods, solid colors, translucent colors and colored mirror as well: http://www.sloanswoodshop.com/acrylic%20sheets.htm

I don't know if this is cheaper or not, but they have a pretty good selection.

Steve

Are you planning to replace the mirror or the colored backdrop with colored plexiglass?

I'm planning on just replacing the mirror with colored plexi

If you are talking about replacing the mirror with the plexi, will you still need a colored backdrop?

I'm not sure! Most of the time I'm just winging it, so I'll have to see what looks good, but I think the colored paper will affect the plexi reflection, so I'm just going to buy a black and a white to begin with.

Will the plexi just be colored, or mirrored also?

I'm thinking just colored, and maybe a clear and a bronze, since I'm ordering and paying shipping. Never know what it's going to look like. With the clear plexi, I can put a peice of constructin paper under it to alter the final color, so we'll see!

:D:D
 

gerryr

Member
Joined
Sep 22, 2005
Messages
5,353
Location
Billings, MT, USA.
I use a white plexiglass light box with either 2 or 3 27w CFL bulbs, depending on how I want the photo to look. I sometimes even use the on-camera flash at 1/8th power and a diffuser, a Gary Fong Puffer. My camera is on a tripod. I always focus manually because I use a 55mm Micro-Nikkor lens that is not an AF lens, and even if it was AF I would still focus manually. I use this lens because it is razor sharp and I can fill the frame with the pen to minimize cropping. I use a gray card to determine the exposure and generally use f/11 and whatever shutterspeed works with that, sometimes as low as 1/15th second. I use an Expo Disc to set the white balance. I use the self timer to trip the shutter since most, if not all, digital camera will not accept a standard cable release and the IF remote sensor on mine is on the front of the camera so it's highly inconvenient. If you want the entire pen in sharp focus, there really is no alternative to having the pen parallel to the sensor, basically parallel to the back of the camera. Depth of field at these distances is extremely small, even at the smallest aperture on your lens. Minimize your frustration and just put the pen parallel to the sensor.
 

SuperDave

Member
Joined
Jun 15, 2007
Messages
682
Location
Sherwood, Oregon - 97140, USA.
Originally posted by gerryr

I use a white plexiglass light box with either 2 or 3 27w CFL bulbs, depending on how I want the photo to look. I sometimes even use the on-camera flash at 1/8th power and a diffuser, a Gary Fong Puffer. My camera is on a tripod. I always focus manually because I use a 55mm Micro-Nikkor lens that is not an AF lens, and even if it was AF I would still focus manually. I use this lens because it is razor sharp and I can fill the frame with the pen to minimize cropping. I use a gray card to determine the exposure and generally use f/11 and whatever shutterspeed works with that, sometimes as low as 1/15th second. I use an Expo Disc to set the white balance. I use the self timer to trip the shutter since most, if not all, digital camera will not accept a standard cable release and the IF remote sensor on mine is on the front of the camera so it's highly inconvenient. If you want the entire pen in sharp focus, there really is no alternative to having the pen parallel to the sensor, basically parallel to the back of the camera. Depth of field at these distances is extremely small, even at the smallest aperture on your lens. Minimize your frustration and just put the pen parallel to the sensor.

Gerry,

I visited your site. Is the above set-up the same one you used to take the pictures of your "Maroon Phantom Baron" fountain pen? This is exactly what I am trying to achieve. Building a light box with 2-3 cf bulbs and separate switches, with a white Plexiglas top is very doable and affordable. If you don't mind me asking, what are the dimensions of your light box?

I need to use my gray card to acquire the exposure setting and then set the camera manually to those recommendations. I have been using a photograph of the gray card to adjust the RAW image white balance using software, but not to establish the exposure setting.

I do use the tripod and self timer currently. I seem to have a greater issue with controlling the light and setting the camera appropriately. I only have the standard 18:55 lens and use AF, as my near vision, even with glasses, makes focusing TTL difficult. However, my FIL has a Canon film slr camera with several lenses... might check the mount type and play around with them if they fit:D

Thanks for the post!

Dave
 

gerryr

Member
Joined
Sep 22, 2005
Messages
5,353
Location
Billings, MT, USA.
IIRC, that pen was photographed before I built the current light box. The Midnight Havana and Italia Serpent Baron were both taken inside the plexiglass cube, which is 12" on a side. With CFL bulbs, I turn them on at least 10 minutes before I plan to take photos because I found they change after being on for a few minutes.

Also, after discussing the issue with several professional photographers, I now only shoot pens in jpeg, not in RAW. By the time the image gets compressed for use on the web, any advantage of starting with a RAW image has been lost. I find it a lot easier to get the exposure and WB correct in the camera than messing with all that in post processing.

If the camera your FIL has uses the old FD or breech-lock mount, the lenses will not work on your camera. I used to use Canon equipment professionally a long time ago and when Canon abandoned that mount, I sold every piece of Canon gear I had and switched to Nikon.
 
Top Bottom