Photo Booth Shakedown - Opintions welcomed

Signed-In Members Don't See This Ad

76winger

Member
Joined
Aug 30, 2009
Messages
2,784
Location
Lebanon Indiana


I went out and tried some more combinations to try and get the color balance, brightness and sharpness levels I would expect to get out of my DSLR without having to run through a lot of post-shooting edits in an image editor.

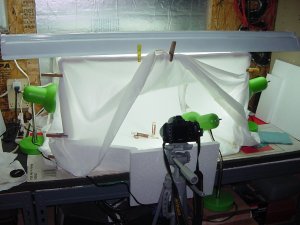
I first removed the Florissant lights on the top which weren't daylights bulbs like I thought they were and put in a pair of tubes that were 6500K daylight bulbs, which match the 6500k CFL lamps in the bases on the sides and front. The photo booth was made from PVC and covered with a white sheet.

I maintained Aperture Priority automatic settings to keep the depth of field in control and used f20 for my setting. Then I used the camera's exposure compensation feature and varied the exposures from 0 through +2 to start getting a feel for what I needed to get the exposure I felt to be the best. For my particular lighting setup and ISO setting of 400, this resulted in shutter speeds varying from 1/125th to 1/25th.

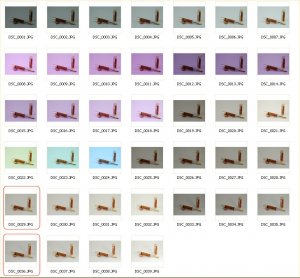
The first row was with the custom white balance settings I've played with for other photos I've taken this past week. They were fair but left a greenish tint I wasn't happy with.

I then tried a Florissant filter, but all of the results for them were to reddish (magenta?) to suit.

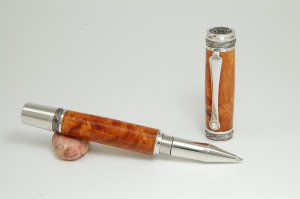
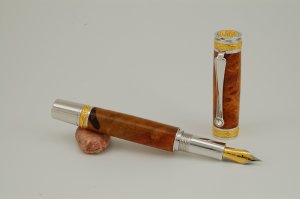
So I removed the filter and started playing with the white balance settings, first Florissant, then daylight (which I think resulted in the bluish colored ones). So decided the Florissant white balance, adjusted to -3 provided the closest to acceptable I could get, but I skipped some of the exposure compensation settings and believed I missed the one that would have worked best. So Stepped through them again and came up with one that I felt was about as close as I could get it, without it looking over exposes. That being DSC_0029.JPG in the thumbnail display.

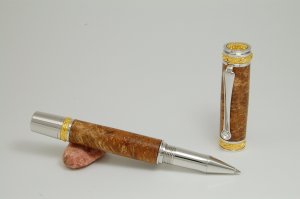
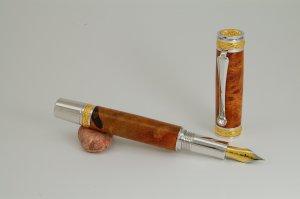
But that was still a little too soft for me, I wanted a little contrast in the photo, so moved the front light into the booth, so it would shine directly on the pen instead of being diffused through the sheet. I think this helped highlight the 3D features of the pen and show off it's details a bit more, and provided a slight shadow on the back side. After bracketing a set with the light on the inside, I ended up selecting DSC_0036.JPG as my favorite for this exercise.

I've attach my two "finalists" for everyone to review. They're straight out of the camera and unedited at this point.

What do you all think?
 
Signed-In Members Don't See This Ad

76winger

Member
Joined
Aug 30, 2009
Messages
2,784
Location
Lebanon Indiana
Someone may have posted similar already. I'm still fairly new as far as my activity on this site is concerned and haven't tried searching for older topics yet.

I'm certainly no expert, so I'm option to suggestions for getting even better results, but I'm working on a budget and using a lot of what I have available around me. It was a big for me to upgrade to a used Nikon D40 so could do better than my wife's old 1.3 megapixel Sony Cybershot point & shoot camera. So equipment suggestions are welcomed as well as technique, however I'll have to work any new equipment into the budget. Which means selling more pens to raised the funds for it! :)
 

rej19

Member
Joined
Jul 19, 2008
Messages
821
Location
Indianapolis, IN
Thanks for posting Dave. This is something that I need to do but just haven't taken the time to do it. How do photos 21,32,39 compare to your choice? It's hard to tell by the thumbnails. They appear to have a whiter background which looks like what you are using. If that is true does that mean that the other colors in the those photos would be more accurate? Either way it looks like you are definetly on the right track.
 

rej19

Member
Joined
Jul 19, 2008
Messages
821
Location
Indianapolis, IN
Dave one other thing. Linda of Indy-Pen-Dance's father who was at the meeting today does some professional photography. I think he is the one who does their photos on their website. We spoke briefly about him doing a photo demo at one of our next meetings. He seemed interested. We'll keep everyone posted.
 

76winger

Member
Joined
Aug 30, 2009
Messages
2,784
Location
Lebanon Indiana
Thanks for posting Dave. This is something that I need to do but just haven't taken the time to do it. How do photos 21,32,39 compare to your choice? It's hard to tell by the thumbnails. They appear to have a whiter background which looks like what you are using. If that is true does that mean that the other colors in the those photos would be more accurate? Either way it looks like you are definitely on the right track.

I was using a white background Ron, and it is represented better in the thumbnails you pointed out. However the colors in the pen body started looking washed out and the plated parts too bright. Thus the reason I picked the two that I did for the best of the bunch. Some photo editing might help out with that, but my goal was to see how good of a picture, overall, that I could pull out of the camera, working with what I have currently.
 

76winger

Member
Joined
Aug 30, 2009
Messages
2,784
Location
Lebanon Indiana
Dave one other thing. Linda of Indy-Pen-Dance's father who was at the meeting today does some professional photography. I think he is the one who does their photos on their website. We spoke briefly about him doing a photo demo at one of our next meetings. He seemed interested. We'll keep everyone posted.

That will be great! Maybe I'll learn enough by then that I'll be able to ask some intelegent questions. :biggrin:
 

76winger

Member
Joined
Aug 30, 2009
Messages
2,784
Location
Lebanon Indiana
Results getting a little more predictable

I played around a little more tonight and was able to bracket about 3 steps instead of 6 and was able to pick some fairly uniform results in both cases. On of my lamps, I actually moved into the booth with the pen (Thanks for the idea Keith!) and it provided a little more of a reflection off the pen, yet not too much since it's still a floresant-type bulb and the light fairly difuse.


The second one is a step darker, because the lighter one left the gold bands looking a little washed out and lacking detail. Since my first and foremost goal is to get some really nice pictures for my online listings, I'm pleased with these results. Although I may try some other options for more "artfull" shots as I get more camera experience under my belt.
 

ctubbs

Member
Joined
Sep 12, 2010
Messages
3,588
Location
Murray, Kentucky
A white background makes it very difficult to get great overall exposures. The wide difference between the correct exposure for the background and the correct exposure for the subject is too great for the sensitive media to capture. There is just not enough latitude in the media. That is one of the reasons that you rarely find a white background in a photo studio. The choice of a neutral gray or a contrasting pastel color for the pen should help remedy the gray instead of white background. If you have something in a pastel blue or green around the house, try laying that in the booth for a few shots. Just an idea.
Charles
 

islandturner

Member
Joined
Jul 17, 2009
Messages
376
Location
Victoria, BC
These are getting really good, Dave. I like the white background -- if you use manual settings, and expose precisely for the pens, it might look effective if the background is blown right out.

I also notice that your camera sensor is dirty -- you'll have to clone out all the dust specs on the keepers....

Looking great...!
Steve
 

76winger

Member
Joined
Aug 30, 2009
Messages
2,784
Location
Lebanon Indiana
A white background makes it very difficult to get great overall exposures. The wide difference between the correct exposure for the background and the correct exposure for the subject is too great for the sensitive media to capture. There is just not enough latitude in the media. That is one of the reasons that you rarely find a white background in a photo studio. The choice of a neutral gray or a contrasting pastel color for the pen should help remedy the gray instead of white background. If you have something in a pastel blue or green around the house, try laying that in the booth for a few shots. Just an idea.
Charles

Thanks for the tips Charles. I've got white and black poster-board for backgrounds right now and wanted to get some other colors in the near future. I figure if I get it figured out with white, the other colors might be easier.

It seems like I loose the richness of the wood color if I expose any longer to brighten the background. Maybe I need to go back and play with the white balance a little more???
 

76winger

Member
Joined
Aug 30, 2009
Messages
2,784
Location
Lebanon Indiana
These are getting really good, Dave. I like the white background -- if you use manual settings, and expose precisely for the pens, it might look effective if the background is blown right out.

I also notice that your camera sensor is dirty -- you'll have to clone out all the dust specs on the keepers....

Looking great...!
Steve

Thanks Steve, I've noticed the dust specks as well. It was REAL noticable when I tried aperture settings in the high 20s & 30s. Part of what I get to deal with on a used camera I suppose.

I've read a little on cleaning the sensor, but that sounds chancy at best, like I might do more harm than good if not extremely careful. I also read mention of tuning them out in the camera settings, I haven't gone through that part of the manual yet, so I'll be giving that a try when I get to that section.
 

Rangertrek

Member
Joined
Sep 10, 2008
Messages
2,104
Location
Bossier City, Louisiana, USA
Thanks Dave for posting all of this information. I also have a D40 and have tried multiple settings and backgrounds and still not completely happy with my shots.

I will check my settings and light information and compare with yours.
 

ctubbs

Member
Joined
Sep 12, 2010
Messages
3,588
Location
Murray, Kentucky
Dave, check with the LOYL and see if she might loan you a piece of cloth, a scarf, or blouse to try for a different color. As long as you don't spill your beer on it, she just might be willing to offer some suggestions on items and colors to accent your pens. Just an idea. Again YMMV.
Charles
 

76winger

Member
Joined
Aug 30, 2009
Messages
2,784
Location
Lebanon Indiana
thumnails.jpg Dsc_0026-1step.jpg Dsc_0027-.7step.jpg Dsc_0028-.3step.jpg Dsc_0030-0step.jpg

Giving a non-white background a try, I got some interesting results. First, I perused the closet and discovered a medium-gray shirt I rarely wear, so dug it out for the next experiment. It's quite a bit darker than neutral gray, so I found I had to braket exposured in the opposite direction to get aceptable results.

The thumbnails show 6 shots I took at -1 step, -.7 step, -.3 step, 0 step, +.3 step and +.7 step. I only upload the first four as the last two were too washed out.

Whereas I favored pusing to +1.7 to get a fair background without washing out the pen color, now the medium gray took the favorisim quit a bit the other way, and I'm debating DSC_026 at +1 step and DSC_027 at +.7 step.

ETA - I took these at F18, as opposed to F20 for all the prior shots. I tried lower, but the dept field just wasn't satisfactory and I wanted to capture as much of the sculptured details of the Majestic as possible.
 
Last edited:

76winger

Member
Joined
Aug 30, 2009
Messages
2,784
Location
Lebanon Indiana
Thanks Dave for posting all of this information. I also have a D40 and have tried multiple settings and backgrounds and still not completely happy with my shots.

I will check my settings and light information and compare with yours.

If you have any questions on how to set anything I've talked about here, I'll be happy to share the settings and process to make them. Just PM me. The big thing to note is things the others have suggested such as using lights all of the same type and color temperature so you can adjust the white balance to accommodate it.

Once the white balance is set then get exposure dialed in by bracketing exposures. This can be done via adjusting manual settings, or using exposure compensation with auto exposure as I've done here. I personally chose aperture priority because I wanted to control the depth of field the use of the exposure compensation forced the camera to adjust shutter speed to create the various over and under-exposed variations.

I want to get a neutral gray background to try next, but I'm not finding any in the poster board supplies as Wal-Mart or Target. I'll keep looking.
 

MatthewZS

Member
Joined
Jul 22, 2010
Messages
482
Location
Georgetown Texas
You mentioned removing lights that you thought where daylight bulbs but wheren't etc..... I thought I would point out. If you go to anyplace that carries lighting for marine aquariums...... petco, petsmart, etc..... or specialty shops...... Most bulbs for saltwater bulbs are labeled and are very accurate, and they keep that color for a long time. And most of these bulbs are in the daylight/white range. Granted some high end bulbs wouldn't be worth it cost wise, but there are some low end bulbs that go in regular sockets that are cheap, long life, GOOD color and in the absence of a local camera oshop...... or the MONEY to buy from a camera shop.........

Worth keeping in mind.
 

76winger

Member
Joined
Aug 30, 2009
Messages
2,784
Location
Lebanon Indiana
You mentioned removing lights that you thought where daylight bulbs but wheren't etc..... I thought I would point out. If you go to anyplace that carries lighting for marine aquariums...... petco, petsmart, etc..... or specialty shops...... Most bulbs for saltwater bulbs are labeled and are very accurate, and they keep that color for a long time. And most of these bulbs are in the daylight/white range. Granted some high end bulbs wouldn't be worth it cost wise, but there are some low end bulbs that go in regular sockets that are cheap, long life, GOOD color and in the absence of a local camera oshop...... or the MONEY to buy from a camera shop.........
Worth keeping in mind.

You know, I though about this just last night, because although I don't have a salt water tank, I keep a 75 gallon planted tank and I got a reflector and bulbs in there to promote the growth of the plants. Those bulbs are 8000k and 10,000K. But that is a big investment for photographing pens, I wrapped a couple hundred up in a used lighting unit for that tank and the bulbs for it are about $50 each and it takes four! So I ruled out trying those due to budgetary reasons. :befuddled:
 

toolcrazy

Member
Joined
Dec 23, 2006
Messages
5,408
Location
Port Orchard, WA
Very nice photos. You might consider reducing your ISO to 100 this will reduce noise then open the aperture to f/16 or so, sometime smaller apertures will make the images muddy. This will still give you the depth of field you need. With a tripod, you don't need to worry about slower shutter speeds. I always use a 2 second shutter delay, so I'm no where near my camera when the shutter goes off.
 

76winger

Member
Joined
Aug 30, 2009
Messages
2,784
Location
Lebanon Indiana
I'm debating DSC_026 at +1 step and DSC_027 at +.7 step.

I like DSC_028 from the grey set.

What I really start to not like on that one is the reflection at the top of the cap. I'm actually not pleased with it on any of them but it's at least acceptable to me on the darker ones. I really want to get where I just have a slight line of reflection while overall color depth remains around what we see in 027 and 028. I'll probably experiment some more this weekend. :bulgy-eyes:
 

soligen

Member
Joined
May 11, 2010
Messages
1,085
Location
Sterling Heights, Michigan
I'm debating DSC_026 at +1 step and DSC_027 at +.7 step.

I like DSC_028 from the grey set.

What I really start to not like on that one is the reflection at the top of the cap. I'm actually not pleased with it on any of them but it's at least acceptable to me on the darker ones. I really want to get where I just have a slight line of reflection while overall color depth remains around what we see in 027 and 028. I'll probably experiment some more this weekend. :bulgy-eyes:

On 26 and 27 it seemed to me that there was an overly dark area on top of the cap, which led me to think they are underexposed (I don't have the benefit of the real pen to judge by). 28 seemed to be where that dark area lightened up enough. Perhaps the light is not even over the whole pen, causing the dark area. Do you have a light above?

Either way, the pics look good. you are definately into the very fine tweaking stage.
 

76winger

Member
Joined
Aug 30, 2009
Messages
2,784
Location
Lebanon Indiana
Thanks for your thoughts Dennis,
I see what you're talking about light on the top. I think it went a little out of focus on that shot, making the top just a little blurry.

I AM struggling with depth of field issues on that current position of camera to pen. I can't get the the band on the end of the pen, the center band, and the top to all be in focus at the same time, even af f18. So I either need to bump it up more or change some positioning.

As for lighting you can see the booth I've got at the start of this thread I've got it flooded with 6500k daylight florescent lights across the top and sides, plus one in the front, although the front one was moved in and over the top for the gray background set, so I'm going to have to play around with placement of that a little so I can bring out the highlihts of the pen withought creating too large of a white spot at any point.

In fact, I'm heading out for another round of trials now! :)
 

76winger

Member
Joined
Aug 30, 2009
Messages
2,784
Location
Lebanon Indiana
Well after a couple more hours of experiments I finally got some new results that I feel improve over the set of pictures, so here's the latest. I'll follow with some of the settings and changes I made.

Dsc_0063-psp.jpg Dsc_0064-psp.jpg

Dsc_0065-psp.jpg Dsc_0066-psp.jpg

Dsc_0067-psp.jpg Dsc_0068-psp.jpg

Dsc00043.jpg Dsc00044.jpg

First off, for my last couple of sets tonight, I took the leap and switched to manual mode! :eek:

Yes, after all the earlier trials, and even the first five sets tonight, I was still using aperture priority, and although my results for this pen and background are satisfactory, I got thinking that when I switch in the next pen, which will be a completely different color, the auto settings are going to go out the window and I'll have another round of experimenting to do (although not to this degree). So decided to switch over to manual mode, and us the favored settings from prior tests as a place to start and then bracket above a below to find the sweet spot in manual mode.

Before I switched to manual, played around some more with composition because I just didn't like the way the top kept coming out and I knew I liked it better in some other photos I've posted. What I ended up doing was moving the pen away from the camera a couple of inches further than I already had, then I raised the camera a little higher so I could get the details of that darned cap! :bananen_smilies026:

So the above photos are my final results. Picture 067 actually depicts the color of the material for the background and pen body as I see them in front of me, however al the metal parts are washed out and flat so it doesn't make the best photo of the pen.

I really like the way the details stands for the 3D metal parts stand out in 063, but it's otherwise way to dark for everything else. 064 is better overall but still a little too dark IMO and 066 is still a little too light. So that leaves me favoring photo 065, because it's right in the middle, the body is a little warmer and richer than real life, but looks great in the photo, and the metal parts still show a lot of detail without crossing over into the washed out zone. So I'm making 065 the winner for this experiment and relieve myself to photograph my other pens and have a party.:bananen_smilies104:

But before I wrap this up I wanted to repost a couple of shots of my DIY booth with the camera still set from the shoot and another showing camera position relative to the subject.

I've kind of used this thread to gain ideas from many of you and I truly thank everyone for your contributions. I also hope others just learning how to do this might get an idea of the process involved by my attempt here and see that they can do it too.

So to review some of the particulars for this attempt:

  • DIY photo booth made from PVC pipe and covered with a white sheet to use as diffuser.
  • 6500k fluorescent tubes across the top
  • 6500k CFL lamps in cheap desk lamp housings, one on each side and one in front. They're green because that's the only color Lowes had them in (I painted one in the front white during my earlier experiments, because the green kept reflecting in the crystal mounted in the pens clip).
  • To get the initial white balance close, I ended up setting my Nikon D40 to florescent light source with a -3 value (this will vary with different color temp bulbs).
  • Kept camera on tripod for all shots
  • Was finding white background created to wide a range of brightness for the camera to replicate well, so I switched to a medium gray material to provide a background closer to neutral so I could capture the pen better.
  • Determined a particular angle that worked good for this pen and it's pose (and noted it for future use)
  • And with the manual settings determined, will have a good starting place for the next pen and the next one, ect. based on current lighting.
  • Making note that as the lights age the color will shift, so I'll have to make accommodations when that becomes noticeable.
And then the photo settings - all were taken at ISO 200, F20 aperture and 50mm focal length on the lens at 10 distance and camera 6 inches above the subject pen. No flash assist used and focus performed manually.
DSC_063 - 1/15sec
DSC_064 - 1/13sec
DSC_065 - 1/10sec - My pick for best of bunch.
DSC_066 - 1/8sec
DSC_067 - 1/6sec
DSC_068 - 1/5sec

Any additional thoughts and opinions welcome, thanks for all the help you've already given.
 
Last edited:

Sylvanite

Member
Joined
Jul 18, 2006
Messages
3,090
Location
Hillsborough, North Carolina, USA.
To clean the dust off your sensor, the first tool you need is a (large or medium) Giottos Rocket Air Blaster.
GTRAB.jpg
This is the blower that the pros recommend. One can be had fairly inexpensively at http://www.adorama.com/GTRAB.html

Put your camera into "sensor cleaning mode", remove the lens, hold the body with the lens opening pointing down, hold the blower with the nozzle close to BUT NOT TOUCHING the sensor and squeeze the bulb firmly several times. This dislodges the majority of the dust and is usually sufficient to clean the sensor.

Wet cleaning kits are also available and work well, but can be pricey.

Regards,
Eric
 

76winger

Member
Joined
Aug 30, 2009
Messages
2,784
Location
Lebanon Indiana
To clean the dust off your sensor, the first tool you need is a (large or medium) Giottos Rocket Air Blaster.
View attachment 43963
This is the blower that the pros recommend. One can be had fairly inexpensively at http://www.adorama.com/GTRAB.html

Put your camera into "sensor cleaning mode", remove the lens, hold the body with the lens opening pointing down, hold the blower with the nozzle close to BUT NOT TOUCHING the sensor and squeeze the bulb firmly several times. This dislodges the majority of the dust and is usually sufficient to clean the sensor.

Wet cleaning kits are also available and work well, but can be pricey.

Regards,
Eric

I need to get one of those. When I had it set above f22 and with the white background the spots were real noticeable. And since I got this camera, used, for about 1/2 new price, I can probably swing some cleaning supplies.
 

76winger

Member
Joined
Aug 30, 2009
Messages
2,784
Location
Lebanon Indiana
Hey Dave, I read through the posts very quickly and may have missed it, but what lens are you using?

I'm currently using the stock 18-55mm kit lens that came with the camera. It's the only I have currently.

Too bad the lenses from my old Minolta XD5 35mm camera won't work, I still have a bag of goodies for it, although most haven't been used in almost 20 years now... :cool:
 
Top Bottom