
Sylvanite
Member
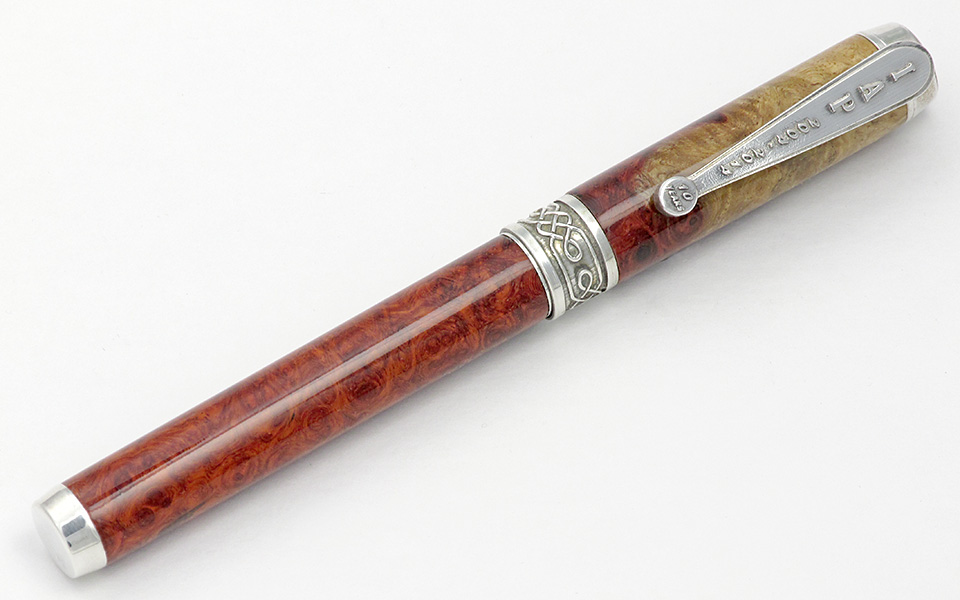
I have previously posted several threads here on various photography concepts.This thread is a little different. It presents a virtual walkthrough of a pen photography session. I'm not discussing a particular photography concept in much detail (like previous posts), but rather showing how they tie together. I'll go through the steps of composing, lighting, and taking a pen photo, explaining what decisions are made along the way and how I make them.
Choosing Equipment
I want to make things as simple as I can, so I'm keeping the gear to a minimum. You don't need a high-end camera and a lot of expensive studio equipment to take a decent picture. For this demonstration, I've chosen a relatively inexpensive point-and-shoot camera:
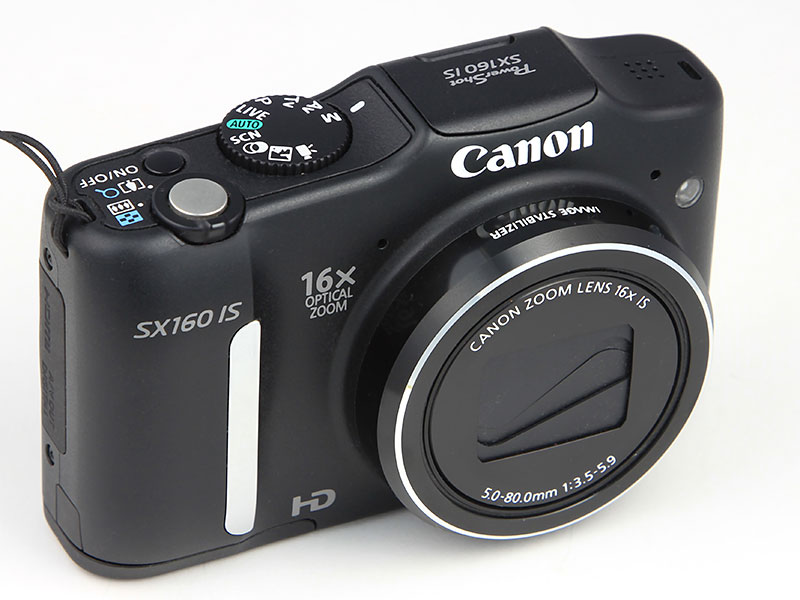
This is a Canon Powershot SX-160 IS that I picked up last year for about $70. There's nothing special about this particular model, it's just one of the cheaper cameras that still has manual controls.
I'll keep the studio equipment basic too. I've restricted it to a light tent, two 26W CFL lights, and a cheap tripod.
Composition
I'm going for a simple composition as well- just a plain white background. For this exercise, I've placed the pen flat on white mat board, angled across the frame and towards the camera.
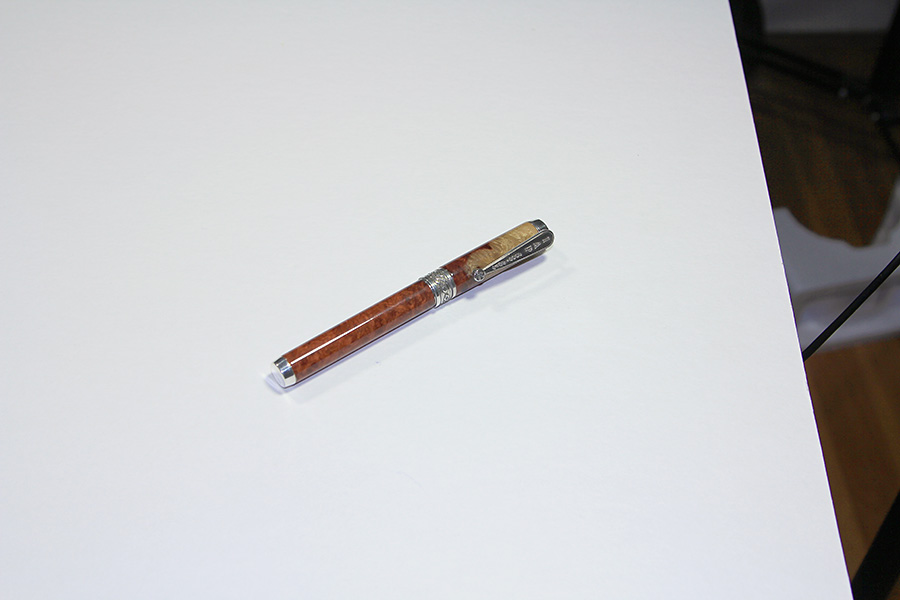
I put the matboard inside the light tent, so that I could photograph it at roughly a 45 degree angle. I usuallly prefer a lower point of view, but the front light tent opening makes that awkward. So, I compromised.
Perspective
I typically place the camera 2 to 2.5 feet from the pen in order to get suitable perspective. This camera, however, doesn't focus well at that distance, so I shot from about 3 feet away and zoomed in to fill the frame (a focal length of about 40mm).
Lighting
A little shadow under the pen adds depth to the photo, so I chose to backlight the pen. I placed the primary light above, behind, and to the left of the light tent, aimed at the rear and left walls.
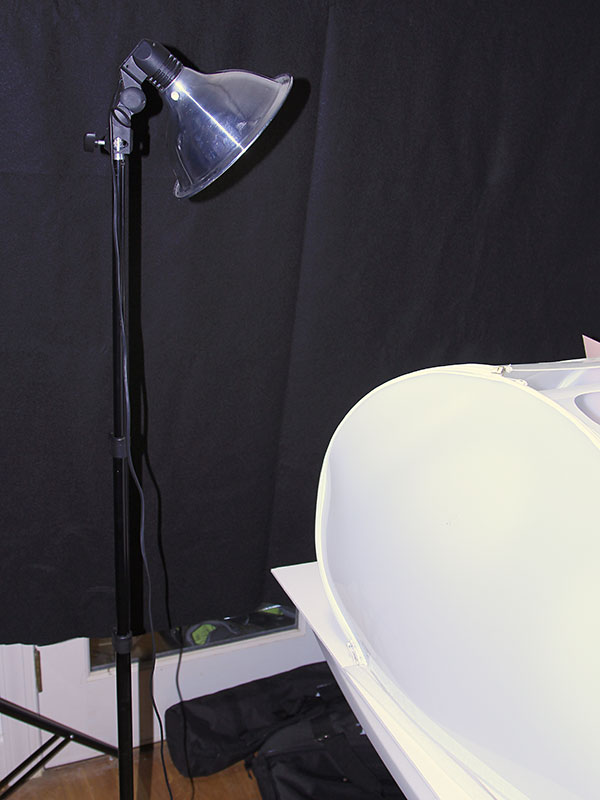
The secondary light serves two purposes. First, it illuminates the front of the pen (otherwise the blank would be in shadow). Second, it creates the "shine line" on the top. A little reflection serves to add depth and it also calls out the glossy finish. I positioned this light to shine on the upper front edge of the right wall of the light tent.
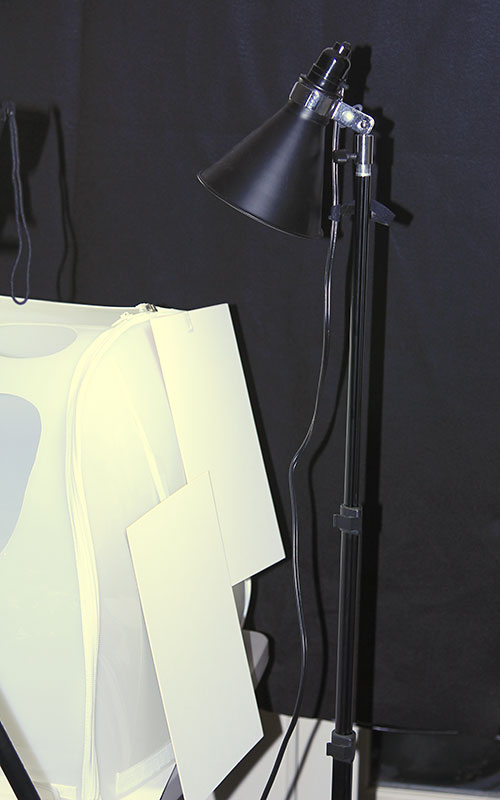
You can also see that I've taped a couple small pieces of mat-board to the light tent. By blocking the light this way, I've controlled the size and shape of the surface reflection. If I had lit the light tent wall evenly, there would be no shine line at all. I used mat-board because I have a bunch of it laying around, but anything opaque (construction paper, fabric, cardboard, etc.) works.
Now the pen is well lit, with a soft shadow and a highlight. Because the reflective metal components are inside the light tent, they are evenly illuminated and show their detail nicely.
White Balance
I used "auto" white balance this time, and it worked out well. If it hadn't, I'd have switched to "daylight", "5500K", or custom white balance.
Depth of Field
I wanted the pen to be completely in focus, from end to end. I've already set the distance and focal length (in the "perspective" section above), so I need to control depth-of-field with the aperture setting. There are depth-of-field calculators available online, but trial-and-error works too. With this camera, at 3ft, zoomed to 40mm focal length, an aperture of f/5.6 will easily give sufficient depth of field. Don't get hung up on the specific f/stop number. Were I using a APS-C sensor camera at the same spot, I'd get about the same depth-of-field at f/22 (or f/32 with a full-frame 35mm camera). With some experience, you'll get a sense of what what works for your camera.
ISO setting
For minimum noise, I set the camera to ISO 100.
Exposure
Given the aperture and ISO already chosen, a shutter speed of 1/10 sec yielded proper exposure. You can use a camera's built-in meter, or just trial-and-error. I set the shutter speed to what looked good in the display, took a test shot, and then adjusted.
Shooting handheld at that shutter speed would result blur from camera shake, so I mounted the camera on a tripod (actually, I'd use a tripod anyway as that makes for easier adjustments to the composition). Even on the tripod, pressing the shutter release jiggles the camera, so I set the self-timer for 10 seconds. That is long enough for any motion to settle out.
I should also have turned off the built-in image stabilization, but I simply forgot to. Image stabilization is great for handheld shots but can acutally introduce blur when the camera is on a tripod. If I had used a DSLR camera, I'd have enabled "mirror lock-up", to elimnate another source of camera shake.
Focus
Remember, DOF extends farther behind the focal point than in front. Therfore, I focused slightly in front of centerband.
Taking the shot
Even though the focal point was not in the center of the frame, I used the camera's auto-focus. I simply turned the camera to where I wanted to focus, held the shutter release halfway until focus locked, then recomposed and pressed the rest of the way. Then I let go and stood still until tripod steadied down and the camera took the picture.
Post-processing
I used Photoshop Elements to post-process the image. I don't, however, want to get into a discussion of photo editing here (I've already done a series of library articles on that). Suffice it to say that I:
I hope that helps,
Eric
Choosing Equipment
I want to make things as simple as I can, so I'm keeping the gear to a minimum. You don't need a high-end camera and a lot of expensive studio equipment to take a decent picture. For this demonstration, I've chosen a relatively inexpensive point-and-shoot camera:
This is a Canon Powershot SX-160 IS that I picked up last year for about $70. There's nothing special about this particular model, it's just one of the cheaper cameras that still has manual controls.
I'll keep the studio equipment basic too. I've restricted it to a light tent, two 26W CFL lights, and a cheap tripod.
Composition
I'm going for a simple composition as well- just a plain white background. For this exercise, I've placed the pen flat on white mat board, angled across the frame and towards the camera.
I put the matboard inside the light tent, so that I could photograph it at roughly a 45 degree angle. I usuallly prefer a lower point of view, but the front light tent opening makes that awkward. So, I compromised.
Perspective
I typically place the camera 2 to 2.5 feet from the pen in order to get suitable perspective. This camera, however, doesn't focus well at that distance, so I shot from about 3 feet away and zoomed in to fill the frame (a focal length of about 40mm).
Lighting
A little shadow under the pen adds depth to the photo, so I chose to backlight the pen. I placed the primary light above, behind, and to the left of the light tent, aimed at the rear and left walls.
The secondary light serves two purposes. First, it illuminates the front of the pen (otherwise the blank would be in shadow). Second, it creates the "shine line" on the top. A little reflection serves to add depth and it also calls out the glossy finish. I positioned this light to shine on the upper front edge of the right wall of the light tent.
You can also see that I've taped a couple small pieces of mat-board to the light tent. By blocking the light this way, I've controlled the size and shape of the surface reflection. If I had lit the light tent wall evenly, there would be no shine line at all. I used mat-board because I have a bunch of it laying around, but anything opaque (construction paper, fabric, cardboard, etc.) works.
Now the pen is well lit, with a soft shadow and a highlight. Because the reflective metal components are inside the light tent, they are evenly illuminated and show their detail nicely.
White Balance
I used "auto" white balance this time, and it worked out well. If it hadn't, I'd have switched to "daylight", "5500K", or custom white balance.
Depth of Field
I wanted the pen to be completely in focus, from end to end. I've already set the distance and focal length (in the "perspective" section above), so I need to control depth-of-field with the aperture setting. There are depth-of-field calculators available online, but trial-and-error works too. With this camera, at 3ft, zoomed to 40mm focal length, an aperture of f/5.6 will easily give sufficient depth of field. Don't get hung up on the specific f/stop number. Were I using a APS-C sensor camera at the same spot, I'd get about the same depth-of-field at f/22 (or f/32 with a full-frame 35mm camera). With some experience, you'll get a sense of what what works for your camera.
ISO setting
For minimum noise, I set the camera to ISO 100.
Exposure
Given the aperture and ISO already chosen, a shutter speed of 1/10 sec yielded proper exposure. You can use a camera's built-in meter, or just trial-and-error. I set the shutter speed to what looked good in the display, took a test shot, and then adjusted.
Shooting handheld at that shutter speed would result blur from camera shake, so I mounted the camera on a tripod (actually, I'd use a tripod anyway as that makes for easier adjustments to the composition). Even on the tripod, pressing the shutter release jiggles the camera, so I set the self-timer for 10 seconds. That is long enough for any motion to settle out.
I should also have turned off the built-in image stabilization, but I simply forgot to. Image stabilization is great for handheld shots but can acutally introduce blur when the camera is on a tripod. If I had used a DSLR camera, I'd have enabled "mirror lock-up", to elimnate another source of camera shake.
Focus
Remember, DOF extends farther behind the focal point than in front. Therfore, I focused slightly in front of centerband.
Taking the shot
Even though the focal point was not in the center of the frame, I used the camera's auto-focus. I simply turned the camera to where I wanted to focus, held the shutter release halfway until focus locked, then recomposed and pressed the rest of the way. Then I let go and stood still until tripod steadied down and the camera took the picture.
Post-processing
I used Photoshop Elements to post-process the image. I don't, however, want to get into a discussion of photo editing here (I've already done a series of library articles on that). Suffice it to say that I:
- Cropped,
- Adjusted Levels,
- Cloned-out dust specs, spots on the background, and some museum wax that showed,
- Resized,
- Sharpened, and
- Saved for web.
I hope that helps,
Eric
Attachments


Last edited:
") I am wondering if the clip has specular highlights around where the 2014 is. If so, one way to deal with those is to find the spot on the tent that directly relates to those reflections and place a small piece of black tape or similar over JUST the area that is directly reflected (not a problem with constant lights or lights with modeling bulbs, but it can be a PITA if you are using strobes...) I'm also wondering if a few strategically placed small pieces of dark board (black or various shades of grey depending on how much you want) just outside the lower left edge of the frame might have helped define the lower and back part of the end of the pen by blocking the light reflecting off of the hardware. I'm not 100% positive that this would work, but I've done similar things in some situations, so it's something to keep in mind, especially with highly reflective surfaces being shot on white...
I am wondering if the clip has specular highlights around where the 2014 is. If so, one way to deal with those is to find the spot on the tent that directly relates to those reflections and place a small piece of black tape or similar over JUST the area that is directly reflected (not a problem with constant lights or lights with modeling bulbs, but it can be a PITA if you are using strobes...) I'm also wondering if a few strategically placed small pieces of dark board (black or various shades of grey depending on how much you want) just outside the lower left edge of the frame might have helped define the lower and back part of the end of the pen by blocking the light reflecting off of the hardware. I'm not 100% positive that this would work, but I've done similar things in some situations, so it's something to keep in mind, especially with highly reflective surfaces being shot on white...