Not pens but woodworking, need help

Signed-In Members Don't See This Ad

Dvoigt

Member
Joined
Dec 5, 2008
Messages
274
Location
Fraser, MI
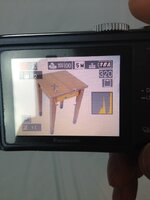
So have an ok camera, it is a point and shoot, but I can adjust setting like exposure and white balance and stuff. I have used this camera for the last few years with acceptable results.

As my woodworking has gotten bigger I have had issues taking pictures of the items, either because my lighting options were horrible or couldn't get a good background. So I recently bought a white back drop and some big soft box light stands in the hopes of getting more consistent results.

The lighting is now a little TOO intense, the bulbs are too white and it makes things look too blue. I can adjust that out alittle with the setting on the camera, but will try different bulbs that will give a warmer feel to the wood.

But now I'm also noticing that my pictures seem super grainy, is my camera wearing out, or is there some fundamental thing that I'm doing wrong?

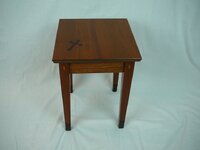
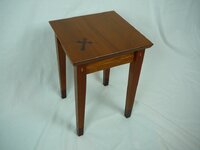
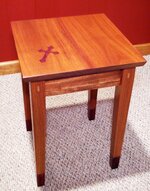
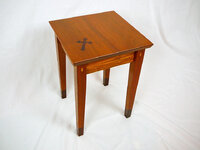
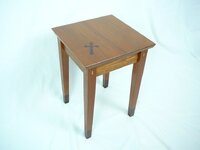
Here is an example of the pictures I took today, blue and grainy...
 

Attachments

  • P1020124.jpg
    P1020124.jpg
    153.8 KB · Views: 332
Signed-In Members Don't See This Ad

Sylvanite

Member
Joined
Jul 18, 2006
Messages
3,113
Location
Hillsborough, North Carolina, USA.
Regarding the color tint, check your camera settings for "white balance". Try "Daylight", or even "Cloudy" settings. Better would be to take a "custom" white balance reading.

As far as "grainy" goes, the typical cause of pixelization is too high an ISO setting. For best results, use lower ISO settings. Some cameras do quite well at high values, but I usually try to shoot at ISO 100.

I hope that helps,
Eric
 
Joined
Feb 25, 2010
Messages
1,799
Location
webberville, mi
For the blue tint: Even the simpler point & shoot cameras will often have different light source settings. Check those out if you have them. If your camera is lacking the ability to adjust for varying light sources, you can upload the pic to your computer. My computer has a pic viewer that allows you to "fix" a photo by adjusting exposure, tint, etc. I get very acceptable results with it.

For the "graininess" - No, I don't believe the digitals wear out, but that's a nifty way of convincing someone else you need a new camera. Again, many (most) cameras will have a setting in there somewhere that will allow you to use more (or fewer) pixels per photo. That may have been inadvertently changed. The more pixels, the better the definition. If that's not the case, check the ISO (old film speed) setting. Best to keep it in the under 400 setting.

Also, try getting more light on the subject. Most anything will work but try to keep it "directional" so the light is pointing at the subject.

Nice work.
 
Last edited:

mark james

IAP Collection, Curator
Joined
Sep 6, 2012
Messages
12,752
Location
Medina, Ohio
Regarding the color tint, check your camera settings for "white balance". Try "Daylight", or even "Cloudy" settings. Better would be to take a "custom" white balance reading.

As far as "grainy" goes, the typical cause of pixelization is too high an ISO setting. For best results, use lower ISO settings. Some cameras do quite well at high values, but I usually try to shoot at ISO 100.

I hope that helps,
Eric

Eric:

YES, that helps - I've read that setting recommendation more and more. Thanks for the comments; We appreciate the help.
 

Dvoigt

Member
Joined
Dec 5, 2008
Messages
274
Location
Fraser, MI
The camera is set for the highest quality and file size. The ISO is set to "auto", I will force is to 80 or 100 and see what that does. I played alot with the white balance and tried to balance it to the white back drop, which then also allowed me to tweak the balance red or blue more, but I didn't try the preset options in there.

I will see how those help.

Any thoughts on the bulbs themselves being too white? They are LoadStone Studio Digital Full Spectrum Light Bulb - 45W Photo CFL 6500K, Daylight Balanced, Pure White
bulbs
 

plantman

Member
Joined
Jan 2, 2012
Messages
3,437
Location
Green Bay, Wi
What type of photo program are you using in your PC. Most of your photo problems can be solved with a quality program. I take realy bad photos, but my PC program can make them look like I know what I am half doing anway. Jim S
 

Dvoigt

Member
Joined
Dec 5, 2008
Messages
274
Location
Fraser, MI
Wow,what a beautiful table!

Wish you could do a new post telling us about that,with more pics.Love the cross in it.


Steve

Let me get some good photos first!

The only program that I have for adjusting pictures is the standard Microsoft Office Picture Manager, this will allow me to adjust the color, brightness, and other things in the picture. But I want to at least get the picture close before I rely on that to make it look good, because they adjust the entire picture and can muddy up the picture pretty quick.

Here is a picture I took with with the ISO at 100 and the W Balance set to Cloudy. - still looks blue to me.
 

Attachments

  • P1020140.jpg
    P1020140.jpg
    144.1 KB · Views: 147
Last edited:

Dvoigt

Member
Joined
Dec 5, 2008
Messages
274
Location
Fraser, MI
Here is that same picture from the previous post "corrected" in the photo program.

While it doesn't look that blue any more, the legs are now darker then they are in real life and the back corner of the table looks yellow while the front corner of the table is more red. In real life the whole top is similar in color, except for the dark strip in the middle.
 

Attachments

  • P1020140auto corrected.jpg
    P1020140auto corrected.jpg
    195.3 KB · Views: 187

Dvoigt

Member
Joined
Dec 5, 2008
Messages
274
Location
Fraser, MI
And here is a picture I took of it under the regular spot lights in my basement with a desk lamp and a regular 60watt bulb to help with the extra lighting.

I think there was some auto correction done on this too, can't remember because it was done a while. But I think this picture shows the color of the top much more how it looks in real life.
 

Attachments

  • Jatoba side table 2.jpg
    Jatoba side table 2.jpg
    295.8 KB · Views: 134

Dan Masshardt

Member
Joined
Jan 30, 2013
Messages
4,806
Location
Mechanicsburg, PA
And here is a picture I took of it under the regular spot lights in my basement with a desk lamp and a regular 60watt bulb to help with the extra lighting. I think there was some auto correction done on this too, can't remember because it was done a while. But I think this picture shows the color of the top much more how it looks in real life.
the top looks nice in the light but the front looks odd.
 
Joined
Feb 25, 2010
Messages
1,799
Location
webberville, mi
Does your camera allow overexposure? You can see that when the sensors pick up a varied background (how they are programmed) the exposure is much better. The white backdrop confuses it. I use a white lightbox for pens and typically have to overexpose +1.3 to +1.5 stops. If you can do it, try for at least +1 stop overexposure.
 

Boz

Member
Joined
Jun 21, 2008
Messages
371
Location
St. Louis, MO.
It appears that your images are underexposed. The background you purchased is white and it is recording as blue/grey. The standard for photographic exposure is 18% grey. The camera is dumb it does not know what is in front of it. Unless you get into really high end cameras that have scene control. Put something that is white in front of it it is going to calculate the exposure to make it grey. Put up a black cloth and it will try and overexpose and make it grey. Back in the old days we would have a grey card and used it to take our exposure settings This all being said you need to adjust the exposure. In this case add about 1.5 to 2 stops of exposure from what the camera says to bring up the shadows. You also have a focus problem. To get the most depth of field you have to use the smallest f-stop possible. It is the highest number seams kind of backward but it works. Put the camera in manual mode. Set the highest f-stop you can then adjust the exposure time for the correct exposure. Those CLFs are not that bright in terms of lumens produced. So your exposure time may get down to as long as a second or two. You will need a tripod to hold the camera steady.
 

Sylvanite

Member
Joined
Jul 18, 2006
Messages
3,113
Location
Hillsborough, North Carolina, USA.
The camera is underexposing your photo. It's doesn't know that the background is supposed to be white, and is trying to make it gray. I did a little tweaking on the photo, which produced this:

attachment.php


The major changes are that I adjusted the white balance some (raised the color temperature and shifted the tone towards magenta) and I increased the exposure by one full f-stop. I think the photo is better, but it would be better still if you made the adjustments in-camera. If your camera permits manual exposure, check what it used and either increase the aperture by 1 f-stop (lower numbers represent larger apertures), or double the exposure time (halve the shutter speed). If you can't set the exposure manually, look for an "exposure compensation", or "EV" setting. Set it to +1.0 EV (which will increase exposure by 1 f-stop). In the absence of that control, look for a "back lit scene" mode. That will tell the camera to expose the photo for the central subject, not the surroundings. You may find that proper exposure helps with the white balance. If not, try the "shade" white balance setting (but I suspect that may be too much).

I hope that helps,
Eric
 

Attachments

  • P1020140a.jpg
    P1020140a.jpg
    167.4 KB · Views: 253

philipff

Member
Joined
Jun 21, 2009
Messages
598
Location
Williamsburg, VA
Check the phone book and local HS and colleges to see if there is a photo club/group that will help you. I have found wonderful experts in those locations. Philip
 

Dvoigt

Member
Joined
Dec 5, 2008
Messages
274
Location
Fraser, MI
That color is a lot better in the picture you adjust Eric.

I will check those settings tonight.

The camera has a little histogram that is supposed to check the exposure. Should I just ignore that... Cause I'm not really sure what that is really telling me
 

Sylvanite

Member
Joined
Jul 18, 2006
Messages
3,113
Location
Hillsborough, North Carolina, USA.
A histogram is a graph that shows how many pixels are how bright. A high value on the left indicates lots of black or dark tones. It typically indicates underexposure. A peak on the right means large bright areas and often implies overexposure.

Your photo, however, has no really dark areas - just midtones and lots of white background. Therefore, the histogram should show low values on the left, a bulge in the middle, and a spike at the right edge.

I hope that helps,
Eric
 

Dvoigt

Member
Joined
Dec 5, 2008
Messages
274
Location
Fraser, MI
. If your camera permits manual exposure, check what it used and either increase the aperture by 1 f-stop (lower numbers represent larger apertures), or double the exposure time (halve the shutter speed). If you can't set the exposure manually, look for an "exposure compensation", or "EV" setting. Set it to +1.0 EV (which will increase exposure by 1 f-stop).

I can set it to +1 on the exposure. I have shutter options of 1/8-, 1/4-, 1/2-, and 1-. I have it set at 1/8-

There is also options to adjust the metering mode, I have it at "Center Weighted" currently but there is "spot" option that might be a better choice. Also for AF I have it on "1-area focusing" but there is also a "spot focusing" option and a few others.

Any suggestions on these?
 

Dvoigt

Member
Joined
Dec 5, 2008
Messages
274
Location
Fraser, MI
To get the most depth of field you have to use the smallest f-stop possible. It is the highest number seams kind of backward but it works. Put the camera in manual mode. Set the highest f-stop you can then adjust the exposure time for the correct exposure. .

I don't see a direct way to change the F-stop. We I press the button half way down it just comes up and says F2.8 1/8. that doesn't seem to change at all (except for the 1/8 part)
 

Dvoigt

Member
Joined
Dec 5, 2008
Messages
274
Location
Fraser, MI
well I took a set of pictures and I don't know what happened, but they were all really dark and really blue. So I reset and tried it all again and got much better results... but i do feel like the color of the wood is still muted

Here is a picture +1 exposure. I feel like it might be too white, but it is certainly not blue. And a picture of how the history gram on my camera looks just before I take it.
 

Attachments

  • P1020158 +1.jpg
    P1020158 +1.jpg
    108.4 KB · Views: 119
  • photo(3).JPG
    photo(3).JPG
    105.7 KB · Views: 116
Last edited:

GDGeorge

Member
Joined
Apr 2, 2010
Messages
192
Location
Bowie, MD
You might want to try the GIMP (Gnu Image Manipulation Program, I think). Anyway, it's free and comparable to Photoshop. Under the <Colors> menu there's an <auto> sub-menu, and White Balance is one of the selections under there. You can also set that manually, but this is a start.

Jerry

Wow,what a beautiful table!

Wish you could do a new post telling us about that,with more pics.Love the cross in it.


Steve

Let me get some good photos first!

The only program that I have for adjusting pictures is the standard Microsoft Office Picture Manager, this will allow me to adjust the color, brightness, and other things in the picture. But I want to at least get the picture close before I rely on that to make it look good, because they adjust the entire picture and can muddy up the picture pretty quick.

Here is a picture I took with with the ISO at 100 and the W Balance set to Cloudy. - still looks blue to me.
 
Top Bottom