first pen pics with new camera

Signed-In Members Don't See This Ad
Joined
Feb 18, 2004
Messages
4,130
Location
Grosse Pointe Woods, mi, USA
Better than my Canon point and shoot but not just right, yet.
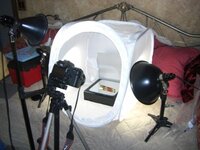
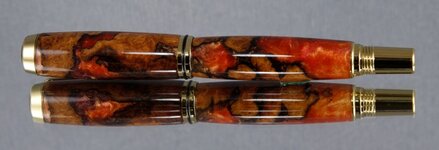
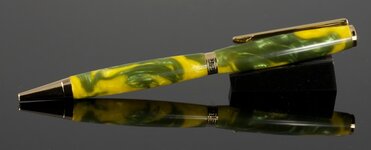
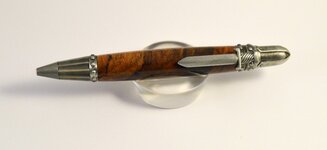
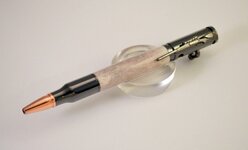
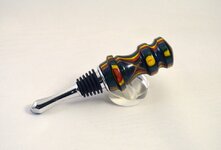
Went DSLR, Nikon D3200 with AF-S DX Zoom-NIKKOR VR 18-55mm (these photos are taken with this lens) and a 50-200mm VR zoom for vacations. Looking to add a 50mm macro fro pen photos.
Used the macro setting with photo tent, no flash, f5.6, exposure time 1/25, ISO 800.
Any DSLR suggestions will be greatly appreciated!!

D3200 Nikon HDSLR Camera | Digital SLR Camera from Nikon
I got a way better deal than this at Best Buy (I am really cheap), but this link has all the specs.
 

Attachments

  • DSC_0072 - Copy.jpg
    DSC_0072 - Copy.jpg
    83.2 KB · Views: 391
  • DSC_0076 - Copy.jpg
    DSC_0076 - Copy.jpg
    113 KB · Views: 394
  • DSC_0081 - Copy.jpg
    DSC_0081 - Copy.jpg
    162.9 KB · Views: 353
Last edited:
Signed-In Members Don't See This Ad

mark james

IAP Collection, Curator
Joined
Sep 6, 2012
Messages
12,752
Location
Medina, Ohio
I like the 3 items!!!

Oh, a photo shoot critique... Yea... the new camera did good also. (Im no photographer... So Ya done good!). :)

I bought a used Canon Rebel T2i DSLR late last year and am slowly learning its capabilities... It will exceed my needs!

Have fun.

The Pics look good!
 

gketell

Local Chapter Leader
Joined
Dec 15, 2006
Messages
2,772
Location
Pleasanton, CA, USA.
Better than my Canon point and shoot but not just right, yet..
Any DSLR suggestions will be greatly appreciated!!.

The problem is "auto-mode". It is readjusting the camera pen to pen. Not what you want.

Your best bet is to buy a 18-percent gray card like
Amazon.com: Mennon Set of 2 Gray Card's size 4x6 inches and 6x8 inches, 18 percent Gray / 92 percent White: Camera & Photo

You can put these in your tent angled so they get the same lighting your pen would. Frame a shot to fill the frame with the card. Using full-manual mode adjust your settings for perfect exposure. This becomes your base setting for shooting your pen photos. Now take a picture of the card and use it to set your camera's "custom white balance". This will make your color rendition perfect no matter what light you use (as long as all your bulbs are the same).
 

ttm7

Member
Joined
May 28, 2012
Messages
151
Location
california 90630
try using iso 100 slow shutter speed (1second) then use the aperature to set depth of field,
multiple shots with diff light settings. should give you a less grain pic or clearer shot.
and i believe this will increase color saturation. there are even slower films say iso 50.

the macro zoom lenses have a tight focal point if i remember correctly.
your f stop or f5.6 lens click to (play with these) f7 or f7.5 this will give you better depth of field (its like squinting, ie you see better). not out of focus pic #2 the only points in
focus are the rifle clip, the rest of the pen is out of focus or out of your depth of field.

imho: what do you think?
yes as gketell says shut off auto setting.
 
Last edited:

thrustmonkey

Member
Joined
Jan 21, 2010
Messages
113
Location
Illinois
Wow, I just got a Nikon D3000 camera body (used) off of e-bay last night for $160 and was wondering what kind of lens to get for it for taking pictures of pens. Now I know. My first DSLR, have been using a 10 yr old Minolta Dimage Z6 point and shoot. Don't know anything about lenses or anything else. Guess I'll have to learn the hard way.

Bought the Minolta and a couple of weeks later they went out of business. Hope nothing happens to nikon.

Ross
 

TBCbushings

Member
Joined
Nov 7, 2009
Messages
931
Location
Hampton, Va.
I have been looking at the 3200 and the 5200 but not sure the 5200 it worth the extra expense for what I plan on using it for...NOT a professional photographer but I like the DSLR's....
 

mark james

IAP Collection, Curator
Joined
Sep 6, 2012
Messages
12,752
Location
Medina, Ohio
Better than my Canon point and shoot but not just right, yet..
Any DSLR suggestions will be greatly appreciated!!.

The problem is "auto-mode". It is readjusting the camera pen to pen. Not what you want.

Your best bet is to buy a 18-percent gray card like
Amazon.com: Mennon Set of 2 Gray Card's size 4x6 inches and 6x8 inches, 18 percent Gray / 92 percent White: Camera & Photo

You can put these in your tent angled so they get the same lighting your pen would. Frame a shot to fill the frame with the card. Using full-manual mode adjust your settings for perfect exposure. This becomes your base setting for shooting your pen photos. Now take a picture of the card and use it to set your camera's "custom white balance". This will make your color rendition perfect no matter what light you use (as long as all your bulbs are the same).

This is really helpful! Hate to ask, any possibility of a picture of your set-up? So that basically we can reproduce it without paying you royalties :)

Mark ( I know less about photography than pen turning... Which is little)
 

Brian G

Member
Joined
Jul 2, 2013
Messages
1,571
Location
Bloomington, MN
Hi Glenn. I bought the same camera through Adorama on Black Friday. Both VR lenses, a nice camera bag, a cleaning kit, and a set of lens filters all came in under $500. It's my first DSLR and it replaced a 15-year old Kodak point and shoot.

I'm a photography dolt, so I have tons to learn. I received the following book Nikon D3200: From Snapshots to Great Shots | Peachpit as a Christmas gift. I found it very helpful. I'm sure there are others specific to the D3200 that would be just as informative.

What really helped was understanding some of the manual settings and example photographs with specific settings. I've read it cover to cover, and back again.

I can't help you with suggestions to make your photgraphs look better, but I sure like how they look!
 

gketell

Local Chapter Leader
Joined
Dec 15, 2006
Messages
2,772
Location
Pleasanton, CA, USA.
I have a 50mm macro and a 100mm macro. I would highly recommend a 100mm or longer. I have to basically have the camera almost in the tent with the pen using the 50mm. The 100mm actually let's me sit back a bit and still get the shot.

Gk
 

gketell

Local Chapter Leader
Joined
Dec 15, 2006
Messages
2,772
Location
Pleasanton, CA, USA.
Here is something I posted 4 years ago to help someone else. If you happen to have a Fuji fine pix s1500 then you can follow this to the T. If not, search your manual for the right pages for the listed features.

OK, got the manual. Looks like all the features you need are in the camera. Just not easy to get to the first time. But once you do it once you can save all the settings so you don't need to do it over and over again each time.

Which brings me to your tent. If you use your tent with the same lighting every time you take a picture then you can save all your settings and just turn the camera on and shoot. If you use different lighting and locations and backgrounds then you will need to go through the process of setting the camera for those choices each time. Your choice but I love just turning my camera on and pushing the button to get the perfect shot.

If you let the camera decide what your pen should look like you get what you get. You need to manually control the following things to get a good shot every time:
ISO
White balance
Depth of field
Exposure
Focus

ISO: Page 64-65 of your manual. Press the "F" button on the back of the camera. Select ISO from the menu and set it to 100 or 200.

White Balance. You want to set your camera's white balance by hand to match the lighting you are using. Page 72 of the manual. Go into the menu: shooting mode: white balance. Select "measure" which is the box with two triangles under it. Set up all your lighting the way the photo will be taken then put a piece of white paper where the pen would go angling it so all the lights hit it and it still faces the camera, zoom so it fills the frame fully then push the button to have the camera measure the white balance and adjust for weird light color.

Depth of field: let's keep it simple and maximize it. Set the camera to "Manual" exposure. Page 39. Turn the dial on top of the camera to "M". Press the "+/-" button until aperture is selected. Use the selector pad, left/right to select the biggest number the camera has.

Exposure: If you have a gray card this is easy. Replace your white paper from setting the white balance with the gray card and then use use the selector pad up/down to change the shutter speed until the exposure meter shows that the picture will be properly exposed. If you don't have a gray card it will be trial and error. Put the pen in place, shoot it. Adjust the shutter speed until it looks good.

Focus: set the pen the way you like it trying to keep it "mostly" parallel to the back of the camera. If it isn't 100% parallel then use "Focus Lock" (page 23) to have the camera focus about 1/3 of the way "back" on the pen. This will maximize your depth of field so you have a better chance of getting the entire pen in focus.

Now you should be getting good pictures.

Go back into the shooting menu and select "Custom Set" option. Next time you shoot in these exact conditions just set your dial to the "C" setting and everything you set above will be repeated.

Feel free to IM me if you want to talk in real time. You can also use skype with my AIM ID from my profile.

GK​
 

gketell

Local Chapter Leader
Joined
Dec 15, 2006
Messages
2,772
Location
Pleasanton, CA, USA.
This is really helpful! Hate to ask, any possibility of a picture of your set-up? So that basically we can reproduce it without paying you royalties :)

Shooting this pen:
attachment.php


was done with this setup:
attachment.php


One light on each side through the tent creating all-over even lighting and one light from "over/behind" the camera coming in through the opening to cause the "reflection" that shows off the finish.

In this case, the pen was sitting on a mirror and the "grey base" was actually a file-folder standing vertically behind the pen. Shoot at a low angle and crop out the line between the bottom and back to get that nice even background.

Since this photo was taken in 2010 I've learned that I like "front side reflectors" like opaque acrylic better than "back side reflectors" like mirrors. The back side reflectors cause double reflections. Front side don't. I also like the reflection to be a bit more subdued so the pen stands out better and the photo is "less confusing".
attachment.php


This was black acrylic with the white of the photo tent reflecting so it showed up "gray". Notice, too, that the pen is at a slight angle both vertically and front-to-back. This creates "movement" in the mind and makes the photo more interesting than the pen just laying flat and straight like the first pen photo. And lastly, the stand is designed to "vanish" as much as possible to not take away from the pen.
 

Attachments

  • PhotoTent-1.jpg
    PhotoTent-1.jpg
    25.1 KB · Views: 196
  • _MG_0321.jpg
    _MG_0321.jpg
    42.4 KB · Views: 201
  • _MG_7399.jpg
    _MG_7399.jpg
    30.7 KB · Views: 215
Top Bottom