
You are using an out of date browser. It may not display this or other websites correctly.
You should upgrade or use an alternative browser.
You should upgrade or use an alternative browser.
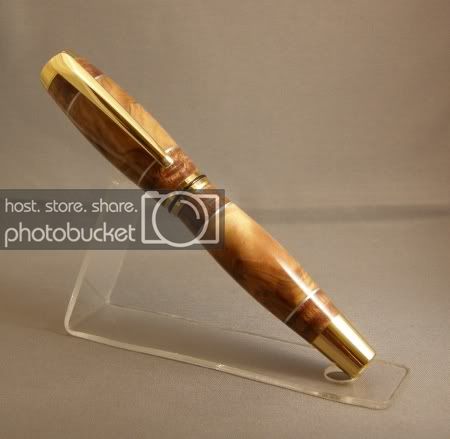
Critique the photo please
- Thread starter les-smith
- Start date
Signed-In Members Don't See This Ad
Signed-In Members Don't See This Ad
OKLAHOMAN
Member
Les, I'm assuming the background is grey, what is your light source, seems that you need to move your side lighting forward and angled toward the pen.
IPD_Mrs
Member
I am by no means qualified to answer this but it does look like your white balance is off or you need more lighting. Also try to take the photo so that the seam in the backdrop isn't visable. Not trying to be nit picking but trying to give any suggestions that I can see.
Fred
Member
I agree with the above replies in that you need to eliminate any shadow behind the pen. If you are using two separate sheets of material for the background ... get a longer single piece for the background, tape the front edge down from edge to edge (helps to avoid wrinkles), and then elevate the very back edge up, again taping the material to something from edge to edge, until a gentle curve is formed. Keep the pen as far toward the front edge to 'hide' the curve, light the pen, snap the shutter. LOOK closely at image in the viewfinder for problems in lighting, subject angle, re-take the picture if necessary. Then post away.
Do as much as possible to have the image you want in the viewfinder first. It is far easier to do your composition in the viewfinder than with a program to alter the image later.
To kind of 'paint' with light' you can put a light in the back of the background material and let the light bleed through to the front. Just don't get so close to the background that you have a 'hot spot' of light, unless you do that on purpose for some type of special effect. Be careful of developing any shadow at the base of the curve again.
Have fun ... experiment with different colors to accent the wood.")
Do as much as possible to have the image you want in the viewfinder first. It is far easier to do your composition in the viewfinder than with a program to alter the image later.
To kind of 'paint' with light' you can put a light in the back of the background material and let the light bleed through to the front. Just don't get so close to the background that you have a 'hot spot' of light, unless you do that on purpose for some type of special effect. Be careful of developing any shadow at the base of the curve again.
Have fun ... experiment with different colors to accent the wood.
ctubbs
Member
All of the above is valid advice. If you only have the one light off to the right, then a well placed reflector of white cardboard just out of frame to the left will help drive the shadow away.
Bringing light through the background will effect the color of the light falling on the subject. Not a bad thing, just keep it in mind.
If you have two or even better three lights, then bring one in from the right front as your main, a second, the fill light, in from left front but slightly further away to help show the shape of the subject and the third just from the top. Make sure the top highlight does not over power the lighting from the main and fill. The highlight may also be from slightly behind the subject and somewhat on the background. If using a white background, jells can be placed on the highlight to change the background color or add a special touch of a color you wish.
Charles
Thanks everyone.
This is a new cheesy little photo kit and it came with two little lights. I had a pretty good setup before, but it was cumberson and it took a while to set up. I can set this one up on a TV tray and take pictures while I watch TV. The lights always seem to be my problem. I always have trouble getting them balanced right.
This is a new cheesy little photo kit and it came with two little lights. I had a pretty good setup before, but it was cumberson and it took a while to set up. I can set this one up on a TV tray and take pictures while I watch TV. The lights always seem to be my problem. I always have trouble getting them balanced right.
76winger
Member
That's the tough part: Getting balanced lighting with positioning so that you still get enough reflection to show off the finish without washing out.
That's the tough part: Getting balanced lighting with positioning so that you still get enough reflection to show off the finish without washing out.
Well put.
I usually get a dot of light, instead of a long strip that shows the shine of the pen.
Nick
Member
Do you use any photo programs to touch up with?
OKLAHOMAN
Member
Try Picasa3 is free and will do just about anything you need and the learning curve is easy, even I can use it when needed.
Try Picasa3 is free and will do just about anything you need and the learning curve is easy, even I can use it when needed.
I'll give it a look. I used the original Picasa before, I didn't know there was a #3.
wjbowling
Member
Les,
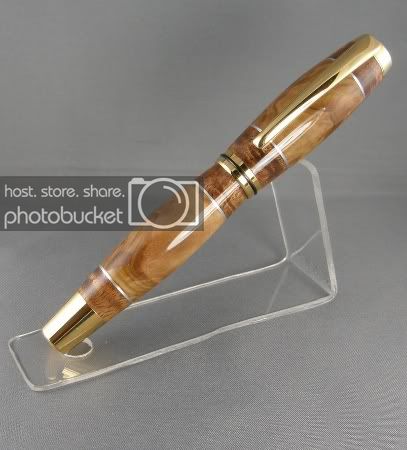
The pen is very well done. I agree with working onthe lighting, but I would look to see if you can create a custom white balance with your camera. The manual should tell you if it is possible. Using that feature will tell your camera that what it is seeing is white.
Wes
The pen is very well done. I agree with working onthe lighting, but I would look to see if you can create a custom white balance with your camera. The manual should tell you if it is possible. Using that feature will tell your camera that what it is seeing is white.
Wes
G1Pens
Member
I think the new picture is a lot better. Two things I notice..first the obvious....the reflection/highlight of the pen need to go away or at least lessen the intensity. That is a hard one. Since I don't know what you are using for al light source it is hard to offer suggetions. Is there any way to diffuse it more or make it more indirect?
The other thing is a small one and it may be me...but...it looks like the top of the pen is just a tad soft. Closing down the aperature a little would probaby fix that. (if you are at f8 go to f11 or if at f11 got to f16....bigger number=more depth of field)
The other thing is a small one and it may be me...but...it looks like the top of the pen is just a tad soft. Closing down the aperature a little would probaby fix that. (if you are at f8 go to f11 or if at f11 got to f16....bigger number=more depth of field)
ctubbs
Member
There is a point of diminishing returns on stopping down the aperture. At some point, and it is different for each type lens, you start to get a defraction effect in the image as the light starts to form bright and dark lines. Most manufactures do not allow the aperture to get this tight so it should be no problem on a well made lens. However, as you reduce the aperture, you also reduce the area of lens that light enters so any imperfections in the glass or dirt on the lens becomes amplified. f16 or 22 is close to the limit I will use for depth of field control.
Your new photo is a great improvement over the first. To reduce the large reflection, you can turn the light around and reflect it onto the subject with a white card or pick up some white filter material to scatter the light to kill the highlight. When using either method, the color of the reflector surface or the interior of the filter will change the color of the light on the subject. Just what you needed, another color problem to solve.
Charles
terryf
Member
Just put on a circular polariser and turn till highlights are gone!
Otherwise turning the pen just slightly left or right may do the trick or camera up or down slightly.
Another thing you can do if you are using a macro zoom is move the camera further away from the subject and zoom in thereby increasing DOF.
Otherwise turning the pen just slightly left or right may do the trick or camera up or down slightly.
Another thing you can do if you are using a macro zoom is move the camera further away from the subject and zoom in thereby increasing DOF.
jttheclockman
Member
May I make a suggestion and add a fourth light and have it bounce off the back drop. It will give the pen some depth of field. If you want to reduce the glare line just place a white cloth over the light and it will cut down on the glare. Hope you are not using a flash. Big improvement though.
DurocShark
Member
1. Can you take a picture of your tent with the lights and the pen? I can infer from the photo where I think your lights are, but confirmation would be nice.
2. What make/model of camera are you using?
That said, it looks like the 2nd photo is improved because you have more hard light on the subject, and less spilling onto the background. You're on the right track, you just need more light.
2. What make/model of camera are you using?
That said, it looks like the 2nd photo is improved because you have more hard light on the subject, and less spilling onto the background. You're on the right track, you just need more light.
Rmartin
Member
You're getting real close to a perfect picture if there is such a thing.
I would change your background. The color is fine, but the mesh is causing the camera problems. Once you get everything the way you like it, I would also get rid of the plastic holder. I take my photos with the pen laying flat, but some people use a polished stone or other trinket.
I think the upper part of the pen is a little out of focus. Unless it's a true macro lens, forget the macro setting. Go to fully programmable mode. Pull back from the pen and allow the camera to focus on the entire pen. Then crop out the extra background before resizing in photo shop.