Maybe of interest to you...!

Signed-In Members Don't See This Ad

robutacion

Member
Joined
Aug 6, 2009
Messages
6,514
Location
Australia - SA Adelaide Hills
Hi folks,

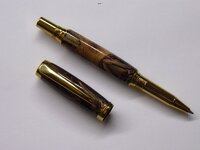
I would like to know, which of you fellow members have turned the highest number of my #45xx Banksia Hairy pod Resifills, before and or after they started to be stabilized.

I'm looking for a person with balls that will be prepared to do a test for me, as I offered this challenge to someone else that made various complaints about these blanks but, was not prepared to even have a decency to reply to my offer, and yes, that did p!$$ed me off but, life goes on, right...???

The reason I require someone with a fair number of these blanks turned preferentially successfully is that, I have 3 of these blanks to be worked on and be made into any kit you like with 2 barrels.

The blanks are made with clear resin as always however, each blank is made with a different resin type, including one that costs about $70 per litre...:eek: yes, that's right.

The deal/offer I made to this other member, had the same purpose but a different intention so, the person that is up to this challenge, appart from getting the 3 blanks sent to his/her door free of charge, will also receive a AU$50.00 gift voucher, to be used on my web-store.

So, what does this challenge entail...??

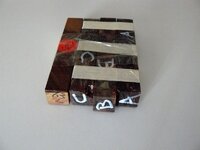
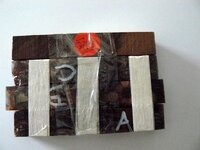
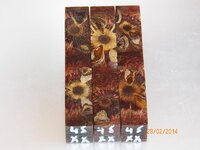
The person will receive 3 identical blanks, each blank will be identified with a letter, "A", "B" and "C", each letter correspond to the resin type/name it was used to make it, which is not to be revealed until the end.

An email or PM will be sent to one of our reputable members and on that email/PM the correct resin names for each test blank letter, will be revealed so, only that person and myself know which is which. When the 3 blanks have been tested, transformed into pens or into a bunch of bits and pieces, in a time period that I would like to be kept around 4 weeks from reception of the blanks, I will request that selected person to reveal the resin names/types for each blank letter, this is to avoid the possibility that someone would think that I change the resin names to my own benefit, no Sir, there will nothing of that nature, everything will be clear to everyone so see.

One would ask, why am I doing this...??? because, a certain person did not have any hesitation to complaint and claim that the blanks are useless and that self destroy, too brittle, basically unworkable. I responded that, the original blanks, that this person purchased in quantity, when I was still selling/giving them practically away, have since been stabilized and prepared is different ways and therefore, were given much less troubles and, a little easier to work with HOWEVER, I consider these, one of my most fragile blanks to handle and that, certain specific suggestions to its better handling, have been made very clear by me, long ago but, the argument was based to his claim that, these blanks could not be improved while using the original Polyester resin that they all were made with, all but 2 of the 3 to be tested.

I have made various attempts to make this person understand that, since the pod material has been stabilised and some other alterations were put into practice, the blanks had indeed improved significantly but, that did not stop this person to go to other social media outlets (Facebook, etc,) and make all sorts of claims/complaints and I attempted to have this person to make these tests and be rewarded with 10 new blanks made with whatever resin he liked the most or, had less problems with.

I did ponder for some time, after this person simply ignored my offer, if i would bring the issue among the IAP family, sure, some will think this was a bad idea and other may think that this was a good idea not forgetting those, that won't give a toss, either way but let me make something very clear, I may be annoyed with this person and somehow, offended with his ignoring of my offer however, I do not wish that this will turn into a fight between myself and the person is question, I indeed request that, that person does not post in here and start something that he may not be able to stop, I only want to make sure that, anyone that has heard/read this person's comments about these blanks of mine that, they are workable even if only traditional tools are used.

Lets see what other people have to say and lets see what will happen to these 3 test blanks and it's pen turner selected...!

Are you the person I'm looking for...??? let us all know...!

Cheers
George
 

Attachments

  • 004.JPG
    004.JPG
    58.7 KB · Views: 495
Last edited:
Signed-In Members Don't See This Ad

Rchan63

Member
Joined
Apr 17, 2009
Messages
672
Location
Framingham, MA
Hi George

I've never turned your Banksia blanks before, but if chosen I will give you a full report of my experience when turning these blanks.

Richard
 

jsolie

Member
Joined
Apr 25, 2013
Messages
2,100
Location
Sunny Murrieta, CA
Hi George, it's been years since I've turned a Banksia pod - probably more than 15 years. I remember them being pretty fun to turn, but messy (what with those red fibers and all) and that there's basically no grain in it like a piece of wood as it's just a big a seed pod. IIRC, I turned several bud type vases that had a 3/4" glass tube inserted for holding a bit of water and whatever flower my wife wanted to put in it.

I'd be willing to help you out and provide a report of my findings with your blanks, from initial cutting to finishing.
 

magpens

Member
Joined
Feb 2, 2011
Messages
15,912
Location
Canada
George, I will do it for you. You know me .... friendly and reliable and a displaced Aussie from your neck of the woods (Blackwood) !!! :biggrin:

But to be honest about it, I haven't turned any of your Banksia blanks before, though I've turned others of your blanks.
 
Last edited:

Karl_99

Member
Joined
Aug 20, 2012
Messages
1,672
Location
Winfield, PA
I have turned one of those blanks and it turned out fantastic. If you get to me, I am willing to take you up on your deal to turn them and report out within 4 weeks.

Thank you, Karl
 

wyone

Member
Joined
Jul 16, 2014
Messages
1,764
Location
15314 Grasslands, Parker, CO 80134
another very generous person on this site. How can this be looked at as anything but a great opportunity for whoever George chooses to do the turning. I am not in the running for this one. I have turned a few Banksia pods into small vases, but to date I have never had the opportunity to turn one of George's Resifills. I will one day when my skills are better and I have more time. I am currently packing all of my tools for the move at the end of the month, so I could not do this anyway.

Never known George to be anything but generous and honest. :) good luck to whoever is chosen. You are one of the lucky ones!
 

robutacion

Member
Joined
Aug 6, 2009
Messages
6,514
Location
Australia - SA Adelaide Hills
Hi peoples,

Thank you for everyone's interest, those that already tried these blanks and those that have not (yet...!).

These blanks are certainly not something that a new turner should attempt, even those with great experience have fail to finish the pen due to too much damage so, I will certainly look for someone that have possibly made a few of these and have a good grasp on what needs to be done to succeed.

Sure, this can sound a great challenge to new folks or folks that have experience but, have never handle one of these and believe me, they are not your normal run of the mill pen blank handling...!

While I have plenty made of the ones made with Polyester, they are both found at the eBay and my web-store so, anyone can buy a pack of 4 and try their abilities but in this case, I have only one of each made with the other 2 resins so, being handled by someone that is familiar with the handling of these blanks, is preferred, sorry...!

I will give it a few more days to see if others can read it, and maybe have the experience I'm looking for...!

PS: Thanks for your words wyone, most appreciated...!:)

Cheers
George
 

Sprung

Member
Joined
Jul 1, 2014
Messages
773
Location
NE WI
Very nice blanks, George! I was eyeing up some of those blanks before on your site. Now, hearing from you how challenging these can be to turn, makes me want to get some sometime to try them and give myself a challenge!

I'll be looking forward to seeing who these blanks end up with and to seeing their pictures of the pens they become - as well as to the reports on how they turn!
 

Krash

Member
Joined
Feb 10, 2014
Messages
1,259
Location
Albuquerque, NM
I'm looking forward to the outcome of this offer/test. I am not eligible since I've never turned da pod. Someday ...... :wink:
 

Rounder

Member
Joined
Jan 16, 2011
Messages
753
Location
Marlin, TX
Hi George, I have turned two of your blanks and love them. I have also done some of the dwarf banksia pods. I followed your directions on turning them. Go slow and lots of thin CA. I had no troubles. Just have to be prepared to spend the time and have the patience. I would be THRILLED if you were to pick me to do this project for you. Thanks for your kind consideration.
Randy

PICK ME!!! PICK ME!!! PICK ME!!!:biggrin::tongue::):laugh::usflag::beer::beer::beer:
 
Last edited:

robutacion

Member
Joined
Aug 6, 2009
Messages
6,514
Location
Australia - SA Adelaide Hills
Pen maker selected...!

G'day folks,

Well, it seems that, I'm not going to have any more takers so, and following the main condition of the person with the most blanks turned of the #45xx is, Rounder (Randy), congrats mate, you will be in charge of performing these tests for me and share the results with us all here, in this exact thread, regardless what the results will be...!

For everyone else that have offered to do the tests, I thank you, I know that, will never be a shortage of members here willing to try something new, maybe next time...!:wink::biggrin:

Cheers
George
 

Cmiles1985

Member
Joined
Nov 12, 2013
Messages
1,611
Location
Aransas Pass, TX
Well, I just saw this. Of course, I've only turned one of your hairy banksia pod blanks, and it was gorgeous! I've been saving the rest for "custom requests." The one I turned was a birthday gift for my mother, and she loves it! Should things "not work out," I would certainly be willing to be your guinea pig. I love a good challenge :biggrin:
 

robutacion

Member
Joined
Aug 6, 2009
Messages
6,514
Location
Australia - SA Adelaide Hills
Well, I just saw this. Of course, I've only turned one of your hairy banksia pod blanks, and it was gorgeous! I've been saving the rest for "custom requests." The one I turned was a birthday gift for my mother, and she loves it! Should things "not work out," I would certainly be willing to be your guinea pig. I love a good challenge :biggrin:

G'day mate,

Thank you for your interest, and as you are aware, I made the worked/turned number of blanks the main condition because I know that, there a few of you guys out there that, have done at least one pen out of these blanks and great pens they were but, I had to draw a line somewhere, knowing that, would be a few of you a little disappointed to miss out but, don't worry, is always another time to win something from me...!

Cheers
George
 

alankulwicki7

Member
Joined
Jul 28, 2010
Messages
1,644
Location
Vadnais Heights, MN
I turned one of the banksia resifills last year and while it certainly wasn't like turning butter, I've turned other blanks were more difficult. Just take small cuts, use thin CA often and you'll be fine.

Here's a picture of the pen I made. It's a Liberty kit that I made for my sister and ironically enough, the pen matches her bible:)
 

Attachments

  • banksia.jpg
    banksia.jpg
    10.5 KB · Views: 237

robutacion

Member
Joined
Aug 6, 2009
Messages
6,514
Location
Australia - SA Adelaide Hills
I turned one of the banksia resifills last year and while it certainly wasn't like turning butter, I've turned other blanks were more difficult. Just take small cuts, use thin CA often and you'll be fine.

Here's a picture of the pen I made. It's a Liberty kit that I made for my sister and ironically enough, the pen matches her bible:)

G'day Doug,

The blank in that pen is the Dwarf Banksia and they aren't even close to the fragility of the #45xx Banksia Hairy pod, completely different pods and structure.

You may need to try some of these, one day...!:wink::biggrin:

Cheers
George
 

gimpy

Member
Joined
Mar 10, 2012
Messages
2,584
Location
Danville, Pa
George, I hope it wasn't me, I'm still attempting to get one right, but continue to try different things.......if it was me please let me know.........thank you

ps: I'm just about out and will need to order a few more, there not gonna win
 

robutacion

Member
Joined
Aug 6, 2009
Messages
6,514
Location
Australia - SA Adelaide Hills
George, I hope it wasn't me, I'm still attempting to get one right, but continue to try different things.......if it was me please let me know.........thank you

ps: I'm just about out and will need to order a few more, there not gonna win

If was you what...??? the one to complain and then ignore my offer..??? No Sir, it wasn't you and quite honestly, I'm over that, I have better things to worry about...!

Well, you know where to find me if you are running low, huh...???:wink:

Cheers
George
 

Rounder

Member
Joined
Jan 16, 2011
Messages
753
Location
Marlin, TX
Just an update on George's test blanks. I have not been able to start the test turning yet as the day after they arrived, we found out that my brother-in-law (wife's brother) was going to have open heart surgery. Bad valve. Since then, I have been helping him complete a MASSIVE honey-do list since he won't be able to do very much for months while healing. And I now have an extra 10 - 15 acres to mow on top of my 3.5 acres. I will do the test ASAP and hope to start next week. Thanks for the patience. (P.S., the surgery was Monday (7/20) and he is doing very well considering what they put the body through while doing this type of surgery)
 
Last edited:

mark james

IAP Collection, Curator
Joined
Sep 6, 2012
Messages
12,750
Location
Medina, Ohio
Hi Randy and fellow FRoG's (Friends of George)!

Randy: No hurries - Family and friends are important.

To All: George (Jorge) sent me on 6/22/15 the identification's for the three blanks. So when Randy is done with his trials, I'll announce what the three were.

Happy Turning!

Mark
 
Last edited:

robutacion

Member
Joined
Aug 6, 2009
Messages
6,514
Location
Australia - SA Adelaide Hills
Just an update on George's test blanks. I have not been able to start the test turning yet as the day after they arrived, we found out that my brother-in-law (wife's brother) was going to have open heart surgery. Bad valve. Since then, I have been helping him complete a MASSIVE honey-do list since he won't be able to do very much for months while healing. And I now have an extra 10 - 15 acres to mow on top of my 3.5 acres. I will do the test ASAP and hope to start next week. Thanks for the patience. (P.S., the surgery was Monday (7/20) and he is doing very well considering what they put the body through while doing this type of surgery)

Hi mate,

There is absolutely understandable, the last thing I want is to complicate your life with the blanks tests.

When I gave a time frame I would expect to see some results, was only as a guide and on normal life circumstances and what you are going through at the moment, is far for "normal circumstances so, I and any other IAP member, have no problem in accepting any delays from your part...!

I'm sorry to hear what is going on with your brother, and I hope that, he gets fixed up good, proper and quickly...!:wink::biggrin:

Cheers
George...!
 

robutacion

Member
Joined
Aug 6, 2009
Messages
6,514
Location
Australia - SA Adelaide Hills
Hi Randy and fellow FRoG's (Friends of George)!

Randy: No hurries - Family and friends are important.

To All: George (Jorge) sent me on 6/22/15 the identification's for the three blanks. So when Randy is done with his trials, I'll announce what the three were.

Happy Turning!

Mark

Hahaha mate, I'm getting all these funny names associated with me or my work, not long ago, someone catalogued my blanks as "Georgenized" and you now found a funny name for my followers and friends, I think is very funny, I hope that, none of my friends mind to be "tagged" as "frog's" hahahahah...!~:biggrin::biggrin::wink:

Cheers
George
 

Rounder

Member
Joined
Jan 16, 2011
Messages
753
Location
Marlin, TX
BANKSIA POD POLYRESIN
TURNING TEST
On 6/15/15 George Valentin, aka Robutacion on the IAP website, offered an opportunity to turn 3 of his super duty #45xx Banksia Hairy pod Resi-fill blanks. I was the very fortunate person to receive that honor. One of the requests that was made was that the test be completed in approximately 4 weeks. Due to family circumstances I was not able to do the tests in the timeframe requested. But a very generous and understanding man, with no hesitation, said to take the time needed and then do the tests. George, Thank you for your patience and I hope to do you proud with these 3 blanks. And thank you for the gift blank of #63Z on you wood list. (Look it up. Use that library.)
8/30/15
So let the tests begin. I have received 3 #45xx Banksia Hairy pod Resi-fills to turn and test for the ease of turning of 3 different poly-resin mixtures. I have previously turned 2 of these blanks and found that with patience and lots of thin CA, they make a beautiful product. I have no knowledge of the resin material used in any of the blanks. All I know is they are called resi-fill blanks and each one has a different mixture of poly-resin. George has sent the info on what each blank is made of to Mark James. I have not communicated in any way with him since he received that information. I will be using Smitty's Pen Works Chrome Caballero kits on 2 blanks and the Gold Caballero on 1 blank for look comparison. They use a Jr. Gent 1 bushing set.
I have examined the blanks on arrival. The blanks are marked on both ends and all 4 sides with the letter A, B, and C. Blanks A and B are in very good condition. Very smooth cut on both. A few pin holes on blank A. There were none visible on blank B. I anticipate blank C will be the most challenging. The surface of C seems to have been cut in the same fashion but it has many small chips out of the surface. The corners had many chips out of them also. 1 end corner of C had a ÂĽ" by ÂĽ" chip out of it. The blanks measure as follows:
Blank A – 0.86 x 0.87 x 5.14
Blank B - .085 x .087 x 5.50
Blank C - .086 x .087 x 5.10
Before I started turning, I soaked all of the blanks with thin CA glue, especially where you could see the red hairs.

9/4/2015
First turning. Set blank "A" up on a Jet 1014 starting with the medium gear range, slow speed (1100 rpm). I am using a homemade carbide tool with a 100MM radius carbide cutter.
I made 3 fairly light passes on the blank. Found it to be a bit grabby at first. Raised the tool rest a tad and it did pretty good. Still a little grabby if you get to aggressive.
At this point, finding it difficult to turn the square blank to round, I took all 3 blanks outside (I have to turn inside the house due to no shop) and used an 80 grit flap wheel on a grinder and took the corners off all three blanks. This helped tremendously, as George suggested it would on his website. Sometimes you have to stop and listen and know that other people know what they are talking about.
Made step cuts instead of crossing cuts to get close to round and made first CA soak. Continued with slow easy cuts and started using more cross cutting instead of step cutting. It became where it was not so grabby.
After the second CA soaking, started to get a little better and smoother cutting. The third CA soaking got it down to the official end wrench Âľ" blank. Most chips gone, still a few pin holes, some pretty good size due to being toward the center of the blank and resin not penetrating there and some also being seed pockets. I also could see a few bubbles in one area into the center, but these may well disappear when the blank is drilled.

(Please note date difference. Above is Sept. 2015. Below is Sept. 2016.) Life happened in this range and I did virtually no turning during this time and I was very seldom on the IAP website. This is where George deserves the most gratefulness I can offer him. He didn't hound me to complete the test. He was very patient with my issues, even not knowing what they were. They were personal and he didn't pry. I offered to pay him for the blanks. He refused and preferred that I complete the test as the people on IAP were expecting. To George, I bow down and praise him as the KING of KINDNESS!!! Thank you, George. You are a very special man. Bless you.

9/9/16
Set up blank "B" in the lathe. Began turning and again took slow easy cuts. Just as I got close to round, stopped and did first CA soak. Continued turning and got down to Âľ inch size with 2 more CA soakings and no issues. Turned smooth and had no problems with chipping. I found this blank to have a much stronger resin odor while turning. Saw very few bubbles or voids in this blank.
Set up blank "C" in the lathe. Began turning and found this blank to more brittle and chippy than blanks "A" and "B", as expected with the initial inspection. I took smaller and less aggressive cuts. This was again turned down to the Âľ" size with 3 CA soakings. This blank did seem to have more voids and bubbles than the other 2 blanks and even round, it seemed more brittle than the other 2.
All 3 blanks were placed in baggies marked a, b and c to keep the proper blanks together through the rest of the turning and assembly.
I now have all 3 blanks turned down to ¾". I cut all 3 blanks to section length and set up for drilling. I used the PSI collet chuck, ¾" size. I used a 15/32" bit on the bottom section and a 25/64" bit on the top section for drilling. I had no issues with drilling any of the blanks. Just went slow and easy, pulling the bit back out every ½" or so. I then painted the insides of all blanks with Rust-oleum Forged Hammer Paint & Primer in the Chestnut color. After they dried overnight, I glued the tubes in with Gorilla Glue 5 minute epoxy.
9/10/16
Blank "A" Fourth CA soak. I turned between centers with the Jr. Gent 1 bushings at 1100 rpm. I turned down to bushing size with slow easy cuts and a fifth CA soaking halfway down to size. Blank not brittle but not throwing off ribbons either. Bubbles in resin disappeared and turned out looking very nice. I sanded with 400 & 600 grit abranet and 1500 to 12000 grit micromesh. Then put on 4 coats of thin CA and 10 coats of Med. CA. Sanded again with 400 & 600 grit abranet and 1500 to 12000 grit micromesh. Polished with No. 2 Novus then finished with Renaissance Wax. Looks very nice and am satisfied with the looks of the pen. Finished weekend of 9/9/2016.

9/17/16
Blank "B". Fourth CA soaking. I started turning top section and ran this one at 2600 rpm instead of 1100 as I did on blank "A". The faster speed seemed to work better. Turned halfway down to bushings then stopped and did fifth CA soak. Continued turning and got close to bushings when I had a blow out on 1 end of the top blank. After close inspection, the blow out was my fault due to poor gluing of the tube into the blank. Where it came apart, I was able to push a thin strip of paper a ½" in between the tube and the blank. This one will get some creative repair to finish. I filled the void with thin CA. I then used crushed turquoise to fill the place where the blowout occurred.
While turning bottom section, had a medium small piece chip out. Found that it had poor resin penetration in area and had a large void. Filled with CA and let dry. Again, let me stress the importance of sharp tools and patience. Was having trouble getting this one to cut good. Then turned my carbide cutter to the next side and cutting was much easier. Where there was mostly resin, did get some ribbons. This resin had a markedly stronger odor than "A" & "B" while turning. The void mentioned above turned out and was no longer visible after getting down to size. Overall, this turned very well once I got past the voids. I sanded and finished this one the same as Blank "A". I did find 1 bubble on the lower section of this pen that was in an open area of the resin. It was not deep enough in the blank to drill out and too deep to turn out so it could not be removed, but otherwise very nice results and looked well when completed. Finished weekend of 9/17/16.

9/24/2016
Blank "C". Fourth CA Soaking. I started turning this set at the same speed as blank "B", 2600 rpm. It was turned halfway down to the bushings and soaked a fifth time with CA. I am seeing more bubble holes in this set. I was having to make sure the holes were filling with CA and drying good before proceeding. Once down to the bushings, there were still many holes that needed filling with CA. This set turned ok but it was still more brittle than the other 2 sets and I had to move across the sections a little slower to prevent chipping out. Once they were turned to the bushings, I sanded and finished the same as the other 2 sets. Looked very good, as the other 2 sets did, even though more brittle while turning. Finished weekend of 9/24/16.

Summary
In summary, I found blank "A" to be the best blank to work with. It was easiest to turn, had fewer bubbles in the resin, it had fewer voids in the resin and seemed to have less issues overall. All 3 blanks made good looking pens though "B" did have the one bubble visible after completion.
Blank "B" had the strongest odor while turning. Blanks "A" and "C" had very little odor while turning.
These blanks did show that you have to pay close attention to your turning skills to avoid operator error while turning.
You must take your time with these. Slow and patient is the way with these blanks. If you don't have the time or patience, don't do them.
You must be prepared to use copious amounts of thin CA on these blanks. If you get in a hurry and don't treat them, you will have issues.
You must use sharp tools while turning. It becomes a battle if you don't. I think the thing that makes these difficult is the change of material as you turn the blank along its length. You are turning through resin and all of the sudden red hairs and resin then hard wood. You can't just push into these blanks and let the wood absorb the pressure. You have to control your tool location on the rest more accurately. I have a tendency to have my finger against the rest with my thumb on top of the tool, pushing into the material. When going from square to round, if you do that here, you are going to blow things up. I started finding that it is easier to take a small bite, than move over 1/16" to 1/8" and push in again. Just step across the blank so to say. Once you get closer to round you can then start cross cutting the blank.
Again, Thanks to George for his immense kindness and understanding. I am surprised he didn't take a boat or plane and come beat me up with frustration, as I well deserved. Just know that he is a man of honor and integrity and anyone on the IAP should be pleased and non-hesitant to deal with this man in any shape, fashion or form.
Thank you George.

Randy Short
(Rounder on IAP) The best pen site in the world.
 

Attachments

  • P1040684.JPG
    P1040684.JPG
    120.2 KB · Views: 206
  • P1040685.JPG
    P1040685.JPG
    149.1 KB · Views: 256
  • P1040690.JPG
    P1040690.JPG
    130 KB · Views: 186
  • P1040705.JPG
    P1040705.JPG
    106.8 KB · Views: 199
  • P1040709.JPG
    P1040709.JPG
    128.3 KB · Views: 247
  • P1040710.JPG
    P1040710.JPG
    132.6 KB · Views: 220
  • P1040773.JPG
    P1040773.JPG
    108 KB · Views: 215
  • P1040778.JPG
    P1040778.JPG
    92.2 KB · Views: 243
  • P1040780.JPG
    P1040780.JPG
    98.1 KB · Views: 234
  • P1040785.JPG
    P1040785.JPG
    107.8 KB · Views: 223
  • P1040790.JPG
    P1040790.JPG
    106.5 KB · Views: 170
  • P1040795.JPG
    P1040795.JPG
    95.8 KB · Views: 229

Rounder

Member
Joined
Jan 16, 2011
Messages
753
Location
Marlin, TX
Seeing that my entered text came out so small (you can barely see it at the top, figured a size 14 font would work), the first 3 pens with the yellowish background are pen "A". The second 3 with the turquoise are pen "B", The last 3 with the gold pen kit is pen"C". And sorry for the sad photos. A photographer I am not.
 
Last edited:

mark james

IAP Collection, Curator
Joined
Sep 6, 2012
Messages
12,750
Location
Medina, Ohio
Hi Randy and fellow FRoG's (Friends of George)!

Randy: No hurries - Family and friends are important.

To All: George (Jorge) sent me on 6/22/15 the identification's for the three blanks. So when Randy is done with his trials, I'll announce what the three were.

Happy Turning!

Mark

Hi FRoG's!!! I do believe I still have the identity of the three test blanks which Robutacion sent Rounder.

However, at the present I am in Galway, Ireland Chaperoning my Wife :eek::wink::biggrin::biggrin::big grin: :bananen_smilies046:

I will not be back home until late this Wednesday, so I will locate the information and post on Thursday or Friday. I May start a new thread and link the previous material.

Sorry for the delay, but I picked the short straw from the glass of Jameson's.

Duty Calls!
 

robutacion

Member
Joined
Aug 6, 2009
Messages
6,514
Location
Australia - SA Adelaide Hills
G'day Randy,

Wow mate, you are good explaining things and while pics are not the best I know very well how difficult is to make clear/sharp pics in most occasions so, don't worry too much.

I will wait until James get's home to reveal what resin was used on each blank but in the meantime, all tree blanks turned out into pens, that is achievement number one the rest are small details that you may not have recalled I mentioning or viewing on my tutorials and as a result, you had that blowout that could have been prevented, how...???

Well, one of the steps I stress firmly on the tutorial is that the drilled barrels should be soak on the inside with thin CA, by putting tape on one end, drip some CA in the hole, close it with tape and then shake it as if you were stirring blood in a blood veil after a blood test, this will allow the this CA to soak from the inside out, its penetration will be approx 2 to 3mm which will them be touching the last coat of CA when you are getting the barrel to final size/shape.

One extra step that you can do to assist with preventing the brass tube to show through at the barrel ends when the pen is done, which is the most common issue, this can be prevented if you use any of the liquid pigments/colourants mixed in the super this CA when soaking the drilled hole however, if you used a pigment you may need to rub some of it on the inside of the barrel because, when you soak the drilled hole for the first time, you need to run the drill back in again to clear any spots that the CA may have raised up, failing to do that, you may find almost impossible to glue the brass insert in. After you cleaned the drilled hole with the drill bit, you don't need to put any CA into the pigment, straight pigment will be sufficient to coat any areas the drill bit scratched out.

The Flap Disk System, can indeed be use right to close final size and shape, with a little practice and with the right grit, which should be 36 or 40 grits, one can take if down to about 1mm from final size, using then finishing gouges and fine sand paper to get it ready for CA finish.

You have confirmed one of the most important factors about these blanks, they are not suitable for first timers, and speedy Gonzalez's folks, they require time and soft touch and as a result, you will get one of the most unique blanks/pens you ever seen...!

In all, you've done a great job with it all, and I thank you for accepting my challenge in the first place, maybe a little late but, is that the end of the world? to me is not and at the same time tells me that you are now feeling well enough to get back in the saddle and that is what is important.:biggrin:

Thank you.

Cheers
George
 

mark james

IAP Collection, Curator
Joined
Sep 6, 2012
Messages
12,750
Location
Medina, Ohio
Resin Identifications

Back home, and unfolded the identity of the resins.

On 6/22/2015 George (Robutacion) sent me the following:

Blank A: EPOXY RESIN

Blank B: POLYESTER RESIN (George's Old Resin)

Blank C: POLYURETHANE RESIN

Randy and George can now add further comments, as well as other FRoG's!

Cheers.
 

robutacion

Member
Joined
Aug 6, 2009
Messages
6,514
Location
Australia - SA Adelaide Hills
Back home, and unfolded the identity of the resins.

On 6/22/2015 George (Robutacion) sent me the following:

Blank A: EPOXY RESIN

Blank B: POLYESTER RESIN (George's Old Resin)

Blank C: POLYURETHANE RESIN

Randy and George can now add further comments, as well as other FRoG's!

Cheers.

Thank's James,

At the time I put these 3 blanks together, I was just coming out of using Polyester Resin and started using Epoxy however, in the process of trying other available resins to me resins that could replace the Polyester due to the poor CNC machining properties the Polyester was offering when I started making the e-cig/vapor blanks and the toxicity levels I was being exposed to with the old resin, I tested the Polyurethane 2 part resin only for the sake of trying, it's AU$60.00 per litre cost was far too expensive for me to use on my Resifills.

I still had a bit left and that is the reason I make one blank with it and have it compared to the other 2 resins used, my old one and the new Epoxy that still almost 3 times the cost of the Polyester, was my only viable option even though being the resin with the strongest adhesion of woods and other materials, was not totally crystal clear like the Polyester and also the Polyurethane, this resin sets crystal clear.

The start of the Epoxy use did also coincide with some new improvements I had made to the preparation and casting of these Banksia Hairy pod blanks that have become my signature blanks and also well know around the world.

At the time, there was some talking about these Banksia Hairy blanks to "self-destroy" as someone claimed, these blanks in question were blanks made/cast with raw pod and not stabilized as a new improved blank that was once more, being studied, tested and submitted to some new improvements, however, many of those stabilized pods were still cast with the Polyester I was still using at the time.

I knew that the Epoxy was going to be, the best quality resin I could use and at the same time resolve some of the issues of "separation", brittleness, and CNC machining problems the Polyester was responsible for.

The very first batch of Banksia Hairy pod blanks I made and made available, I made a special note of my web-store listing, of this new improved blank, one of many improvements I made to it, since the very first time I decided to cast blanks from these pods, the price was slightly increased just to cover the extra resin costs and nothing else.

When I first asked on IAP, who would be interested in doing this test for me, I already knew what the results would be however, I wanted to keep neutral of the improvements to these blanks I was claiming and I knew that, the person performing these test would have no problems with the differentiation of the performance of the 3 samples provided and to make sure, I was keeping that neutral status, I provide Mark James with the blanks identification and requested his assistance in providing the results when the time was right.

That time has come and after my explanations on this post, Randy and everyone else that have been following this thread, will agree, Randy has made a very accurate test and review of the samples provided, blank A (Epoxy) was always going to be the winner, blank B (Polyester) very distinguishable material/smell and blank C (Polyurethane) the most expensive and clear resin however, not the best casting resin and the results did show that well.

In all, I'm very grateful to Randy that he has completed this challenge after some less pleasant times, its all done and dusted mate, you are a good sport...!

Thank you also everybody for taking the time to read and follow this thread, it may not make these Banksia blanks any easier to make however, their improved quality can only increase the chances you endup with a finished pen, instead of the "alternatives"...!:biggrin::wink:

Cheers
George
 

Rounder

Member
Joined
Jan 16, 2011
Messages
753
Location
Marlin, TX
Hi George,
That makes me feel better that the results were as you expected. That tells me I did a good thorough accounting of what you already knew. My only regret was not finishing in the time frame requested but life is better now and the days keep moving. I am proud to wake up breathing each day and was proud that you chose me to do this for you. Thank you my friend for your kindness and understanding. You are the best.
 

robutacion

Member
Joined
Aug 6, 2009
Messages
6,514
Location
Australia - SA Adelaide Hills
Hi George,
That makes me feel better that the results were as you expected. That tells me I did a good thorough accounting of what you already knew. My only regret was not finishing in the time frame requested but life is better now and the days keep moving. I am proud to wake up breathing each day and was proud that you chose me to do this for you. Thank you my friend for your kindness and understanding. You are the best.

Hi Randy,

There is absolutely no reason for you to feel guilty about the delay mate, do you remember I got also sick for almost 4 months in the beginning of the year? I couldn't prevent it, either so, stop worrying about it, please...!

Yes, I was hoping your experience with those 3 blanks to be also a positive one, considering their nature and yes, you were very accurate, thank you...!

Weakening up breathing every morning is a great thing, huh...???

Be well and take care,

Cheers
George
 
Signed-In Members Don't See This Ad

bpgoldo

Member
Joined
Apr 13, 2010
Messages
340
Location
Carlsbad
George, If you wish to supply the blanks, I will supply the sweat in turning them. I have done 4 dual barrel pens with your blanks, all with embellishments and turned them with a simple gouge. Proud and pleased if you choose me. Love to do a brother a favor.
 
Top Bottom