Glow in the dark "beans"...!

Signed-In Members Don't See This Ad

robutacion

Member
Joined
Aug 6, 2009
Messages
6,514
Location
Australia - SA Adelaide Hills
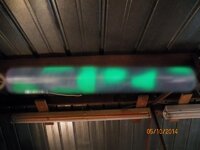
Some time ago, I received a email with some advertising and in it, was these dark green (looked like lollies) resin/plastic (not sure yet) that was advertized as glow in the dark...!

Yes, they do glow in the dark from what I saw so, I though in ordering 1kg of them to try on pen blanks casting.

It took a long time to arrive but, when it did, I lost no time and using a single pen blank mold to test it out. My first problem was to work out how to position these beans in the mold and make them stay put. I thought of my kabob bamboo skewers to keep loose pieces together so, I started drilling them when I realise that, this material melts at low heat temps, as the drill bit was melting the stuff after a few rotations and get clogged with this melting stuff that wasn't easy to remove from the bit so, I decided to freeze a few I needed (7) and then drilled them without any dramas.

I noticed that each bean (95% of them) has air bubbles inside so, they were made with some sort of injecting mold that trapped air (obviously not designed properly) so, I decided to drill then through the centre, regardless if was up and down or sideways, this way I would remove most of the bubbles and all that area where the bamboo skewer is, would be removed/drilled at least 7mm so, that would take care of any other small bubbles, near by.

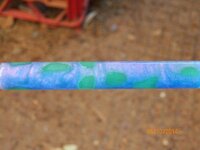
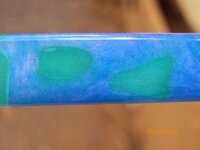
As for the resin to use, I knew that I had to use a semi-translucent powder to allow the glow to work so, I use one of the few "interference powders" that Pearlex makes, interference are their name for translucent, I used interference violet...!

The beans are touching each other but, due to their various shapes, the brass would be seen at certain places so, I couldn't make it too translucent but translucent enough to allow the beans to glow.

After I got the blank out of the mold, I decided to turn it round but I had the feeling that was still too early, the resin hadn't harden enough and at the blanks middle was a large bean that didn't allow that much resin around it so, without reinforcing it with a glued brass tube and turning it full lenght unsupported in between centres, was a big risk to the wobbles in the soft blank and forcing some separation between the resin and bean at the middle point.

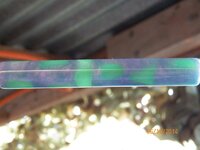
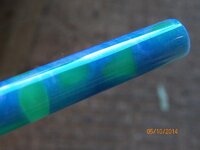
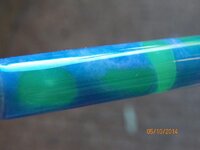
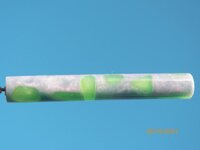
Using the flap disk I manage to get it so size without any problems but, the more material I took, the more it start to wobble in the middle, and the separation I was concerned about did occur, not a full separation but enough movement between the 2 materials to keep breaking the surface of the CA layers, reason at the white hair line seen at the middle of the blank.

Not optimum but, good enough to allow me to take a few pics and see how much glow it would come through.

As I said previously, I only made this blank as a sample, I don't know why I keep bothering making these sort of blanks, when none of my woods are used when I have a train full of casting pieces in stock however, I have the glow beans that I can always use for something else but, if any of you like them and want some done, let me know...!

The only thing that I can saw is that, the bean material is a bit softer than I would like when you try to work it, even though they look pretty hard in your hand.

I can also say that, I'm not aware of many resin blanks out there that have glow in the dark pieces in its construction so, we can always say that, they look "different"...!:wink::biggrin:

What are your thoughts...???

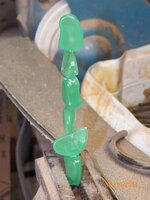
PS: I just noticed that, I have no pics of the beans kabob but, the first pic, is another way I thought in making the blanks skeleton to put in the mold, I used thick CA
and accelerator to position the beans on top of each other but, I endup not using it in the end...!
Cheers
George
 

Attachments

  • 003.JPG
    003.JPG
    49.3 KB · Views: 341
  • 006.JPG
    006.JPG
    44 KB · Views: 299
  • 007.JPG
    007.JPG
    45.7 KB · Views: 359
  • 008.JPG
    008.JPG
    47.2 KB · Views: 306
  • 001.JPG
    001.JPG
    56.7 KB · Views: 377
  • 009.JPG
    009.JPG
    36.5 KB · Views: 301
  • 010.JPG
    010.JPG
    35.7 KB · Views: 304
  • 011.JPG
    011.JPG
    25.7 KB · Views: 326
Last edited:
Signed-In Members Don't See This Ad

robutacion

Member
Joined
Aug 6, 2009
Messages
6,514
Location
Australia - SA Adelaide Hills
I am constantly surprised with the things you find and the lengths you will go to in making your next great blank. Gotta love your creativity and imagination.

Bruce

Thanks mate,

You're are correct, I never stop to want to create new things, even if I do it only once.

I suppose, is in my nature to challenge myself all the time, by creating all sorts of things that all start as an instantaneous though from what my eyes capture.

I'm fortunate to have a natural ability to "visualize" stuff even before its made, that helped me considerably in the various work orientations I experience in life however, I don't always succeed in creating what I visualized and that sometimes, frustrates me pretty bad, other times I take what comes out, as the way it had to be and accepting that I failed to consider all the facts and or variations possible to what I'm doing, sometimes I know what to expect, other times I don't, is that expectation and curiosity feeling that drives me in life...!

Is a lot of fun, though...!:biggrin:

Cheers
George
 

robutacion

Member
Joined
Aug 6, 2009
Messages
6,514
Location
Australia - SA Adelaide Hills
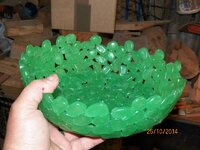
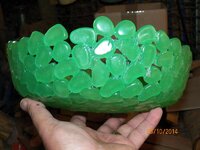
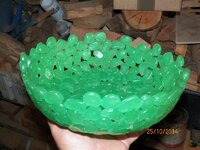
The bowl made with the glow beans...!

Hi peoples,

It was obvious to me and many of you that, these glow beans I purchased to try, weren't going to become a pen blanks success, I certainly didn't think much of it but, I had to try it and show it tom you all so, all good...!

I did made the observation that, these beans could possible be put to better use on something else and, when I said this, I already had in mind an idea to where I could use them for.

This afternoon, I decided to seat down on my bandsaw table and get "cracking" with my idea. It felt good doing it, I was having a bad day and I needed something to calm me down...!

I purchase 1kg of these beans and the bag said 200, I have used 7 on the pen blanks sample, I had one that broke when I drilled it, as the sample was done with the beans drilled and mounted in a bamboo skewer, like a kabob...!

However, the idea originated when I tried another way to get the beans together, in different positions (4 different shape beans) and straight, and that is what I have shown on one of the pics in the opening thread. Seeing the beans stuck together with thick CA, was what gave me the idea of gluing them together as a bowl and then cast it with some Interference Pearlex colour (translucent) to keep everything together, nicely...!

Well, I used every single bean I had, was just enough for the size bowl molds I had prepared for this, the bean gluing went well and was unexpectedly more stable than I predicted so, handling it to prepare it for casting, was quite easy but with gentle handling...!

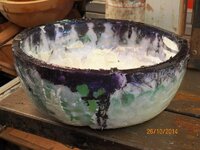
About 2 litres of PR and this was pretty much the minimum possible as I made sure, the casting wouldn't have much wastage of resin. I've used a mix of blue and violet Interference Pearlex powders for the main body of the bowl and then a small ring all around with some carbon black powder.

This black ring around the bowl will be a lot smaller (thinner) than what I had plan but, I din't put sufficient weight on top of the top mold and it floated slightly as I was pouring, without me realising and when I did, I had already poured the 2 litres and was wondering why the mold wasn't filled yet, to the level I wanted.

Off-course, when I pressed the mold down and use some more weight, it squeezed some resin out (waste) and then, I didn't have enough depth to fill with the carbon black, without wasting even more resin so, I decided to not waste much and, relief the top weight a little bit to allow the wooden mold to float just a little to drop the resin level, just a bit.

The main pouring, seem to have reacted a lot sooner than I anticipated also, it may be due to the high volume of the glow beans that are also some sort of resin so, when I was ready to pour the black, the resin underneath was already too gelled to allow much penetration with the black resin, to create the effect I was looking for so, I simply used a long wire to poke the gelled resin all around to allow some of the black to go in so, I will not be exactly what I wanted but, we will see with what I endup with, tomorrow...!

So, I leave you guys and gals with the pics I took of what I've done so far, before I retire for the day, enjoy...!

Cheers
George
 

Attachments

  • 008.JPG
    008.JPG
    66.9 KB · Views: 224
  • 013.JPG
    013.JPG
    79 KB · Views: 263
  • 009.JPG
    009.JPG
    76.5 KB · Views: 304
  • 007.JPG
    007.JPG
    64 KB · Views: 316
  • 006.JPG
    006.JPG
    71.3 KB · Views: 254

robutacion

Member
Joined
Aug 6, 2009
Messages
6,514
Location
Australia - SA Adelaide Hills
Hi folks,

Not finished yet but, not far now...!

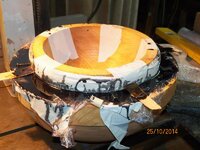
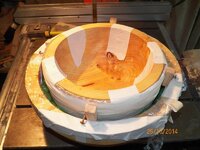
This is how it come out of the molds, 002.JPG

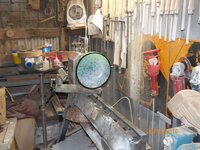
After some mounting and removing excess resin and turn it true, I left it tonight with the rough turning done, followed by a full covering with a generous coat of thin CA, 004.JPG

Tomorrow, I will finished by removing a little more on the outside, now that the inside is pretty OK. I had some masking tape inside and out, that seems to have reacted with the PR curing heat and, shrunk on the outside mold and expanded on the inside mold, making its way into the fresh resin, and endup being stuck on the resin, a lot deeper than I would liked so, it did require a little extra material removal from the inside and tomorrow I will do the same on the outside and hopefully, I won't have any masking tape embedded into the resin and spoil the looks, I can then finish it with a few coats of CA...!

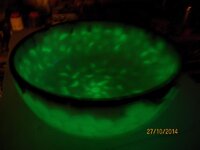
This thing really glows..!

Cheers
George
 

robutacion

Member
Joined
Aug 6, 2009
Messages
6,514
Location
Australia - SA Adelaide Hills
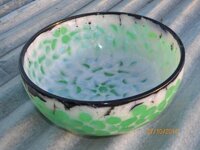
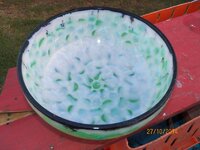
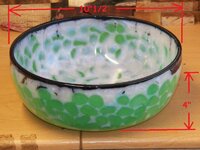
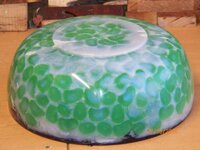
Well peoples, I've got it finished...!

I've spend all afternoon trying to finish this piece, it was an absolute pain in the rear end, I tell you...!:mad: I went as far as I could to attempt removing some of the bits of masking tape embedded in the resin yesterday, and today I gave it another go, removing another couple of millimeters but, the damn tape was still deeper, I don't really know how it got there, so far into the resin but, it was and was not much I could do, unless I would "carve" the tape out and recast the holes but that, would be even more noticeable than the way it is.

The bowl thickness is 5mm, and it is pretty much that size all over (the beans/beads thickness), a good size as a fruit bowl, no problems in washing this one...!

Far too much work, and I made it even worse when I decided that I wanted to finish in today and in time to take some pics with some natural light but, making the decision to finish it with CA, was a timely, difficult application and finish nightmare, costly mistake.

Sure, I finish it with the last 15 minutes of sun left on the horizon that, for my disappointment was half covered with low horizon clouds, the first pic was taken on top of one of the shed low roofs, is not much sun hitting it, anymore...! After that, any different position and location to take some more pics, didn't seem to work for me so, I done what I could...!

I'm very disappointed with the result, I wanted a lot better but, things didn't go all according to plan either but, one of the bigger mistakes was the bowls' body filling resin colour. The Interference powders blue and violet, didn't work, they were far too solid/opaque, 1/3 of the powders amounts, would be more than enough...!

The carbon black rim looks far from what I wanted, overflowing due to pour mold preparations, didn't help and in some way, the reason the rim didn't come out as I wanted/envisage.

Another critical mistake that I never done before, was the use of the bubble wrap (2 full turners) to adjust the diameter of the top mold, 2 layers of the bubble wrap, becomes too soft and uneven when used with a masking tape to hold it all together and maintain a shape, I should have used some more solid...!

The protecting film that I made inside of the base wooden mold, using some clear wrap would have been OK is I had used what I normally do, some spray glue to keep the protecting film in place and with the exact shape of the mold, instead, I used a 2" masking tape to seal the join of the 2 pieces of the clear wrap and use the tape extremities to attache to the outside wooden mold, this created the embedded tape problem, when the resin was poured the tape reacted and stretched, attaching itself to the surface of the glow beads, in some areas...!:mad:

I'm attempted to buy another bag of these glow beads, and recreated what I had before I cast it. I really like the way it looked and to create an identical look but strengthening the beads glue-up, I should be able to achieve that with the crystal clear resin mix. I need a few more beads to complete the skeleton, I need some thicker CA than the one I've got (less messy), re-think the way I will prepare the molds (top and bottom) and make sure I don't overfill next time, don't let it set so much and then pour something else as the rim, I reckon a mix with my glow in the dark powder, about 1/2" deep, would finish the piece a lot better.

Also, the one thing to avoid is to go through the body of the beads, they are made of some very melting type resin, the bowl thickness need to be double and make sure I have a few mm of clear resin all around the beads, this will allow a much easier shaping, sanding and finish with CA or simply a good polish, something I couldn't do with the one I just finish, the areas where the beads were shaved off, if required some filling and hardening for the sanding...!

In the end, I can say that, the technique/process of making one of these, is quite OK, not a lot of resin wastage and no need for a pressure pot, unless the piece is small enough to fit in a normal pot (I would have if I had a pot big enough...!), it wouldn't harm using one but , not absolutely necessary...!

I have no problem in sharing with you all, something that I'm not that happy with, the intent was to satisfy my own curiosity and utilize what I had, and at the same time, share with you all, one of the techniques/processes I use to make casting bowls, there are other ways...!

Successes and failures are all part of life and, what we do, sound principals do make things easier however, you still have to consider some preparation steps to assure the best possible results.

You can do one of these with, pods, seeds, bits of wood, left over resin bits and many, many more items, your imagination is the limit...!:wink::biggrin:

Thank you for watching...!

PS: You are most welcome to give me your honest opinion, I have gave you mine...!:)
 

Attachments

  • 005.JPG
    005.JPG
    65.6 KB · Views: 266
  • 008.JPG
    008.JPG
    64.5 KB · Views: 196
  • 024.JPG
    024.JPG
    112.4 KB · Views: 260
  • 022.JPG
    022.JPG
    62.9 KB · Views: 263
  • 032.JPG
    032.JPG
    30.5 KB · Views: 311

robutacion

Member
Joined
Aug 6, 2009
Messages
6,514
Location
Australia - SA Adelaide Hills
It look odd in the light but cool in the dark IMO

Yes, I agreed...!

I may have to "display" it only, at night...!:wink::biggrin:

I don't know what I was thinking, when I made that resin mix...!:mad:

Once upon a time, all my instinctive decisions worked well, to amazing well, I'm obviously losing my touch and mind capabilities, growing old is not fun...!:frown:

There is always tomorrow, and the next time so, I will survive...!:wink::biggrin:

Cheers
George
 

southernclay

Member
Joined
Sep 6, 2013
Messages
2,260
Location
Dawsonville, GA
Losing your touch? Nah! Give yourself a break George! Stuff happens

I actually think it's pretty cool, the pic of it in the dark is great. With Halloween this week it sure would make for a sweet candy bowl!
 

magier412

Member
Joined
Feb 6, 2013
Messages
219
Location
Seattle, WA
I think it's an absolutely awesome prototype! You've found out what works (and what doesn't) and now you can carry forward the lessons learned to your next great idea! Very very cool! :)
 
Top Bottom