How to handle the #45 Banksia Hairy pod Resifills...!
Do you have any hints on dealing with Banksia pods? A friend gave me one and I am not sure the best way to approach it.
Thanks
Yes, I do have a few, indeed...!
But before I do so, let me tell you a little about how it all started and how it developed, lets call it, "Part - 1"...!
The #45 Banksia Hairy pods Resifills, have been one of my best sellers since the day I start making them, a few years ago, I was making 3 main cut types, the straight cut (1 quarter of the pod cut longways), the diagonal, with the pod cut diagonally and the cross cut long tail, there is, I would cut the pod cross way, position the part at one end of the mold and fill the other mold half with the pod hairs.
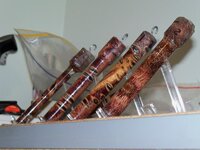
All these were cast in raw (dried) form and cast in crystal clear Polyester (PR) resin, the only resin I use.
People seemed to be handling them OK, with a few complaints about blow-outs, on any of the cuts/styles made, and it became obvious that, those with little turning experience or should I say, those without much experience with pen blanks made from various materials, apart from solid wood, were unaware of the extra steps and handling requirements to avoid any major problems...!
With the introduction of the stabilisation system since June 2012, I decided to try hardening the pod material before it was cast, and attempt to harden that red "velvet" type material in these pods,
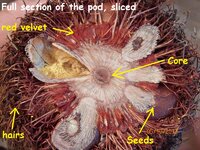
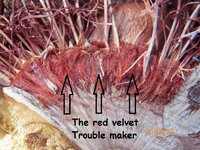
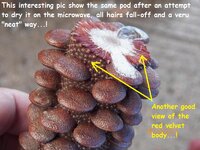
that I noticed from the very first batch I made of these blanks that, didn't allow much, the resin to soak through. I did later found out that, these pods as many natural plants and animal materials are built with some resistance to liquid soaking (rain, etc...) which we know as "water/liquid repelling".
I have stabilised the cut-up pod pieces but, I had some trouble with the juice concentrating too much of the hairs of the pod while cooking, coming out with lots of big "blobs" of dry resin stuck all over those hairs that did prove impossible to remove and not no good looking when cast with crystal clear resin so, I made a couple of batches where I stabilised the pod pieces but use some dye in the juice to attempt to disguise those dry "blobs" but, didn't work and people didn't like to buy them.
The problem was that, people didn't realise that those dry chunks of resin, would all turn-off/be removed, by the time the blank would get close to final size however, the pods being stabilised with some blue or red dye, did not appeal tom buyers as they would prefer the natural look and colours of the pod, which was, fair enough.
In that stabilising process, I requested to a few of people that purchase some of them to report back on the possible handling improvement the blanks could have had, since stabilised but unfortunately, I need to get that opinion from someone that already had turn some of my normal ones, only then, they could be in the position to tell the difference but, those in that position didn't wanted to buy the new stabilised ones and only sold to some people that never had turned one of these, before so, they had nothing to compare with...!
I had done my own testing's and found that, the red velvet material did not harden fully but had improved 30% while the rest of the pod had harden considerably so, a little easier to turn.
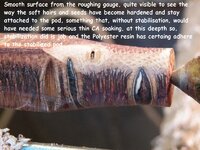
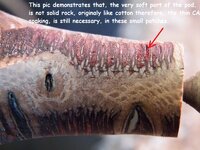
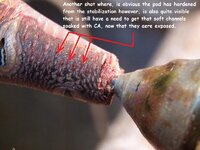
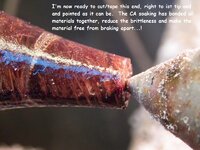
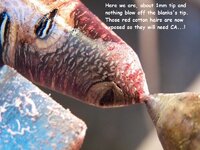
I did find that, the amount of thin CA soaking that is normally require to successfully make it into a pen, was reduced considerably, there was a lot less soft areas in the blank to soak with CA therefore, quicker to turn and more workable with most cutting gouges used and that to me, looked a great improvement however, the stabilised blanks were also priced with the stabilisation cost which is TO ME (Importation costs), $1.50 per blank.
Some time later, I decide to try another way to stabilise the pod material but this time, I cast the blanks first and stabilise after. After the molds come out of the pressure pot, and let them set for a few hours, I cut the blanks on the bandsaw and that exposes lots of areas of the blanks where the pod comes through the resin, those were going to be the entry points of the cactus juice when put under full vacuum however, I was most confident with this step and soaking of the pod inside the resin but, I was very concerned about having to expose the cast blanks to 90° Celsius for 90 minutes, in my toaster oven, excess brittleness was one and juice expansion inside the resin was other, plus any other factor that I may be confronted with when the timer, reached the cooking time...!
I had various pod cuts styles in that batch, and the results were not that different than what I was predicting. Most of the blanks come out looking quite workable, with only a few surface areas where it seems that the juice and resin had a bit of a fight however, any of the blanks that were cast with the pod cut in a way that was also experimental, there is, using the full spine/centre of the pod, that was then split in 2 parts which creates a very interesting effect of a snake skin. These are mostly solid but spongy pod material that had soaked a lot of juice and that cooking provoked the "expansion" that I was concerned about, making the blanks break apart as if they have blown up...!
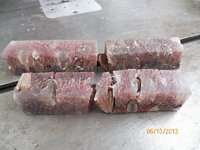
Of the blanks that did come out in a workable condition, I have been request to those that purchase half a dozen of so of the normal blanks to allow swapping with one of the cast+stabilised ones and request them to turn 1 or 2 normal ones first and then the marked stabilised blank, take notes as they go and provide that information to me. I have a few sent recently, I'm yet to received any reports...!
OK, I think that we can go now to "PART - 2", in it I will concentrate on all the steps/processes that I have been advising everyone that seems to have encountered problems, to use as a guide. This is exactly what I do, when handling any of these type blanks...!
*- Blank presentation...!
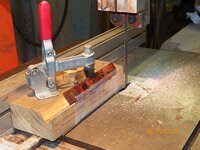
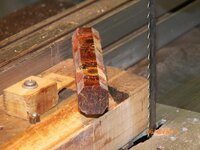
Blanks are supplied at about 22mm square x 130m long, they have been soaked with thin CA (5 cup) after cut on the bandsaw
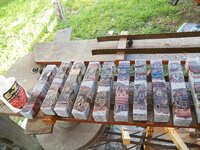
they are then sanded on a 12" disc sander and then sprayed all over with gloss varnish, this is only for cosmetic purposes and colours enhancement.
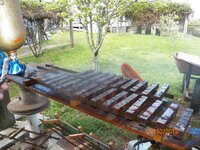
Blanks are normally supplied with all its square corners intact however, there are occasions where they have to be removed/cut for parcel weight adjustment.
 *- Preparation for drilling
Drilling is the reason of many blanks failures, regardless if they are Resifills or not however, any blank that is composed/made with more than 1 (one) material/component is susceptible to "separation" and "fractures", mostly happen inside the blank therefore, not always visible to the naked eye.
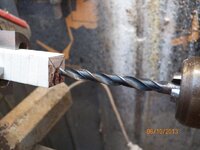
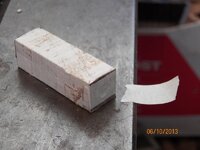
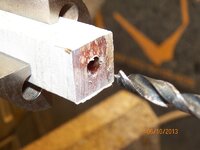
Sharp drill bits are a must, slow speeds are reccomended and removing/cleaning shavings as the drill cuts so far, are all very important details. So, considering that you have sharp drill bits and regardless if the blanks(s) is going to be drilled on a bench drill or on the lathe, the first step you should take is to, wrap the blank with some non-elastic tape (masking tape is good), 4 or 5 loops around is sufficient.
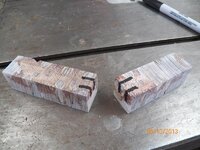
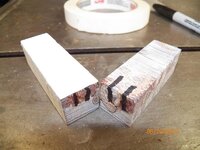
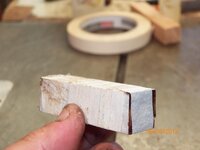
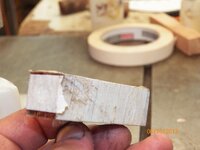
Before you wrap the blank(s) with tape, you should cut and mark the position of the 2 halves (if you are making a 2 barrel pen), marking it in such way that will allow you to see those marks even with the blank wrapped, this is achieved by marking the blank on its surface and then on the end-grain (joint faces) as the pics illustrate,
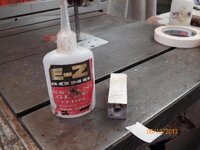
To avoid drill bit exit blow-outs, you can either leave the blanks longer or glue a "sacrificial" block, that is nothing more than a solid wood off-cut, this is by far the safest way...!
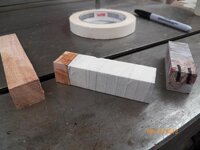
This sacrificial block can be used on a pen vice for bench drill or for lathe drilling, this is when, a long set of jaws on the chuck, can become most useful.
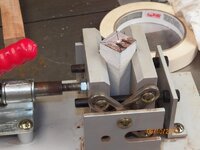
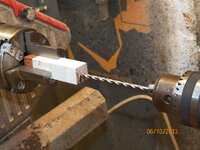
If using long drill bits, is advised that you mark you drill bit, with the correct depth you require to drill using a marker or a piece of tape. This is not as crucial if you are drilling on the lathe but most important if you are using a bench drill and some sort of vice, as you don't want to hit the metal table or the base of the pen vice...!
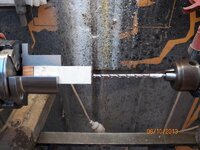
Pre-drill the blank first with a smaller size drill bit and then use the correct size drill bit to correspond to the brass tube size you are going to use.
At this point I suggest that you acquire your drill bits 0.25mm (1/4 of a millimeter) bigger than the tube size, I will explain why, soon...!
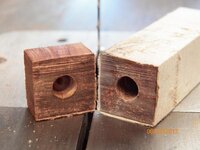
After you drilled you blank(s) to size, cut the sacrificial wood block, using the bandsaw,
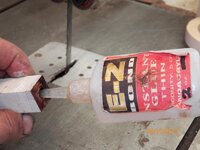
cut 2 small pieces of masking tape, put 1 piece on one of the blanks' end and put a generous amount of very thin CA in the hole, rotation slowly as you go, use the other piece of masking tape to seal the other hole end, rotate and tilt the blank so that the CA inside, soaks well all the inner surface of the blank. When you believe the CA is soaked, remove or perforate the tape on one end and spray a little accelerator to make sure the CA hardens quick.
THIS IS ONE OF THE MOST IMPORTANT AND PREVENTIVE STEPS TO AVOID SEPARATION FROM THE BRASS TUBE WHEN TURNING...!
When done, re-drill the blank to cut a clean pass for the tube...!
Note:At this point, I strongly suggest that you paint you tube brown or with any other shade/colour that you see appropriate, or reverse paint, doing both is also a good option. Recent tests made me realise that, is not worth the risk of not painting the tube, at least, the brass will show in 70% or more of cases so, better safe than sorry...!
I strongly suggest that you use epoxy (5 minutes or other) to glue your tubes in after they are properly clean, as this is when the 0.25mm over the tube size, is going to make the difference. Tight fitting will simply scrape the epoxy from the tube while some small gap, will guarantee sufficient epoxy stay in between brass tube and the CA soaked inner surface of the blanks hole however, I suggest you to use something like a kabob bamboo skewer, to spread the epoxy evenly inside the blanks' hole. Put some also on the tube surface and insert it, rotating as you push it into place.
The epoxy inside the tube, kas to be removed/clean immediately and for that, I find that if I use a small piece of paper towel, soaked with acetone and inserted inside the tube, close to the front of the tube to the end that will be inserted first, not a lot of epoxy will enter the tube and a small dowel or screw-driver inserted into the tube, as soon as the tube is in place, the paper towel will be pushed out wiping any epoxy in its way...!
Let it set/dry, properly and trim the ends (many ways to achieve this...!)
Now, the blank(s) is/are ready for turning, the way you are going to mount them on the lathe, mandrel or TBC, is of your choice, in this demonstration, I will simply use the longest piece of the 2 barrels previously shown, mounted in between centres. Take note that, the blank is only drilled and soaked with CA inside the hole, there is no other support or anything else strengthening the blank, there is not necessary to remove the masking tape, turning will take care of that...!
* Turning the blank
I'm going to use the "flap disk system" (look in
here) with a 40 grit disc and demonstrate how smooth, fast and safe (from blowing/damaging) the blank, it will perform. I'm also only going to turn to pen size 1/2 of the blank, and showing/explaining the 3 main steps of removing this pod material (resin and raw pod), from square to final hand sanding...!
Turn the blank to take it to 1 or 2 mm, pass the round shape, stop the lathe and soak with thin CA...!
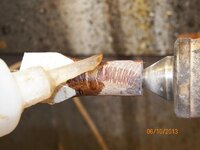
When dry/set, continuo on, removing the second layer, to about "little finger" diameter (average little finger size, I suppose...!), stop the lathe and repeat the CA soaking...!
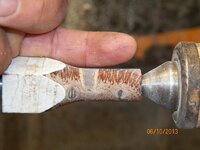
The third CA soaking, is going to be done when the blank reaches the size needed for the final hand sanding, let it set/dry properly and then proceed with your normal hand dry sanding, mine is (120, 240, 320, 400).
In this case, I have continued on, and finish the blank with 6 coats of medium CA, and polish compound...!
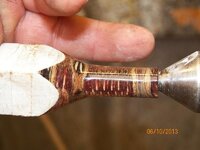
This next pic, you can see that is no brass tube and you can see also how thin that wall is, at this point, I would like you think very carefully to what this mean and why.
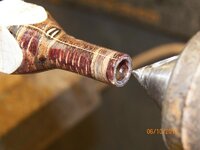
Firstly, we are dealing with a pod material that is not a solid piece, is composed of many parts, as shown previously, some of these parts/components are embedded with Polyester resin however, you should not forget about the red velvet "devil" that comes up to annoy you all the time but, the solution is simple, thin CA soaking, in consecutive layers, there is, the CA will only soak about 2 or 3mm deep before the, "repellent" characteristics of the red velvet, stop the CA on its tracks so, you soak/harden a little, you remove a little and so on...!
I can also point out that, if you are going to turn these blanks to size, using any sort of cutting gouge, you MUST double the number of soaking steps, you can't take as much material as the flap disc can, without running the risk the "tear" a chunk out so, every couple of millimetres, stop the lathe and soak with CA, let it dry before you continue on...!
Remember I suggesting the soaking of the drilled hole with thin CA...???
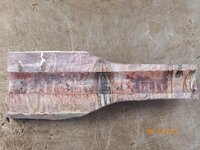
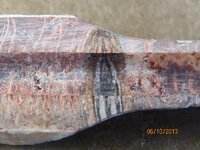
There is only one major factor that allowed me to go that thin, as per the pic above, without any support in the blank, and that was the correct CA soaking of that inside hole. If done right, the thin CA will penetrate at least 2mm from the hole wall, in so, when you are getting to the last soaking layer/step from the outer part of the blank, the pod material is already a solid "mass" and is also attached/glued to the brass tube so, the chances of tearing/ripping a chunk of the soft pod material from the tube, will be almost impossible, allowing you to go as thin as you want/need...!
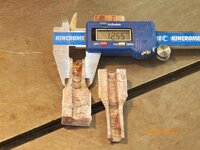
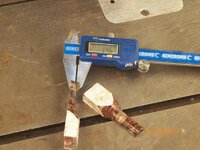
To give a better perspective of what I finished with and to demonstrate how solid the drilled hole area is, I decided to slice the blank with a thin metal blade, is not centered but, is sufficient to demonstrated that, these #45 Banksia Hairy pods Resifill blanks, are capable to survive to some extreme turning, the 2 main ingredients are, and I should say, 70% of its success depend on, thin CA and flap disk system, the other 30% are some care and some patience...!
I hope that, this step by step demonstration, has answered all your questions and concerns and while it represents a direct approach to correctly and successfully handle these blanks, this methods are applicable to all my Resifills and other blanks of similar type, that are available elsewhere...!
Best of luck...!
PS: I'm always here to answer any questions/concerns, you may have about any of my made blanks and, I hope you don't mind my new measuring system "the little finger, comparison...!):wink::biggrin:
A little additional information about these Banksia trees that I shared another day on someone else's thread here
No wonder why I'm getting orders fast and furious and from every corner of the globe, I have been making these blanks for years (same pod different cutting angles) and they have always sold but 5 to 10 each month or less so, not long ago I was mentioning the "air-cut" that I had to do on my front yard 2 Banksias, (the mothers of my pods) and state that I had stored enough pods from previous good yield seasons that would last me a long time and certainly until the Banksia trees/bushes recover and start producing some more pods again.
I remember that I said that, I'm expecting at least 2 years before I get any fair number of new pods that are usable for making these blanks BUT, I may have to swallow my own words and accept that, at this rate, I will have the stock I had gone and I will be looking at those trees and consider it I have done the right thing or not in cutting them down so much.
In the long run, this is the ideal treatment for the survival and pod production of these Banksias, and I know that however, this is one of those times where, you think you have it all planned properly and all of a certain, you realise that, you van never account for everything...!
I may run out sooner that I expected sure, I still believe I done what was best for those 2 Banksias life span chances and that is what counts...!
One other aspect of these pods that I don't think that I have made much reference to, is the fact that, the pods when transform from flower to the pod itself, changing its appearance to very hairy and dark brown in colour, that would be what some people would think was the end of the pod maturity however, this is far from the truth, the pod stays attached to the tree, after the first year and it does so because the pod is not yet developed inside.
The seeds inside the pod can take up to an extra 2 years to develop, while some pods will never develop any seeds at all. They will all fall out from the tree but, that can take up to 5 years so, nature as created the pod as the "house" where the seeds will grow from, that red velvet that causes so much trouble when the finished blanks are handled by penturners, is there to protect the seeds from any rain, while the hairs keep the birds away, unless you are in Australia, and you have some species of native birds such as the black cockatoos and Galahs that can tear these pods into threads to get the seeds out so, a number of pods are lost to these birds.
The seeds will stay attached to the pod core until the pod fully matures and drops to the ground, at that stage, the hairs start to fall out, the hard seeds shell opens up with heat, and the seed separates from the pod and stays in the ground until germinates or is taken away by a bird that will ingest it and will drop it some place a day or so later...!
So, usable pods for these blanks, require at least 2 years in the tree, the longer they will stay, the more seeds will generate and the bigger they will become so, picking them up too early, is no advantage to anyone so, will see what happens.
Another thing that will change is that, as soon as I sell the ones I have done, all Banksia pods pieces will be stabilized with Cactus Juice, this will increase the blanks cost up AU$1.50 but, it will assist and improve their "workability" considerably, for those using them, some of you may have develop ways to handle them successfully however, that will be a different story for those less experience penturners or those that never worked with such material composition and nature.
Cheers
George


 cut 2 small pieces of masking tape, put 1 piece on one of the blanks' end and put a generous amount of very thin CA in the hole, rotation slowly as you go, use the other piece of masking tape to seal the other hole end, rotate and tilt the blank so that the CA inside, soaks well all the inner surface of the blank. When you believe the CA is soaked, remove or perforate the tape on one end and spray a little accelerator to make sure the CA hardens quick.


 Firstly, we are dealing with a pod material that is not a solid piece, is composed of many parts, as shown previously, some of these parts/components are embedded with Polyester resin however, you should not forget about the red velvet "devil" that comes up to annoy you all the time but, the solution is simple, thin CA soaking, in consecutive layers, there is, the CA will only soak about 2 or 3mm deep before the, "repellent" characteristics of the red velvet, stop the CA on its tracks so, you soak/harden a little, you remove a little and so on...!


