Banksia Porn!

Signed-In Members Don't See This Ad

edstreet

Member
Joined
Aug 12, 2007
Messages
3,684
Location
No longer confused....
Wood porn that is. Enjoy, I know I am.

These are non-sanded and straight out of the box to the photography room.

attachment.php


attachment.php


attachment.php


attachment.php


attachment.php


attachment.php


attachment.php


Thanks George for the order.
 

Attachments

  • IMG_9062.jpg
    IMG_9062.jpg
    333.1 KB · Views: 1,521
  • IMG_9061.jpg
    IMG_9061.jpg
    265.5 KB · Views: 1,571
  • IMG_9067.jpg
    IMG_9067.jpg
    429.6 KB · Views: 1,567
  • IMG_9072.jpg
    IMG_9072.jpg
    245.9 KB · Views: 1,551
  • IMG_9075.jpg
    IMG_9075.jpg
    282.7 KB · Views: 1,527
  • IMG_9076.jpg
    IMG_9076.jpg
    245.8 KB · Views: 1,468
  • IMG_9079.jpg
    IMG_9079.jpg
    207.3 KB · Views: 1,635
Signed-In Members Don't See This Ad

edstreet

Member
Joined
Aug 12, 2007
Messages
3,684
Location
No longer confused....
More!

attachment.php


attachment.php


attachment.php


attachment.php


attachment.php


106437d1388265663-banksia-porn-img_9080.jpg


106440d1388265663-banksia-porn-img_9089.jpg


106441d1388265663-banksia-porn-img_9091.jpg


106445d1388265892-banksia-porn-img_9105.jpg
 

Attachments

  • IMG_9089.jpg
    IMG_9089.jpg
    199.9 KB · Views: 1,197
  • IMG_9091.jpg
    IMG_9091.jpg
    193.9 KB · Views: 1,214
  • IMG_9086.jpg
    IMG_9086.jpg
    222.6 KB · Views: 1,310
  • IMG_9085.jpg
    IMG_9085.jpg
    234.6 KB · Views: 262
  • IMG_9080.jpg
    IMG_9080.jpg
    218.6 KB · Views: 1,208
  • IMG_9093.jpg
    IMG_9093.jpg
    299.2 KB · Views: 1,315
  • IMG_9100.jpg
    IMG_9100.jpg
    266.7 KB · Views: 1,360
  • IMG_9101.jpg
    IMG_9101.jpg
    238 KB · Views: 1,388
  • IMG_9105.jpg
    IMG_9105.jpg
    241.5 KB · Views: 1,217
Last edited:

robutacion

Member
Joined
Aug 6, 2009
Messages
6,514
Location
Australia - SA Adelaide Hills
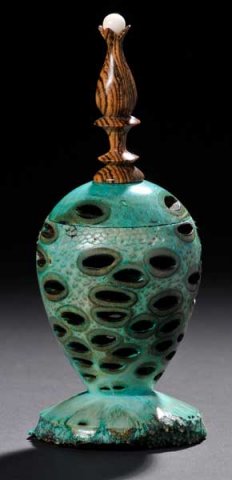
Ed,, these are utterly gorgeous...

Will they be any available for sale? :))

Thanks,
Mike

Hi Mike,

Oh boy, lets see if I can give you an answer that you and other will be able to understand and accept and true and correct.

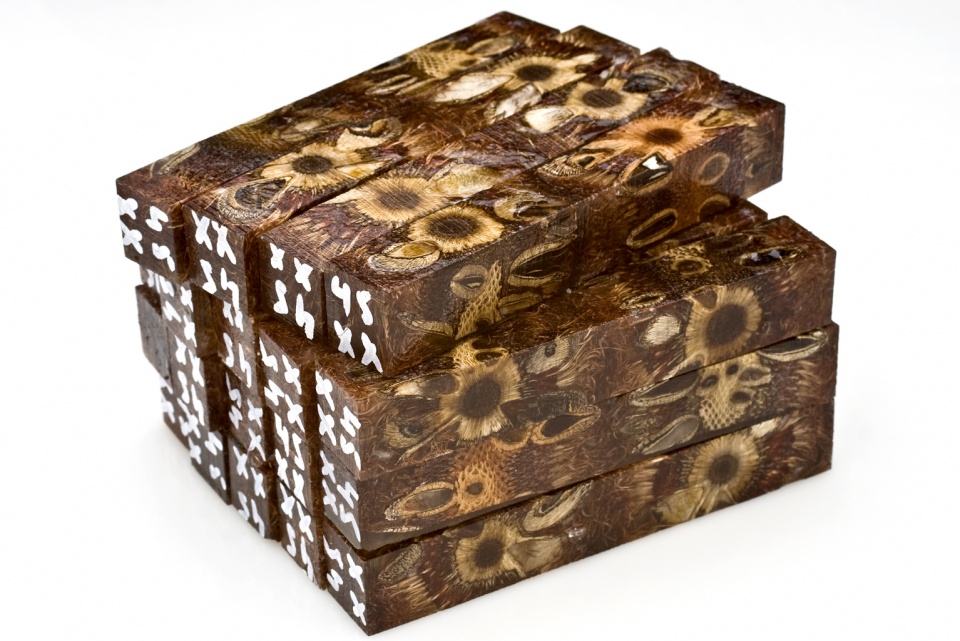
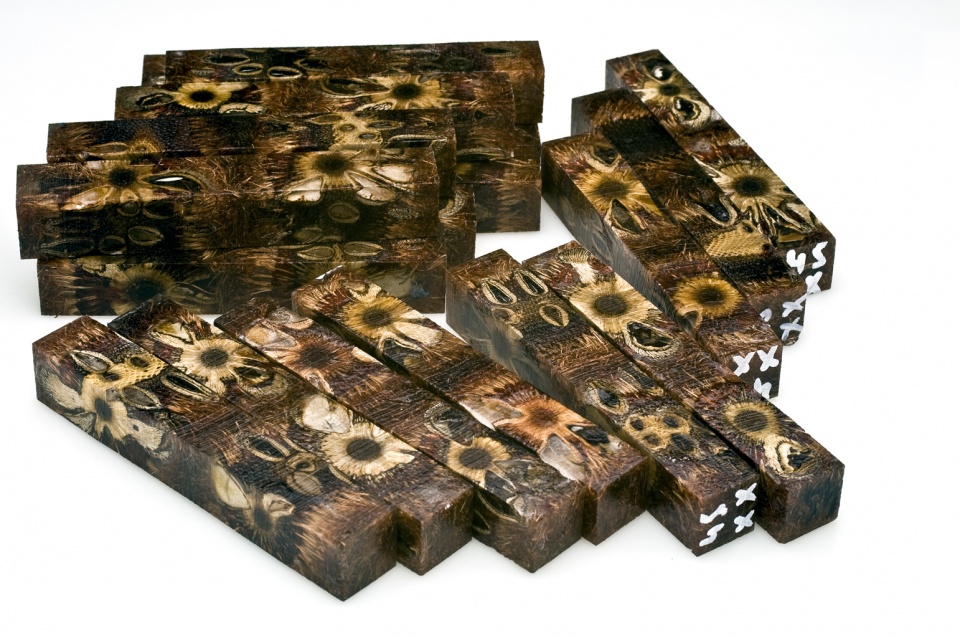
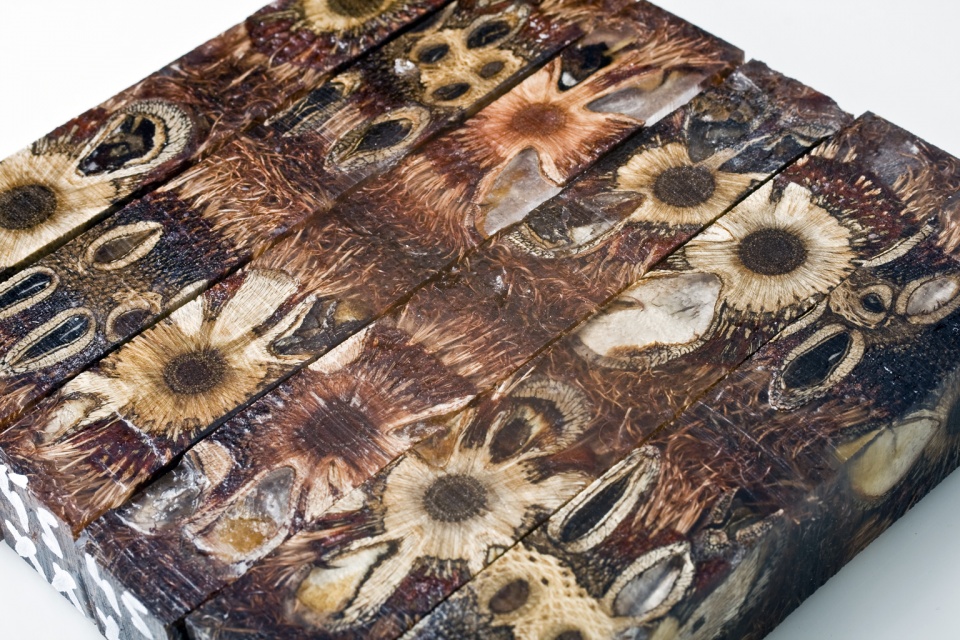
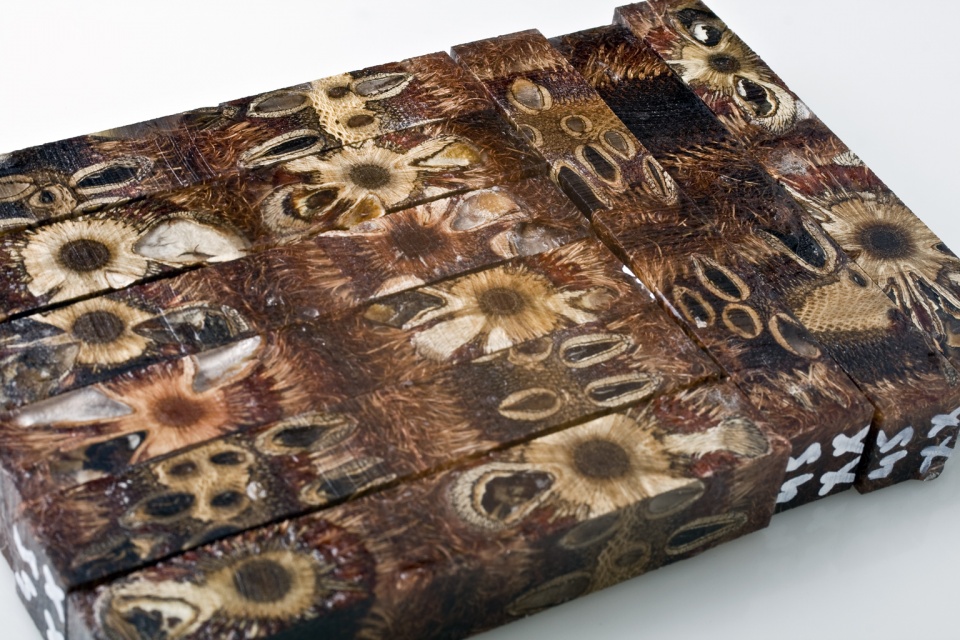
These blanks have been made by me for some years and they were made to demonstrate how one could use many of the natural resources, we all have around us, I had these 2 small Banksia tree growing in the front yard of this place when I rented it nearly 9 years ago.

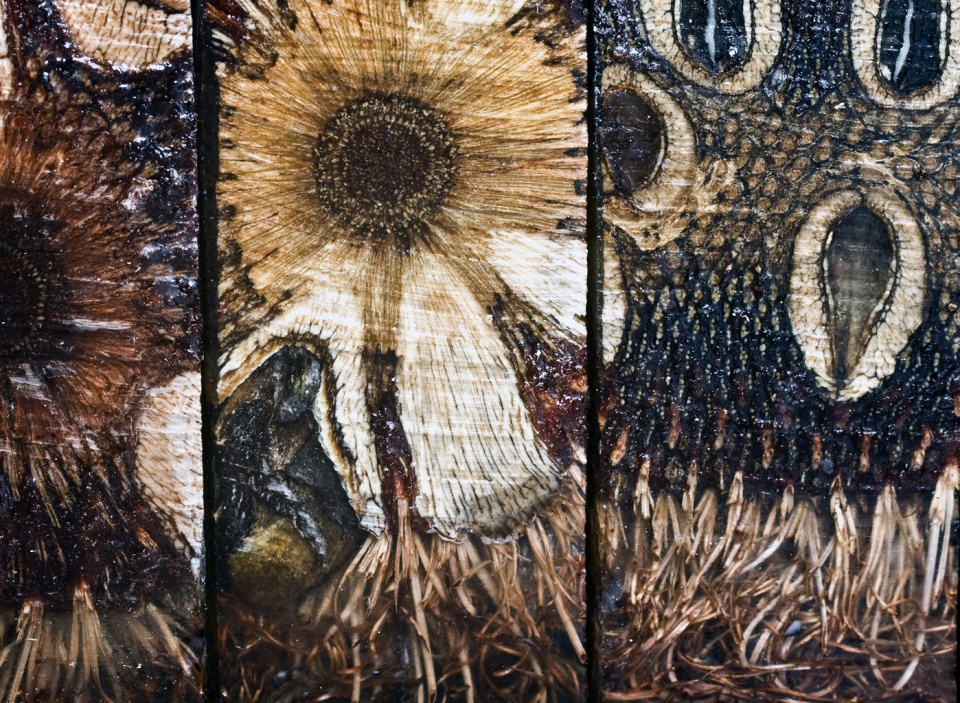
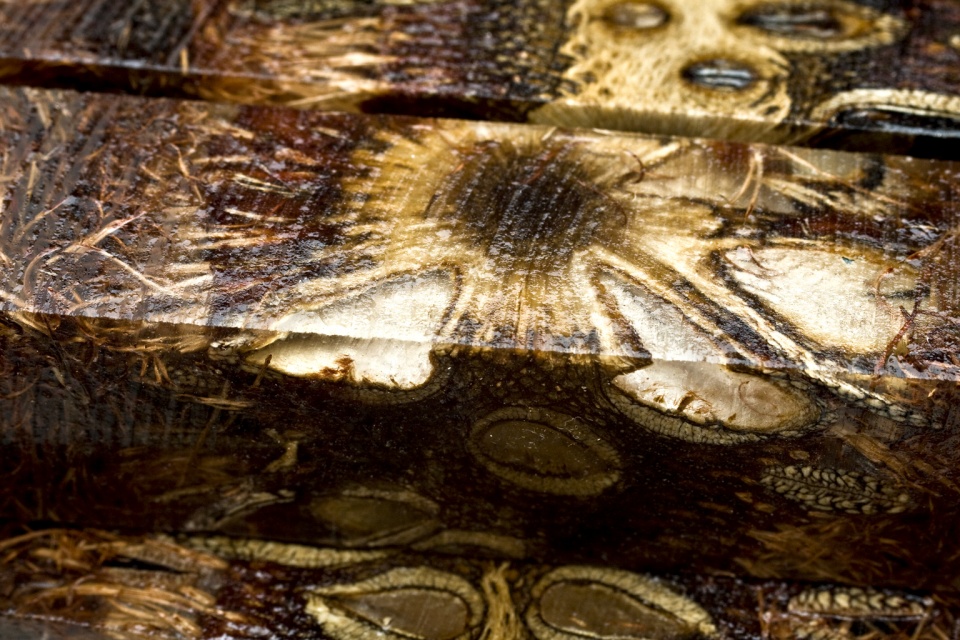
When I started to make Resifills (resin filled blanks) I looked at those Banksia's and wondered what the pods would look inside and how could I use them to make pen blanks from, using this new casting process I was implementing.

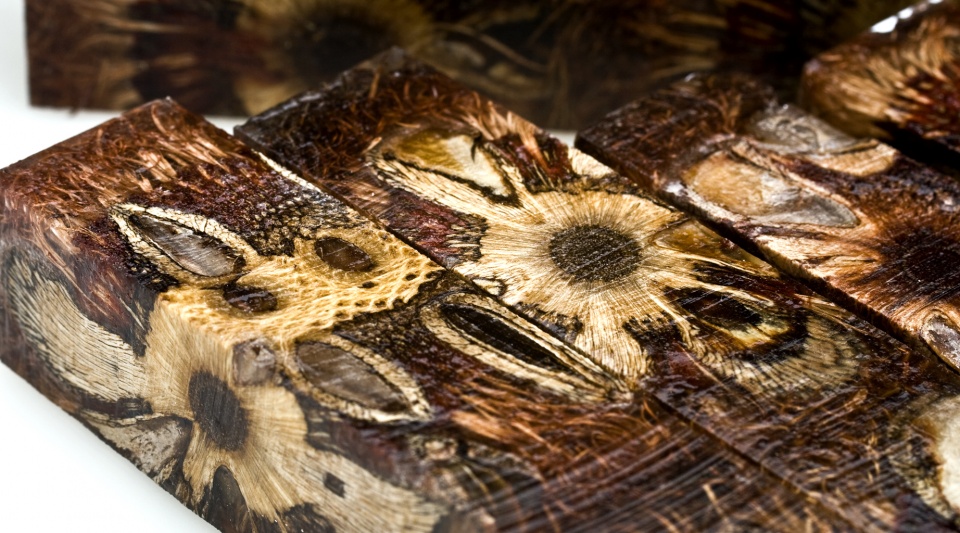
I soon find out that half of the pods are not suitable for these blanks as they never develop any seeds and the suitable ones were a tricky material to work with but I made experimentation after experimentations and started to sell them for people to try and see if they could make nice pens with them.

The majority of the braver people in those days were regulars that have been buying my solid wood pen blanks for some time so, I knew they could make pens, that was a good start however, most of them found them very difficult to handle and blown them up, one after another and many gave up but some, did realise that with some patience and some gentle handling, magnificent pens could be made from them but never a easier process, never the less...!

I made a few different types, basically different way to cut the pods making the diagonal cut ones, the most sourced at the time. I always had a few dozen made, of which I would make in one go, they would last me a few months at about 8 to 10 blanks sold each month.

I kept adding blanks on the old listings to keep the listings alive but I never bother to update the prices as the costs of the resin supplies, power and everything kept going up, I wasn't selling that many to worry about and as I said before, 99% of times they were sold to my most regular pen blanks buyers, that I knew they would blow a few every so often so, I kept supplying them at once upon a time, was the cost price (materials only).

When I first started stabilising, I though in improving the blanks strength but stabilising the pod pieces and then cast them as normal, I added the $1.50 for the stabilising as the average per blank stabilising cost and had the 2 listing on my eBay store, the old raw cast pods and the stabilised ones.

Believe it or not, they were there for months before a single one was sold while the raw pod ones were selling as normal so, when I asked the reason why they keep going to the raw ones knowing that the stabilised ones would be easier to handle, I'm told that, they didn't wanted to pay for the extra stabilising cost when they had already got used to handle the raw pod blanks. They endup selling but took 1 year or so to sell 18 blanks.

So why is that, the blanks have been listed on eBay for AU$5.50 each until last night and now the updated price for the 21 blanks left of the last raw pod batch is now AU$8.50 each and the future batches will be listed with all the blanks with the pod pieces stabilised, and at AU$10.00 each..???

Well, the reason is very simple, I can not keep making them for nothing and get all my pod stock disappear, these 2 months have seen me making over 300 blanks and use 2/3 of all my pod stock when the trees will be unable to produce any significant number of pods for another couple of years, I can not spend days and days making them to accommodate such volume of orders of at least 10 blanks per order, from every corner of this Earth and from people that I never heard about.

I have 2 options, I either stop wasting my time and my pods for no return and stop making them all together or, I bring the prices up to a more realistic and accurate value to what they worth to me...!

My decision to do these blanks with the stabilised pods, is due to the constant complains from those that ignored any of my advice on how to handle these blanks and decided to treat them as if they were solid wood blanks, and then complain that the blanks are no good and are not made right so, I need to make sure, these blanks if made are going to be made with the best options I have to make them a little more user friendly, we all know and saw, what these blanks can do when done right, the stabilisation is not going to solve all the problems but will improve their workability up to 50%, that is the best I can do at the moment, with the materials I have available to use.

So Mike, and to answer your question, yes they are available for sale, at this precise moment, I should have 17 of these older batch blanks (raw pod) at $8.50 each available on my eBay store, here

After those are sold, the listing will be removed and will be replaced with the new listing of the stabilised pods pieces and then cast, those will be available at AU$10.00 each.

I have about 50 of those blanks already made since last week, they will not be listed until at least 4 weeks have passed from the day they were made, this is to ensure all the resins are cured/set properly before they go on sale. This has been a normal practice from me for all my Resifills, unfortunately, with the crazy demand for these blanks lately, no one was prepared to wait and wanted the blanks ASAP, advise was clearly given in each order that, the blanks require a minimum of 14 days to cure, I recommend an extra 2 weeks just to make sure and while I was promised that they would respect that, mostly overseas which normally take 2 weeks to arrive, only is some occasions it take about 1 week however, in some of these orders, I had complains as early as 2 weeks after these blanks were posted, complaining that the blanks weren't cast properly and were braking apart...!:eek: now, figure that out...!

So, I apologise for the long explanation and for some "disappointments" I may have created, I created the problem, I fix the problem...!:wink::biggrin:

Cheers
George
 
Last edited:

robutacion

Member
Joined
Aug 6, 2009
Messages
6,514
Location
Australia - SA Adelaide Hills
Ed, I've been trying to send you a message for some time but I get a "forbidden" message, do you know why...??

Cheers
George

that would be a jeff question and it is likely something in the subject or body that is the problem. Instead try my direct email ed@street-tek.com

Yes, I agree and the question has been made to Jeff before I posted here, Jeff is maybe not available at the moment and I was trying to have an idea what could be causing such message so, thanks for you reply, I will use your private email address, thanks...!

Cheers
George
 

healeydays

Member
Joined
Nov 30, 2012
Messages
1,057
Location
Bedford NH
George,

You need to price your products accordingly. If your materials and time are worth X you need to sell for X + profit or why bother doing it? I have never had an issue with your prices and love the products I have bought from you.

As for warnings of how to work with your blanks, I think you do a great job giving folks warnings and instructions. From there folks trying them out need to understand that not all folks are skilled enough to take on the challenge at that time...

Mike B
 

SDB777

Member
Joined
Feb 6, 2010
Messages
6,620
Location
Cabot, Arkansas USA
Think these would be great just hanging on the wall...ART!!!


Awesome photo's that can hide nothing!!!


Scott (like a green haired dog) B
 

edstreet

Member
Joined
Aug 12, 2007
Messages
3,684
Location
No longer confused....
How is the finish? (that's about 1/4" from top to bottom there) I know it sucks right? I did skim greatly but wanted to get it presentable, I just rounded one of them and finished about half the blank. Had to find out how it works, turns, sands and what to look for.

attachment.php


attachment.php


The blank is 0.72" in diameter, bit over 18mm. FYI
attachment.php


On the lathe.
attachment.php


attachment.php


attachment.php


chip!
attachment.php


106540d1388381414-banksia-porn-img_9143.jpg


106539d1388381414-banksia-porn-img_9148.jpg
 

Attachments

  • IMG_9174.jpg
    IMG_9174.jpg
    162.6 KB · Views: 264
  • IMG_9156.jpg
    IMG_9156.jpg
    135.1 KB · Views: 588
  • IMG_9169.jpg
    IMG_9169.jpg
    149.9 KB · Views: 770
  • IMG_9175.jpg
    IMG_9175.jpg
    178 KB · Views: 610
  • IMG_9178.jpg
    IMG_9178.jpg
    204.3 KB · Views: 243
  • IMG_9151.jpg
    IMG_9151.jpg
    230.8 KB · Views: 757
  • IMG_9148.jpg
    IMG_9148.jpg
    193.5 KB · Views: 509
  • IMG_9143.jpg
    IMG_9143.jpg
    305.5 KB · Views: 596
  • IMG_9140.jpg
    IMG_9140.jpg
    200.8 KB · Views: 737
  • IMG_9139.jpg
    IMG_9139.jpg
    350.8 KB · Views: 595
  • full-IMG_9178.jpg
    full-IMG_9178.jpg
    207.8 KB · Views: 618
Last edited:

robutacion

Member
Joined
Aug 6, 2009
Messages
6,514
Location
Australia - SA Adelaide Hills
OK so, I read what you said, and I have to ask, how did you find it...? (these are all cast with the raw pod pieces), better, worse that you expected...???

One of the things I can see is many of the seeds pockets being filled with the clear resin as the seeds obviously weren't there when cast, possibly from disturbing the pod when slicing it to pieces however, I found that most of the blanks like that, are so on the surface, as you get closer to the average pen barrel size, most of the seeds are still intact as they tighter towards to pod core/centre...!

The detail and accuracy in those pics is just amazing, I took many pics of the blanks in all stages, some close up but not that close however, every detail shown on all these pics, is something that I admired many times when I turn and CA finish a sample and look through it with a magnifying glass/lens so, I just can imagine what some of you is thinking when looking at your pics, all work from nature, I only helped a little...!:wink:

Great work..!

PS: Did they feel harden enough...???

Cheers
George
 
Last edited:

edstreet

Member
Joined
Aug 12, 2007
Messages
3,684
Location
No longer confused....
To be honest I used my uber elite high speed low drag drill ;) as seen here http://www.penturners.org/forum/f14...hless-wood-114494/?highlight=wayne+ryan+blank
How to round a Wayne Ryan Reincarnated Wood blank in under 60 seconds. - YouTube I used abranet 80 grit and then used a flat skew. From the very first touch on the drill I noticed how hard the material was. I did have 2 pods on the end that was unfinished come out but thats not a problem at all, this was my learning blank.

Even the chips concured with what I was thinking, very very hard. I can easily see how some could have problems with these. They have dull chisels and have to take hard deep pressure cuts to remove material when it snags and being to deep and to much pressure things goes SNAP.

After doing this brief one I would have to agree with you that stabilizing is the way to go, then cast them. It would be well worth the added $. I could easily tell a difference between pod and resin which is another pitfall that I can see turners having problems with.

I did try to find the lowest detail blank to start with but that to was a major undertaking as all of them look very good and it was hard picking one to use.
 
Last edited by a moderator:

robutacion

Member
Joined
Aug 6, 2009
Messages
6,514
Location
Australia - SA Adelaide Hills
To be honest I used my uber elite high speed low drag drill ;) as seen here http://www.penturners.org/forum/f14...hless-wood-114494/?highlight=wayne+ryan+blank
How to round a Wayne Ryan Reincarnated Wood blank in under 60 seconds. - YouTube I used abranet 80 grit and then used a flat skew. From the very first touch on the drill I noticed how hard the material was. I did have 2 pods on the end that was unfinished come out but thats not a problem at all, this was my learning blank.

Even the chips concured with what I was thinking, very very hard. I can easily see how some could have problems with these. They have dull chisels and have to take hard deep pressure cuts to remove material when it snags and being to deep and to much pressure things goes SNAP.

After doing this brief one I would have to agree with you that stabilizing is the way to go, then cast them. It would be well worth the added $. I could easily tell a difference between pod and resin which is another pitfall that I can see turners having problems with.

I did try to find the lowest detail blank to start with but that to was a major undertaking as all of them look very good and it was hard picking one to use.

OK, thanks for that...!

Well, the head you had on the drill, is pretty much the same as the 2" sanding pads that I modified to go on a normal 4" or 5" grinders, the #40 grit on them remove material very fast but, not as fast and smooth as the 4" flap discs, the #40 or #60 grits leave an unbelievable smooth finish that any 120 grit will take care of.

Anyway, I have 3 questions, did you seen the red velvet material standing up when removing material, either sanding or with a skew/gouge, and how everything around it is hard but not the velvet stuff...???

Did you use and thin CA to cover the blank with (as a soaking coat), in any stages from square to final round size...??

When you use your 80 grit abranet in your drill to remove material fast, do you have any idea of how hot the blank will get...???

Cheers
George
 

edstreet

Member
Joined
Aug 12, 2007
Messages
3,684
Location
No longer confused....
OK, thanks for that...!

Well, the head you had on the drill, is pretty much the same as the 2" sanding pads that I modified to go on a normal 4" or 5" grinders, the #40 grit on them remove material very fast but, not as fast and smooth as the 4" flap discs, the #40 or #60 grits leave an unbelievable smooth finish that any 120 grit will take care of.

Anyway, I have 3 questions, did you seen the red velvet material standing up when removing material, either sanding or with a skew/gouge, and how everything around it is hard but not the velvet stuff...???

Did you use and thin CA to cover the blank with (as a soaking coat), in any stages from square to final round size...??

When you use your 80 grit abranet in your drill to remove material fast, do you have any idea of how hot the blank will get...???

Cheers
George


1) the velvet 'hair' material did come up and I saw it before the lathe stopped turning. I was able to read the blank as it was turning and saw that we were dealing with raw material and not resin, simply due to the color and the shine on the turning blank. I took some thin CA and saturated it good then went back over it with thick CA for a final coat. This works exactly like denim micarta does, often the fuzz from the cotton sticks out and as you get lower and lower on the grit of sandpaper they disappear. Cept in this case they tend to rip easily.

Also this was in select areas and now that I know where they will be I can easily make accommodations for this in the future by looking at square blanks.

2) I used thin CA when I exposed bare material, it went from a high shine to a dull finish. But then I also cheated and used novus #3 to spotlight those areas as well. They are easy to see on the blank now that I know what to look for.

As you may know I also use odorless CA, BSI and UFO brand.

3) Heat and abranet is like having a bbq in the icebox, not going to happen. When/IF you get build up on the abranet then you can generate heat. Typically this does not happen and if you are still sanding when the buildup occurs then you are oversanding.

On the drill I would often stop the drill and use it on select spots, I would put my fingers on the opposite side of the blank (from sanding). To be honest there is likely more heat build up due to my fingers being on the blank than from the abranet itself. Which is a good thing because that allows you to remove the pad, clean it, clean your hand and allow the blank to cool down.

Heat build up on sanding occurs from 3 parts:
1) removing chunks from the material
2) buildup on the sandpaper pooling heat and not letting it escape. and
3) the spacing of the grit particles on the sanding media. finer you go the more dense packed the grit is and the more buildup you get.

I use my bare fingers to sand with and there is no heat build up at all due to that. With abranet you can physically see the chips jumping off the spinning blank and you can see when it starts to dull in that spot as the height of the jump and the volume of the chips is reduced greatly.
 

robutacion

Member
Joined
Aug 6, 2009
Messages
6,514
Location
Australia - SA Adelaide Hills
OK, thanks for that...!

Well, the head you had on the drill, is pretty much the same as the 2" sanding pads that I modified to go on a normal 4" or 5" grinders, the #40 grit on them remove material very fast but, not as fast and smooth as the 4" flap discs, the #40 or #60 grits leave an unbelievable smooth finish that any 120 grit will take care of.

Anyway, I have 3 questions, did you seen the red velvet material standing up when removing material, either sanding or with a skew/gouge, and how everything around it is hard but not the velvet stuff...???

Did you use and thin CA to cover the blank with (as a soaking coat), in any stages from square to final round size...??

When you use your 80 grit abranet in your drill to remove material fast, do you have any idea of how hot the blank will get...???

Cheers
George


1) the velvet 'hair' material did come up and I saw it before the lathe stopped turning. I was able to read the blank as it was turning and saw that we were dealing with raw material and not resin, simply due to the color and the shine on the turning blank. I took some thin CA and saturated it good then went back over it with thick CA for a final coat. This works exactly like denim micarta does, often the fuzz from the cotton sticks out and as you get lower and lower on the grit of sandpaper they disappear. Cept in this case they tend to rip easily.

Also this was in select areas and now that I know where they will be I can easily make accommodations for this in the future by looking at square blanks.

2) I used thin CA when I exposed bare material, it went from a high shine to a dull finish. But then I also cheated and used novus #3 to spotlight those areas as well. They are easy to see on the blank now that I know what to look for.

As you may know I also use odorless CA, BSI and UFO brand.

3) Heat and abranet is like having a bbq in the icebox, not going to happen. When/IF you get build up on the abranet then you can generate heat. Typically this does not happen and if you are still sanding when the buildup occurs then you are oversanding.

On the drill I would often stop the drill and use it on select spots, I would put my fingers on the opposite side of the blank (from sanding). To be honest there is likely more heat build up due to my fingers being on the blank than from the abranet itself. Which is a good thing because that allows you to remove the pad, clean it, clean your hand and allow the blank to cool down.

Heat build up on sanding occurs from 3 parts:
1) removing chunks from the material
2) buildup on the sandpaper pooling heat and not letting it escape. and
3) the spacing of the grit particles on the sanding media. finer you go the more dense packed the grit is and the more buildup you get.

I use my bare fingers to sand with and there is no heat build up at all due to that. With abranet you can physically see the chips jumping off the spinning blank and you can see when it starts to dull in that spot as the height of the jump and the volume of the chips is reduced greatly.

Thanks for the reply...!

I never used abranet, reason of my question as you should avoid overheating these blanks.

I have tried to demonstrate/show where that red velvet material is in the pod, in the pic on this thread, they are quite visible on the square blanks and that is one of the details that I brough people's attention to, identifying the red velved in the blank and keep it saturated with thin CA, is all you need to keep it under control however, I like to coat the whole blank with the thin CA on these raw cast pods, as soon as it gets round, and then every 2 or 3 milimitres as that is all the CA is capable to penetrated on that velvet stuf.

If you have the opportunity, drill the blank and watch for any soft areas that are not the raw pod, what I mean is, if the resin is not set properly, while drilling you may see sticky resin mixed with the pod material, that is what happen when these blanks are worked on, before the resin sets properly, something that, and as you were advised to, that is about 3 weeks and a bit since those were made, the reason why I asked you to let them rest for a little longer.

The one blank you are using to do your tests, seems to have set already so, the final test will be the drilling that, if any signs of the sticky resin, means that, is close, but not yet right to make pens with...!

I do hope that your tests with these blanks, will contribute together with my own information, to a better understanding of what these blanks are about and assist others to turn their failures into successes, and others of not being afraid to have a go, after all, it may be a special blanks but, only a replaceable pen blank...!:wink::biggrin:

Cheers
George
 

edstreet

Member
Joined
Aug 12, 2007
Messages
3,684
Location
No longer confused....
Perhaps this would help greatly.

As you turn it there's a very unique change of look and the chisel will feel different. In fact you will notice the chisel difference long before the visual.

attachment.php


attachment.php


This second pic is very interesting, good classic example of reading the blank, shavings and sandpaper.

What we see in the second pic is build up of dust in the hairs, they need to be cleaned out before changing grit sizes or doing a CA coating.
 

Attachments

  • IMG_9147.jpg
    IMG_9147.jpg
    240.1 KB · Views: 774
  • IMG_9137.jpg
    IMG_9137.jpg
    243.5 KB · Views: 753
Last edited:

edstreet

Member
Joined
Aug 12, 2007
Messages
3,684
Location
No longer confused....
5 new ones I took just now of the fuzz. The last one should be of note as it is from the unfinished, unsanded section of the blank. It clearly shows clean chisel cuts then some problem areas that came up with the fuzz.

Perhaps one of my favorites so far. I might just have to do some prints and framing on this batch. :)
attachment.php


attachment.php


attachment.php


attachment.php


attachment.php
 

Attachments

  • IMG_9198.jpg
    IMG_9198.jpg
    232.8 KB · Views: 678
  • IMG_9193.jpg
    IMG_9193.jpg
    239.5 KB · Views: 680
  • IMG_9189.jpg
    IMG_9189.jpg
    319.7 KB · Views: 690
  • IMG_9182.jpg
    IMG_9182.jpg
    246.1 KB · Views: 676
  • IMG_9180.jpg
    IMG_9180.jpg
    302.3 KB · Views: 681

edstreet

Member
Joined
Aug 12, 2007
Messages
3,684
Location
No longer confused....
This is one of the seed pods that broke out, this was 100% my fault to.

attachment.php


Also stabilizing the pod would help greatly and after that perhaps some DYE maybe?
 

Attachments

  • IMG_9181.jpg
    IMG_9181.jpg
    321.8 KB · Views: 753

robutacion

Member
Joined
Aug 6, 2009
Messages
6,514
Location
Australia - SA Adelaide Hills
Great pics, once again...!

Like I said previously every detail on these pods, was studied, examined and tested to all sorts of things, and even been aware of all its details, looking at your pics, if validates to me the reason why spend years try to convince other pen turners to have a go and find an optimum way to enhance and show its beauty and uniqueness, I tried everything, even selling them at cost price just to make it more inviting to the purchase.

I made from these pods, knife blanks, fishing rod handles making, game call blanks and other stuff but, no one seemed to be comfortable in handling this material, resulting is many failures that were mostly caused by the lack of skill to handle it.

You mention the possibility of stabilising then with a dye, well my friend, I've done that as soon as I got my stabilisation system going, in fact, the first material I stabilised was precisely this Banksia pods, I tried full pods and quickly realise that, wasn't the ideal ways to treat the pod material that was required for the casting.

The first tries were with the clear Juice and them I done about 6 or 7 blanks with some dye colours, such as red, blue and green. Listed the at the same price as the stabilised clear, $1.50 more than the raw ones and no one touched them. If I remember correctly, they endup being given away as gifts (one at the time) to those that kept ordering the blanks cast with the raw pod. I would send of of the stabilised one, in any colour I would pick and request that they would use it to experiment and then report to me if it was easier to work with, then the raw ones or not...!
A year later I still had some of those left that, only one person ordered 5 of the stabilised with red dye were ever ordered and that resulted in a complain and full money back, when I received 2 untouched blanks and the other 3 in little pieces ...!

From day one, this guy complained about the blanks, I asked him to stop using them until I had the opportunity to take some pics of a few testes I was going to do for them, demonstrating that the blanks would brake apart/blow out, without a reason but, he was too damn of an expert to admit that he had absolutely no experience with these type of hybrid blanks, whatsoever.

I'm attaching a group of pics some some notes written on them of what I was doing and demonstrating is workability, sent to this person a couple of days after the complains started. Didn't make a damn difference, his mind was set for the full refund, believing that was my responsibility to pay for him to practice and play with them. Just not right...!:mad:

Some of the reports I had from these people, would confirm that the stabilise blank was easier to work with but, none of them liked the pods with any artificial colours, they all preferred the pod in its natural colour...!

I will try to find some of the pics of these blanks stabilised in other coloured dyes but one thing I can say, the pods rarely took on any of the colours, I admit that at the time I didn't use and much dye as I use today to get close to the colours I want but, I doubt that, the pod would take much more colour, regardless of how strong the dye could be. I may try again one day just to make sure...!

Read my comments of those pics and see for yourself, what I was trying to demonstrated...!

PS: The pics date is 13/1/13

Cheers
George
 

Attachments

  • 002.JPG
    002.JPG
    140.5 KB · Views: 317
  • 006.JPG
    006.JPG
    130.1 KB · Views: 211
  • 005.JPG
    005.JPG
    159.2 KB · Views: 255
  • 003.JPG
    003.JPG
    113.1 KB · Views: 281
  • 004.JPG
    004.JPG
    175 KB · Views: 321
  • 007.JPG
    007.JPG
    163.1 KB · Views: 235
  • 008.JPG
    008.JPG
    133.9 KB · Views: 273
  • 009.JPG
    009.JPG
    171.9 KB · Views: 194
  • 010.JPG
    010.JPG
    137.9 KB · Views: 200
  • 011.JPG
    011.JPG
    143.4 KB · Views: 206
  • 012.JPG
    012.JPG
    148.9 KB · Views: 303
  • 013.JPG
    013.JPG
    98.2 KB · Views: 190
  • 014.JPG
    014.JPG
    147.3 KB · Views: 286

robutacion

Member
Joined
Aug 6, 2009
Messages
6,514
Location
Australia - SA Adelaide Hills
Ok, I found some pics of the blanks stabilised with the blue dye.

Note that, these blanks were made with the straight cut pod, there is, the pod was cut to full length and then quartered to make 4 blanks.

This was my first cut I made, and it was as popular the the diagonal cut pod, the current pod cut in more recent and in an attempt to improve the blank.

As you can see, is a slight shade of blue in certain edges but not much, first 2 pics only, the rest is my old cuts and effects...!

Enjoy...!

Cheers
George
 

Attachments

  • 011.JPG
    011.JPG
    59 KB · Views: 257
  • 014.JPG
    014.JPG
    66.8 KB · Views: 270
  • PIC08813.jpg
    PIC08813.jpg
    156.9 KB · Views: 229
  • PIC08817.jpg
    PIC08817.jpg
    156.8 KB · Views: 211
  • PIC08834.jpg
    PIC08834.jpg
    181.3 KB · Views: 252
  • PIC08836.jpg
    PIC08836.jpg
    203.3 KB · Views: 255

edstreet

Member
Joined
Aug 12, 2007
Messages
3,684
Location
No longer confused....
OK I did some drilling and more testing today. Interesting results,not all good either.

attachment.php


attachment.php


On the outside you can add thin CA like you said to get a good cut. However, on the inside that's very tricky unless you are doing a inverse drill vertical then you will run into an obscene number of problems.

Since the inside will be glued and these are not stabilized we will have to adjust our bonding agent to compensate.

I drilled to 7/16" which went fine with no problems. I decided to test it with a 12mmx0.8 triple lead tap and I met with failure. I was using the tailstock for alignment and by simple hand twisting, with very little effort, the blank went SNAP. Which means the blanks are very brittle and likely your mix/ratio is off on the resin. I was not even to the pod and mostly working in the hair region.

attachment.php


This took very little effort. So conclusion here, until you can get the mix way less brittle I would say don't try to tap/die it.


After that I trimmed it up good on the chuck and re-drilled for a 3/8" tube
attachment.php


attachment.php


Clean and square yes? :)

I took the section left over, did an ever so slight lip chuck and cleaned it up good. The missing seed pod I took *one* drop of my thick CA and fixed that right up but good.

attachment.php


See it?

The section is currently resting before I do anything else to it. Since we had a small section left over ....

attachment.php


attachment.php


attachment.php


One other thing I did find, I always see these regardless of who made the blank. It is a fact of life and for someone to say they can produce a blank without one/some of these is a flat lie :) Any good turner worth their salt can make these disappear.
attachment.php
 

Attachments

  • IMG_9218.jpg
    IMG_9218.jpg
    184.4 KB · Views: 581
  • IMG_9217.jpg
    IMG_9217.jpg
    158.2 KB · Views: 633
  • IMG_9233.jpg
    IMG_9233.jpg
    172.9 KB · Views: 771
  • IMG_9234.jpg
    IMG_9234.jpg
    183.9 KB · Views: 619
  • IMG_9228.jpg
    IMG_9228.jpg
    210.8 KB · Views: 1,182
  • IMG_9238.jpg
    IMG_9238.jpg
    247.2 KB · Views: 914
  • IMG_9242.jpg
    IMG_9242.jpg
    212.9 KB · Views: 607
  • IMG_9253.jpg
    IMG_9253.jpg
    150.7 KB · Views: 556
  • IMG_9257.jpg
    IMG_9257.jpg
    189.9 KB · Views: 596
  • IMG_9248.jpg
    IMG_9248.jpg
    178.1 KB · Views: 715
Last edited:

robutacion

Member
Joined
Aug 6, 2009
Messages
6,514
Location
Australia - SA Adelaide Hills
Ed,

Allow me to make some observations on the testes you performed and point certain things that I see as the problem.

Lets start by saying that, we are dealing with a blank that was cast with the Banksia raw pod so, attempting to do a pen where making threads into the material are necessary, that's the wrong blanks to use in the first place, the stabilised ones may allow for that type of work but, that I haven't tried yet so, I will put a question mark to the stabilised blanks suitable, something that I soon will have the answer.

Then we have the fact that, you seem to have forgotten that I'm using Polyester resin, the "mixing" here is non existent, compared with the Alumilite, the clear resin gets mixed with 1% or 2% depending if is Summer or Winter, all castings regardless of what is in it, get done the same way so, that brittleness you are referring to is not from excess hardener, those are factory recommendations and I didn't noticed any difference in hardness when I was processing them...!

I wasn't expecting you to attempt to cut threads in these blanks and looking at your pics, I can see why you snapped that barrel, I can see a few things that I would have done differently, firstly I would try to cut the inner threads while the blanks was still in the square form and with all its "meat" to support it. Secondly I would never attempt to drill at such large diameters with wrapping the blank with some runs of a non elastic tape, masking take is OK.

Drilling such large diameter with the blank already rounded to a small diameter and have absolutely no support for 3/4 of its length, is asking for troubles, the chuck jaws have to be a lot longer to support the blanks in these situations. For the tap size you used, I would have drilled 7mm, them 10mm, and soak the hole inside with the 5 cup CA, using the method I shown on my tutorial about these same blanks.

When dry/harden I would clean the hole with the closest/correct drill bit suggested for the tap size, and only then, I would attempt to cut the threads.
Is just no way that, these type of blanks could be handled that way and not crack from the tap twisting/cutting forces. This can also mean that, while you think the resin is fully cured, it may not be yet...!

Yes, I can see where you fixed the missing seed, these blanks allow more repairs than most people would imagine...!:)

Now, if is one thing in these last pics you added to this thread that are one of the best exemplifications of the thickness created by the consecutive layers of CA on a typical CA finish, I've seen , is the 5th pic from the top, of the close up shot of the squaring of the blank's end.

Many people ask how much thickness a CA finish can add to a pen barrel, how much thickness of material protection the CA provides or even, people asking when their barrel are always too "rich" when they finish their pens with the CA finish, well, that pic gives the answer. I don't know how many coats and viscosity used here but I would thing about 8 medium coats, right...???

As for air bubbles, I'm surprised to see some in there, I normally don't get them as the 100 PSI pressure should have taken care of all them so, I wonder if some exist closer to the blank outer surface only, or some can be found closest to the centre as I haven't seen any in the blanks I used to make pens with. Possible...??? that is always possible, constant...? definitely not...!:)

You may need to purchase some of the stabilised ones to test the differences...!

Cheers
George
 
Last edited:

edstreet

Member
Joined
Aug 12, 2007
Messages
3,684
Location
No longer confused....
I was actually expecting some type of problem with the threading and I wanted to see how it would react, it was the test blank and we were doing drilling to show what happens.

The mixing thing baffles me you said 1% or 2%, are you SURE that is not drops and not % ?? PR I am told is mixed with the catalyst and it's something like that many drops per ounce. If you are mixing it by percentage and not drops then that would account for the difference. Am very curious now, which PR are you using?

I do plan on getting some of the stabilized ones and trying them eventually. Right now I do have one tube that will be going on a brass tube soonish :)

Ed,

Allow me to make some observations on the testes you performed and point certain things that I see as the problem.

Lets start by saying that, we are dealing with a blank that was cast with the Banksia raw pod so, attempting to do a pen where making threads into the material are necessary, that's the wrong blanks to use in the first place, the stabilised ones may allow for that type of work but, that I haven't tried yet so, I will put a question mark to the stabilised blanks suitable, something that I soon will have the answer.

Then we have the fact that, you seem to have forgotten that I'm using Polyester resin, the "mixing" here is non existent, compared with the Alumilite, the clear resin gets mixed with 1% or 2% depending if is Summer or Winter, all castings regardless of what is in it, get done the same way so, that brittleness you are referring to is not from excess hardener, those are factory recommendations and I didn't noticed any difference in hardness when I was processing them...!

I wasn't expecting you to attempt to cut threads in these blanks and looking at your pics, I can see why you snapped that barrel, I can see a few things that I would have done differently, firstly I would try to cut the inner threads while the blanks was still in the square form and with all its "meat" to support it. Secondly I would never attempt to drill at such large diameters with wrapping the blank with some runs of a non elastic tape, masking take is OK.

Drilling such large diameter with the blank already rounded to a small diameter and have absolutely no support for 3/4 of its length, is asking for troubles, the chuck jaws have to be a lot longer to support the blanks in these situations. For the tap size you used, I would have drilled 7mm, them 10mm, and soak the hole inside with the 5 cup CA, using the method I shown on my tutorial about these same blanks.

When dry/harden I would clean the hole with the closest/correct drill bit suggested for the tap size, and only then, I would attempt to cut the threads.
Is just no way that, these type of blanks could be handled that way and not crack from the tap twisting/cutting forces. This can also mean that, while you think the resin is fully cured, it may not be yet...!

Yes, I can see where you fixed the missing seed, these blanks allow more repairs than most people would imagine...!:)

Now, if is one thing in these last pics you added to this thread that are one of the best exemplifications of the thickness created by the consecutive layers of CA on a typical CA finish, I've seen , is the 5th pic from the top, of the close up shot of the squaring of the blank's end.

Many people ask how much thickness a CA finish can add to a pen barrel, how much thickness of material protection the CA provides or even, people asking when their barrel are always too "rich" when they finish their pens with the CA finish, well, that pic gives the answer. I don't know how many coats and viscosity used here but I would thing about 8 medium coats, right...???

As for air bubbles, I'm surprised to see some in there, I normally don't get them as the 100 PSI pressure should have taken care of all them so, I wonder if some exist closer to the blank outer surface only, or some can be found closest to the centre as I haven't seen any in the blanks I used to make pens with. Possible...??? that is always possible, constant...? definitely not...!:)

You may need to purchase some of the stabilised ones to test the differences...!

Cheers
George
 
Last edited:

robutacion

Member
Joined
Aug 6, 2009
Messages
6,514
Location
Australia - SA Adelaide Hills
I don't understand, why would I call you a cheater and why grey...??

I was going to do a couple of tests for you but, I changed plans after last night when I was sorting some stuff...!

Continued here

Anyway, I did no tests but I took some pics of the resin container and some other that I will explain next.

The hardener ratio is seen on one of the pics, it works on resin weight times number of hardener drops. For the containers I decided to use (glass jars) I weigh the smaller jar (normal jam jar) and then fill it up with resin, leaving enough room to stirring, and check the weight.

Looked at the mix ratio sticker and worked out how many drops I would need for the resin weight, got a 2.5ml pipet (show in the pic), filled it up with the hardener/Catalyst and then started to count the number of drops for each 0.5ml, continued counting to make sure the number of drops was identical as I was coming down 0.5ml at the time.

I was happy with mu count per 0.5ml so, worked out how many ml I needed for that jar of resin, the calculation sown that for the 2%, I needed 6ml so, 2 pipet filled up to the 2ml mark and I was done for that jar size.

I done the same on the bigger jars (about 1lt or so), they have the capacity of 2 of the small jars so again, the calculation were easy as is to use the correct amount of Catalyst I need to use every time. In Summer, I use only 1% so, the catalyst amount is easy worked out, simply half of what I use on the 2%, easy...!:biggrin:

The only variation is when the jars start to get full of dry resin on the inside, reducing slightly the resin capacity/volume so, when I think that is time to start with a new glass jar, I have plenty to go around...!

I hope this answers you question...!

Cheers
George
 

Attachments

  • 002.JPG
    002.JPG
    83.2 KB · Views: 156
  • 003.JPG
    003.JPG
    52.3 KB · Views: 269
  • 004.JPG
    004.JPG
    109.5 KB · Views: 144
  • 006.JPG
    006.JPG
    127.1 KB · Views: 127
  • 007.JPG
    007.JPG
    70.8 KB · Views: 138

edstreet

Member
Joined
Aug 12, 2007
Messages
3,684
Location
No longer confused....
Sorry the cheater comment was because I used a spray etching primer as the base coat on the brass tubes. I can/am going back after that and put a color coat on there, think you previously mentioned a dark brown. Grey just happens to be the color of the primer and that allows you to use any acrylic spray on the tube.
 

edstreet

Member
Joined
Aug 12, 2007
Messages
3,684
Location
No longer confused....
106761d1388667310-banksia-porn-003.jpg


thought so.

Requires the addition of 0.6 - 2.7% MEKP catalyst. Best results are achieved by using 0.75 - 1.9% MEKP.

0.6% would be 5 drops per ounce or in your case 50ml would be 12 drops. 5 drops would be over the 3 which I was told. The more catalyst you add the more brittle, fragile and harder to work the material becomes.
 

robutacion

Member
Joined
Aug 6, 2009
Messages
6,514
Location
Australia - SA Adelaide Hills
Oh..., I see now...!

Well, etch primers are the best there is so, using it as a primer will certainly give you the best base for the top coat.

And yes, if you are to buy some paint, I would suggest you look at the darkest brown you see in these pods, that would be my colour preference...!

Sometimes, you can get great results by using 5 minute epoxy and some Pearlex powder, powders are a better option to mix with epoxy than any liquid dyes or paints, epoxy will maintain its integrity with powders, no so much with liquid colours...!

With the epoxy being mixed with the dark brown (in this case) you don't need to primer on the tube, you only need to rough it out with some course sand paper and make sure the hole is big enough to allow some epoxy in between the tube and the blank, works pretty much like the reverse painting, but do the job in a single step.

You have to use enough powder to darken the epoxy sufficiently for the small thickness that will stay in between the tune and blank...!

Cheers
George
 
Last edited:

robutacion

Member
Joined
Aug 6, 2009
Messages
6,514
Location
Australia - SA Adelaide Hills
[/IMG]

thought so.

Requires the addition of 0.6 - 2.7% MEKP catalyst. Best results are achieved by using 0.75 - 1.9% MEKP.

0.6% would be 5 drops per ounce or in your case 50ml would be 12 drops. 5 drops would be over the 3 which I was told. The more catalyst you add the more brittle, fragile and harder to work the material becomes.

Yes, the 1.9% is the ideal within temps of about 15° to 20° Celsius, that is what I use within those temperatures however, in Summer time, those temps double, so I half the MEKP %, as recommended by the manufacturer.

There will be always minuscule variations in each mix, as I fill the jars to the level I know it should be, this doesn't mean that, the volume is precise to the exact gram, nor is the MEKP amount that comes out of the pipet, will be always a few drops or either side of the scale so, when I mention 2% is based on the information the manufacturer recommends as the ideal 1.9% but, 1.8% or 2% doesn't change much in the final results, that I know...!

Cheers
George
 

mtassie

Member
Joined
Feb 19, 2011
Messages
311
Location
Southington, CT
I blew the end out of mine today, i had sharp tools and i went slow, kept adding ca to it. Oh well its going to be a key chain now. Good thing i have 5 more. I really like this blank..
Mike
 

robutacion

Member
Joined
Aug 6, 2009
Messages
6,514
Location
Australia - SA Adelaide Hills
I blew the end out of mine today, i had sharp tools and i went slow, kept adding ca to it. Oh well its going to be a key chain now. Good thing i have 5 more. I really like this blank..
Mike

Hi Mike,

Bugger...! not you too...!:frown:

You know, I'm expecting a lot of complains from people that these last 2 months decided to by 10 blanks at the time, that I don't know and I'm afraid, they are not ready for these sort of blanks and that are going to have troubles when they handle these as normal solid wood or full acrylic blanks.

If I ask what skills/experience they have as penturners, "they" get offended and upset so, I stop asking and sending them here to see the tutorials and other info I have about these blanks but, I doubt that half of them even bothered, and that, I can't do anything about it.

I realised too late that, I was not doing myself any favours buy allowing such orders sizes and in quick succession, not knowing where 2/3 of them went (turners skill), reason why I stop making them and remove the listing from my eBay store.

Sure, I would like to know that after years of trying to promote and demonstrated how different and special pens made with these blanks can be/look, and the fact that people all over the world were having the chance to have a go and see what my front yard Banksia Hairy pods trees produce however, I never intended to see these blanks been blowing apart/destroyed, regardless of the reasons, is my work after all, and I'm proud of it...!

One of the very first "things"/advice that I said/gave was that, even with the sharpest of tools, the risk of having a catch is very real and that would mean the blanks destruction in 70% of cases, the very reason what I "introduced" what I called the "Flap disc system" or anything that works based on the same principle, as the most effective way to go from square to final size/shape, just shy of the final hand sanding process/step.

I wish that I had a better recommendation for the drilling than the one I shown on my Tutorial, (tapping the blank and CA soaking inside the hole), but apart from that, I don't have yet, a better suggestion.

Now, I made some pens myself from these same blanks, all from the raw pods cast, I'm yet to make a pen with the stabilised ones as such but, I have turned a few samples as tests so, I have and understanding of how fragile they can be. There will be cases where, a blank was destroyed and nothing anyone could have done to avoid it, one of the most common is a bad catch (everyone get those) and or, a large drill bit grab the inside of the blank and twist/snap it badly. In both cases, the risk could have been minimised by following some principles but, will be always the accidental OOPS that is just that, an accident...!

I always like to see the pics of the damaged/destroyed blanks and see better what happened, sometimes they can be fixed, other times not so much. Being 100% successful is not as easy as one may think, there will be always some lost blanks that in my view are the price to learn and to improve ones skills. Giving up because is difficult, is never the solution and while the bank replacement cost is now a little higher than before, is not the end of the world and not something that will cost you hundreds of dollars to replace so, I still believe that is well worth it when that blanks lets you get to the finished product and allow you to "show-case" a very unique pen, indeed...!

So, you may have lost half of the blank, I'm sure you learn something, huh...???:biggrin:

Good luck...!

Cheers
George
 
Signed-In Members Don't See This Ad

mtassie

Member
Joined
Feb 19, 2011
Messages
311
Location
Southington, CT
George
I'm not complaining or giving up, I love these Blanks! I already have a couple more glued up and ready to go for tomorrow night, were in the missile of a snow storm so I'll be shoveling out tomorrow. I gave a blank to my brother and he turned it very slow with no blow outs.
Keep up the good work, I'll be ordering more.
Thanks George

Mike
 
Top Bottom