Using a drill press to square off turned blank ends

Signed-In Members Don't See This Ad

MyronW

Member
Joined
Jan 27, 2011
Messages
39
Location
Valley Center CA
I love cool jigs and fixtures, but my shop is full and my bank account isn't and I needed a dead-on accurate way to square the ends of blanks after turning and finishing. This is what works for me.

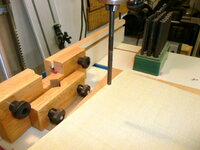
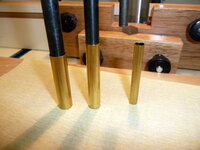
The basic setup is simply the drill press, a set of transfer punches, a small piece of smooth plywood (mine is a 12" square of baltic birch), and assorted sandpaper. I don't glue the sandpaper down, because I shift it around a lot as I work. Clean sandpaper cuts much faster.

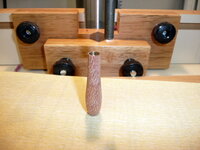
Find the right size punch for the tube you are using, and chuck it with the point up. This will keep the plywood from getting wrecked. Adjust the drill press so that there is enough gap to get the workpieces in and out, and for the punch to make firm contact with the sandpaper.

Please note that this is strictly a non-powered operation. The drill press is just a guide.

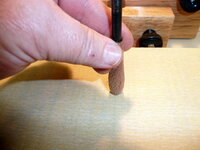
Place the workpiece on the punch, lower it down to the sandpaper, and twirl it back and forth a couple of times. That's usually all it takes.

Norton 3X 220 cuts fast and clean, but delicate woods require finer grits. If you're trying to do unturned blanks, get some 100 grit and pack a lunch. It will take a while!
 

Attachments

  • P1040441.JPG
    P1040441.JPG
    147.4 KB · Views: 840
  • P1040444.JPG
    P1040444.JPG
    142.3 KB · Views: 813
  • P1040442.JPG
    P1040442.JPG
    153.2 KB · Views: 802
  • P1040443.JPG
    P1040443.JPG
    157.6 KB · Views: 770
Signed-In Members Don't See This Ad

MyronW

Member
Joined
Jan 27, 2011
Messages
39
Location
Valley Center CA
Hmm. I don't think so. I have never tried, but since the bit makes a hole that is bigger than the OD of the tube, it stands to reason that it wouldn't fit in the ID of the tube. Even if it did, the point of the drill bit will quickly wreck the surface of the plywood and you will no longer have a smooth surface to back the sandpaper. You could avoid this by not bringing the bit all the way down, but I have found that holding the sandpaper with the punch makes it work much better than allowing it to squirm all over the place.

Like I said, this is what works for me. I would just as soon put sharp things out of reach of my fingers. A slim transmission got the top of my thumb in the last pic, and I don't want them conspiring with the drill bits to get me in some other way. ;)
 
Last edited:

DSallee

Member
Joined
Mar 29, 2008
Messages
358
Location
Holden MO. USA
I thought a we a were supposed to square them before turning and finishing.
Do a good turn daily!
Don

Thats what i've been doing too!! With a barrel trimming kit... otherwise, if your blank is not square on the ends when you mount it to turn it, it won't turn true???

Dave
 

Rick P

Member
Joined
Apr 30, 2011
Messages
1,686
Location
Palmer Alaska
Thats correct Dave in fact you can bend the mandrel and end up with a pen thats not round. I rough turn the blank round then use a chuck to hold the blank while I true the ends with a skew. Most effective and accurate way I have found to do it so far.
 

MyronW

Member
Joined
Jan 27, 2011
Messages
39
Location
Valley Center CA
Maybe the thread title should be different

Of course you're supposed to have everything square first, and if you try to use this method to do it, you will think I'm a blithering idiot and come take away all of my toys! :biggrin:

When I was taking the pictures for the first post, I took a rough blank that I had already squared with a pen mill and used this method to see how long it would take to get rid of the proud corners. First I used a clean sheet of Norton 3X 320. I gave that up pretty quick and went to 220. I wised up there pretty fast, too, and switched to 150. And rubbed, twirled, rubbed, twirled, and finally said the heck with this nonsense. There is is just too much hard end grain surface area to deal with to waste time like this.

A turned blank, however, is just a thin ring, and trues up very fast. I don't possess the skew wizardry yet to risk a finished blank, so fast manual methods suit me just fine.

I really should have titled this thread "This Is How I Use a Drill Press to Gently Square Up Turned and Finished Blanks Just Before I Assemble Them So That They Will Lay Up Dead Flat Against My Components With No Daylight Showing". :)

In all sincerity, thanks for the feedback. Reading back through my original post, I can see that I did not clearly define the problem, and I understand how my solution caused head-scratching. So, just for clarity, I was unhappy with the way my pen barrels were fitting against the components. There were slight gaps and irregularities, and I just couldn't bring myself to buy a jig when I knew there had to be a cheap or free way to do the job. It's really just a vertical, non-powered adaptation of the various transfer punch and disk sander methods for rough blanks, with a light touch.
 

randyrls

Member
Joined
Feb 2, 2006
Messages
4,829
Location
Harrisburg, PA 17112
Myron; That is a great idea! I use a disk sander and jig, but the drill press concept is a good one.

I make sleeves for all the tubes larger than 7mm. The sleeve is just a 7mm tube cut from 12" lengths.
 

sbell111

Member
Joined
Jan 16, 2008
Messages
3,465
Location
Franklin, TN
I'm not understanding the need for this. If I square up the blank prior to turning, why would I need to do it again after?
 

MyronW

Member
Joined
Jan 27, 2011
Messages
39
Location
Valley Center CA
The only reason to do this is to give the end of the finished barrel a smooth surface that is perpendicular to the longitudinal axis of the tube, ensuring a coplanar interface with the purchased components of the pen in order to eliminate visible gaps at the edges of the interfaces caused by angular displacements and rough mill marks.

If the finished blank is already square and smooth to your satisfaction, you do not need to do anything more.
 

SCR0LL3R

Member
Joined
May 19, 2011
Messages
390
Location
NS, Canada
I need to square my blanks (and sand off the CA that overhangs) after putting CA and use a the barrel trimmer upside down with sandpaper stuck to it as some others here do.

I use a trimmer shaft that is a few sizes under the tubing size I am doing. I keep it perpendicular by pushing the tube up against the shaft on one side which is all that is needed. This allows the sandpaper to last significantly longer since you are using a much bigger surface of the paper than if you use the exact size shaft for your tubing. Works great for me. Some sandpapers last much longer than others doing this. I find a medium speed works best and usually just use a cheap 150 grit paper which seems to hold up rather well.

I hope my explanation of all this was clear enough to follow.
 

DSallee

Member
Joined
Mar 29, 2008
Messages
358
Location
Holden MO. USA
Thanks for clearing that up MyronW... Yes, I was scratching my head like do wha?? LOL

This "your process" does seem like an easy inexpensive way to do the final trueing of the blank... Thanks for sharing the idea!

Dave
 

sbell111

Member
Joined
Jan 16, 2008
Messages
3,465
Location
Franklin, TN
I still don't understand. If the blank has been prior to turning through the use of a pen mill, it would still be true after turning.
 

MyronW

Member
Joined
Jan 27, 2011
Messages
39
Location
Valley Center CA
I'm not understanding the need for this. If I square up the blank prior to turning, why would I need to do it again after?

The surface left by a pen mill is true, but it is not necessarily smooth. During the milling operation, the operator (yours truly) is concerned with a lot of things, and surface finish is last on the list. Getting the edges to cut but not chip out the blank, not wrecking the inside of the tube with the tip of the pilot, not going too far and hitting the tube, not having the tube come loose, you know the drill. Or mill...

If you look carefully at the innermost section of a milled but unturned blank, where the barrel will ultimately be formed, you will see what I mean. Chances are pretty good that there is some roughness in the form of chatter marks, tiny chips around the tube, and slight height differences between the tube and the blank itself. All of these defects will telegraph into daylight upon assembly if they hit the edge. Truing the blank with a disk or belt sander is probably a better technique, but a different set of problems will be substituted.

The big gaps I was unhappy with were about 0.002" thick, and went about 120 degrees (a third) of the way around at the tip. Barely visible, but I am a quality engineer in the medical device industry and really anal about these things, and they had to go. (Believe me, you want me to be this way!) I think that the gap was caused by freehand sanding the ends. I am really pretty good at holding an angle, but the friction of sanding is more than enough to cause the wrist to rotate. If somebody wants to work out the trig, how much rotation off of vertical is necessary to cause a .002" gap to form?

The other issue is just the appearance of the joints. Any slight roughness shows up against the smooth metal of the tip and other parts. Attention to detail was pounded into me in the USMC.

Now, none of this may bother you in the slightest. Your customers will probably never detect a gap that slim. But what if they happen to hold their new $150 pen up to the window to admire it again, and a sliver of daylight that they had not seen before glints through at the tip or centerband? I have a bloodwood/gold slimline on my desk at work that has an exaggerated gap that I have to hold just right to see, but when it pops, look out. If I had bought it, I would be on the phone.

I never expected to get some of the comments that I did, particularly about it being too much extra work and all. That's quite alright with me. It just shows how diverse a group we are, and how the group is not going to put up with any tomfoolery.
Let me assure you that I am not one to make extra work for myself! :biggrin: Here are the reasons that I like to do this:
  • I don't have to hunt down my pen mill and little allen wrench and reverse the cutter.
  • I don't have to change the pen mill back when I'm done. (where's that dadgum allen wrench at this time?)
  • I don't have to buy or make little stickyback sandpaper rings.
  • I don't poke sharp things into my hand while I'm truing the ends.
  • I can change sandpaper grits any time I want with no hassle and no glue on my fingers to get on the pens along with grains of abrasive.
  • I always have fresh abrasive handy.
  • My ends are always dead flat.
  • One transfer punch set for 15 bucks covers every pen I'll ever make.
  • No risk of messing up my finished blank with a skew or disk sander. Like catching it or tearing the wood off. Or sanding my finger again.
  • It takes less than fifteen seconds to do both ends.
  • It is quiet. Only a little skritch skritch sound.
  • I can tell my customer that I hand-lapped the pen to ensure a perfect fit. They really like this one. It adds to the aura and prestige, and I can say it with a straight face.

Anyhow, we all have our ways of doing things. If another member has a way that works better and will save me some money, great! If you would like to share it, I would love to learn it.
 

sbell111

Member
Joined
Jan 16, 2008
Messages
3,465
Location
Franklin, TN
The Corps also taught me to pay attention to the details, but the bigger lesson was to keep an eye on them, but not get lost in them.
 

Gloria

Member
Joined
Dec 30, 2011
Messages
3
Location
Australia
Oh MyronW ..... I know EXACTLY where you are coming from and you might have just solved one of my biggest problems when turning pens. Thank you!!!!!!

I kept asking different pen turners at my club how to solve this problem and they couldn't see I had a problem! so I asked how they avoided those tiny gaps and teeny misfits - they didn't have them with their pens! and yes I use the pen mill to square off the ends before turning. I must say though I am using a different lathe now and also a mandrel saver which keeps the pens turning much truer or maybe I am just gradually getting better, but the ends are still my biggest problem with turning pens and I would love to master that and end up with a really professional looking pen.
Gloria
 

BSea

Member
Joined
Dec 28, 2009
Messages
4,628
Location
Little Rock, Arkansas
Great Tip MyronW. It's simple, cheap, and fast. I don't know why I didn't see this thread sooner. I do almost the same thing. But I use the pen mill as my guide (it's usually still in the drill press anyway). But in some cases where the shaft doesn't fit exactly, your method would work better.

And RickP, your way of initially truing a blank is a great idea too. I use a collet chuck for drilling, so it would be a simple step to put a blank back in the chuck after the tube is in to true up the blank with my skew. I think I'll use this method from now on. And now I can quit sharpening my pen mills.:good:
 

opfoto

Member
Joined
Dec 28, 2004
Messages
1,047
Location
Albany, NY, USA
Am I the only one who thought there might be a "new, need to have tool" mixed in this somewhere????

But this happens to me too, willing to give it a try!!!
 

raar25

Member
Joined
Mar 29, 2011
Messages
770
Location
Glastonbury CT
Seems like a nice simple solution to me, as long as the drill press table is square in both axis (X and Y) to the spindle. I have found that if I hold the pen blank secure while trimming the ends the surface is worse because the pen mill tends to chatter, instead of my hand compensating for the vibration. Somtime I just need to give the surface a very light touch with the mill to remove the high spots and rough surface gives me a nice finish. I also use a 5/8 mill for almost everything which chatters alot less than the 3/4.
 
Top Bottom