Image quality for decals

Signed-In Members Don't See This Ad

Dale Allen

Member
Joined
Oct 27, 2012
Messages
1,384
Location
Massillon, OH
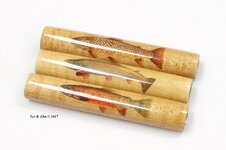
I have successfully made 2 pens recently with waterslide decals on them.
However, I was not real happy with the quality of the print.
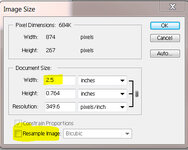
I use an older version of photoshop and I cannot figure out how to reduce an image and keep the resolution high. I always end up with jagged edges of the pixels. Like this image. Any help would be greatly appreciated.
 

Attachments

  • choppy.jpg
    choppy.jpg
    23.8 KB · Views: 281
Signed-In Members Don't See This Ad

Dale Allen

Member
Joined
Oct 27, 2012
Messages
1,384
Location
Massillon, OH
Sometime yes. An image from my camera is fine but when I take something from a webpage it is apparently of such low quality that shrinking it causes this problem.
One would think that if you squeezed the dots down the quality would be better.
 

liljohn1368

Member
Joined
Jul 19, 2015
Messages
2,286
Location
Brooksville, MS
I don't use photo shop. But with CorelDraw X6 you can re-sample a pic to a higher dpi that helps this. Another thing when you search for the pic you are looking for. Make sure to specify high resolution. 99% of the time when a pic is put on the net it is done so with a 72 dpi (dot per inch). A pic doesn't get good quality until at least 300 dpi. I owned a printing shop until about a year ago and ran into this all the time with customers sending me pictures to print in an email. Hope this helps.
 

Dale Allen

Member
Joined
Oct 27, 2012
Messages
1,384
Location
Massillon, OH
OK, I think I have this figured out now.:)
In case someone else can use this info.
When you resize an image in Photoshop, at least in my older version, you have to NOT do the resampling.
I turned off the resampling on this image that was over 12" wide and changed it to 2.5" wide while keeping the proportions.
When done, the jpg image has the same file size as the original but when it prints the size is at 2.5" wide.
I printed one out and looked at it with a magnifier and it looks far better than the way they were printing before.
I don't understand it all but it works for me!:biggrin:
 

Attachments

  • imaqge_size.jpg
    imaqge_size.jpg
    57.5 KB · Views: 291

Mr Vic

Member
Joined
Aug 11, 2008
Messages
1,865
Location
Falcon, CO
The resolution is also a key. The higher the better but what is the highest resolution (dpi) your printer will print. Keep it at least 300 dpi, Unlock the document size by clicking the little knot/chain on the right. you only want the height and width locked so it will maintain the aspect ratio then manually set your resolution.
 
Joined
Feb 11, 2018
Messages
17
Location
South Florida
When it comes to printing there are two basic types of drawings; raster and vector.

The most common is raster. a raster drawing is made up of tiny "boxes" or dots. When you enlarge the drawing you enlarge the boxes and you see in the first post of this thread.

A vector drawing is made up of mathematical formulas to define a line and where it goes. A vector drawing when blown up simply increases the numbers and there is no jagged edges.

You need a program that handles vector images to manipulate them. Programs like Photoshop, when working with raster, will often break up the larger boxes into smaller ones by resampling the image as we see in the instructions above.

Hope this clears things up a little as how and why.
 

rd_ab_penman

Member
Joined
Jun 1, 2007
Messages
1,646
Location
Red Deer, Alberta, Canada.
I use MS Excel or MS Word and Insert photo/image. Then open Picture Tools to resize all my photos/images for decals.
This allows me to keep the aspect ratio and original resolution.

Les
 

Attachments

  • 4 - Group.jpg
    4 - Group.jpg
    161.7 KB · Views: 258
Top Bottom