DIY Vacuum chamber

Signed-In Members Don't See This Ad

More4dan

Member
Joined
Mar 17, 2016
Messages
2,102
Location
Katy, TX
I made mine from 4" clear PVC pipe purchased off EBay. You can use a 4" pvc cap for the bottom and a piece of thick plexiglass with a rubber gasket for the lid.

I used parts from www.turntex.com for my top and base.

f4ceb55370c4ecbc86547186ca969ac6.jpg


Sent from my iPhone using Penturners.org mobile app
 

Talltim

Member
Joined
Mar 12, 2017
Messages
650
Location
Tennessee
By the time you add up the parts does it come out much cheaper than buying one? I looked up the clear pvc and they don't give that away.

I would like to pics of other diy setups.
 
Last edited:

chartle

Member
Joined
Mar 13, 2015
Messages
1,287
Location
Pgh, PA
I've used half gallon and quart wide mouth mason jars. I used a 4" PVC cap that I slightly modified to fit a little better. For a seal I made one from silicone sealant but I have a sheet of rubber around here somewhere.
 

lorbay

Member
Joined
Jul 2, 2009
Messages
3,384
Location
BC. Canada
By the time you add up the parts does it come out much cheaper than buying one? I looked up the clear pvc and they don't give that away.

I would like to pics of other diy setups.

Your right about the clear PVC I just bought a 10' length of 8"as they will not cut it.
It was $900.00. But I will get 10 . 8" x 12" chambers out of it.
Lin
 

More4dan

Member
Joined
Mar 17, 2016
Messages
2,102
Location
Katy, TX
I was able to purchase a 2' section on EBay. You could use normal PVC for less $$. I started with a qt mason jar but was fearful it would implode at some point. A 2' length of 4" clear pvc is $36 on eBay. There is also a listing for 1' x 4" clear acrylic tubing that fits 4" sch 40 pvc fittings for $28.


Sent from my iPhone using Penturners.org mobile app
 

Talltim

Member
Joined
Mar 12, 2017
Messages
650
Location
Tennessee
More4dan,

I have a couple of questions if you don't mind. I like the looks of your set up.

Four inches sounds small. How many blanks can you or do your typically run in a batch? I assume you run them vertically? Can you double stack them?

What type of pump do you use?

Others can chime in also.
 
Last edited:

romoshka

Member
Joined
Jul 22, 2017
Messages
8
Location
Clemson, SC
I'll chime in. It's been my experience that most of the time the savings offset in a DIY is minimal and if you figure the hassle and headaches of going here and there for the bits to build it you're probably better off just plunking down the pile of dead presidents for the tested and built item. I built my chamber from 4" clear PVC bought off eBay, cobbled the top and bottoms together, had to make a custom o-ring, sand the top of the tube smooth and square (a tedious task indeed) and got it done with probably only 6-8 hours of time and an unknown $$ amount but I'm pretty sure my $$ savings were minimal, if any if you factor in gas used to drive here, there, and back to acquire bits. In hindsight I wish I'd just sat at my computer, ordered Curtis' chamber, paypal, poured a glass of wine and anxiously awaited the UPS driver. Now I find that 4" chamber inadequate for some items so just ordered, off Amazon, the 3 Gallon GlassVac Aluminum Chamber for $117+$9.95 shipping. I looked at it and said to myself, "I could build that." but then reminded myself of my recent tube chamber build and hit the order button. For some the build is half the fun and in some cases it's true for me...sometimes. Someone asked about pumps. You get what you pay for. I initially ordered a cheap pump off amazon. It failed on first use - all the oil left the pump and went into the chamber. My HVAC man says internal valve failed. Complete failure at getting any help from Amazon and no response from manufacturer. Then bought the economy pump recommended by Curtis: Robinair 15310 at $115 on Amazon. That's my $0.02 YMMV.
 

Bill Bulloch

Member
Joined
Apr 21, 2009
Messages
22
Location
Griffin GA
You don't need to get to complicated with these. I took an old Dutch Hoven form the Kitchen, it's about 6" deep and 11" diameter. I took a piece of Plexiglas and threaded to accommodate a 1/4" Air Barb. Get a thick piece of Plexiglas though, I first used a 3/8" thick piece that imploded after a few weeks use. Moved up to a 3/4" piece and it works fine. The Pot was Free to me, the Plexiglas cost about $25 on Amazon and the Air Barb cost $1.90 at Ace. You'll need some sort of seal for the lid. I use a piece of form wrapping that a TV I bought was wrapped in (it's the smooth kind not the bubble wrap). I use this on my vacuum chucks also.
 

More4dan

Member
Joined
Mar 17, 2016
Messages
2,102
Location
Katy, TX
I used mine primarily for knife handle blanks. I only do small batches, so 4" works for me. I use a HF vac pump on sale for $99. I changed out the oil to Castrol HVAC oil I got from my local auto parts store.

If I had volume to do I would repurpose a pressure cooker or paint pot and make a clear lid as others suggested. I would then set mason jars in it to stabilize my blanks. You could do multiple dyes and woods at the same time. Clean up would be easier. And it would take less resin to cover the wood.
I also keep my resin in mason jars in the fridge to prolong its life.

I also use needle valves on my cap for bleeding. It allows me to turn on the pump with it partially open and I can control the amount of vacuum to control foaming at the beginning. I use the ones made for water supply lines to a refrigerator's ice maker. I use the same valve between the pump and tank to seal the vacuum when I turn the pump off.


Sent from my iPhone using Penturners.org mobile app
 

Sprung

Member
Joined
Jul 1, 2014
Messages
773
Location
NE WI
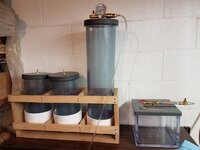
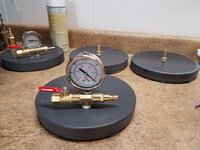
I have built my own chambers. I found it a worthwhile investment and it didn't take a ton of time either. I bought a 5' piece of 6" Schedule 40 Clear PVC and built four chambers from it, sold one of them. The bottom is a Schedule 40 cap - since it's domed you'd need to build a rack to hold the chamber(s) upright. Lid is 1" Schedule 40 PVC sheet that I cut and turned round. Didn't turn easy, but it drilled and tapped very easy for the fittings. Gasket is Buna-N rubber sheet/gasket that I cut out.

It was about 6 hours time to build all four chambers. Only three of the ones I built are pictured as I had sold one. As far as obtaining parts, I didn't have to drive here, there, and everywhere. I ordered much of what I needed online. The fittings and the caps I purchased from Menards and just had a list ready and stopped in at a time when I was already driving past.

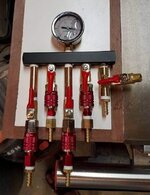
In the end and after recouping a little bit of cost by selling the fourth chamber, my cost to build the three chambers I kept for myself was maybe $30 more than I would have spent to buy a single 6" x 24" chamber already made. And it absolutely was not difficult to do. Then I spent another about $40 on fittings and parts and built a manifold that allows me to run all four of my chambers (three I built, plus an original TurnTex square chamber) off of one vacuum pump.

And, if you want a little smaller chamber, 4" Schedule 40 Clear PVC isn't spendy, especially for a piece about 2' long. A 6" chamber takes a lot of resin to fill, so keeping in mind the volume of the work, as well as the size of the material you want to stabilize, is important to consider when choosing or building a chamber. If I load up my 24" chamber with the maximum amount of material I feel comfortable loading it with, it can take 2 gallons+ of stabilizing resin to fill it.
 

Attachments

  • Chambers.jpg
    Chambers.jpg
    71.5 KB · Views: 209
  • Chamber Lids.jpg
    Chamber Lids.jpg
    233.1 KB · Views: 267
  • Manifold.jpg
    Manifold.jpg
    63.8 KB · Views: 226

Brotherdale

Member
Joined
Apr 15, 2017
Messages
306
Location
Houston, TX
About a year ago I bought one off eBay like the square one pictured by Sprung. At first I put the CJ directly in the chamber but quikely found this to be inefficient for me. Now I use tupperware containers that I set inside it. This eliminates cleaning the chamber and allows me to keep one for each color I use. I just put the lid on and put it back in my garage fridge.
 
Top Bottom