Roy_Quast
Member
I made this tutorial back in 2010 and I put it on Penturner's Paradise. That site has since shut down. A few people have asked me to put it here so... here it is. I would hope that if you read all the way through this thread that you learn 2 things. 1... how to make the fish-scale pen and 2... and probably more important is how to NEVER blow up a blank while you are drilling the hole for the barrel, no matter how much you have it segmented, or what kind of glue you use, no matter what size hole you need, all with NO step-drilling needed.
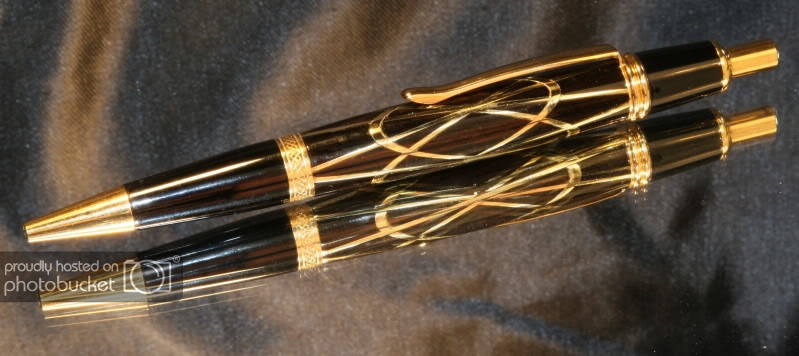
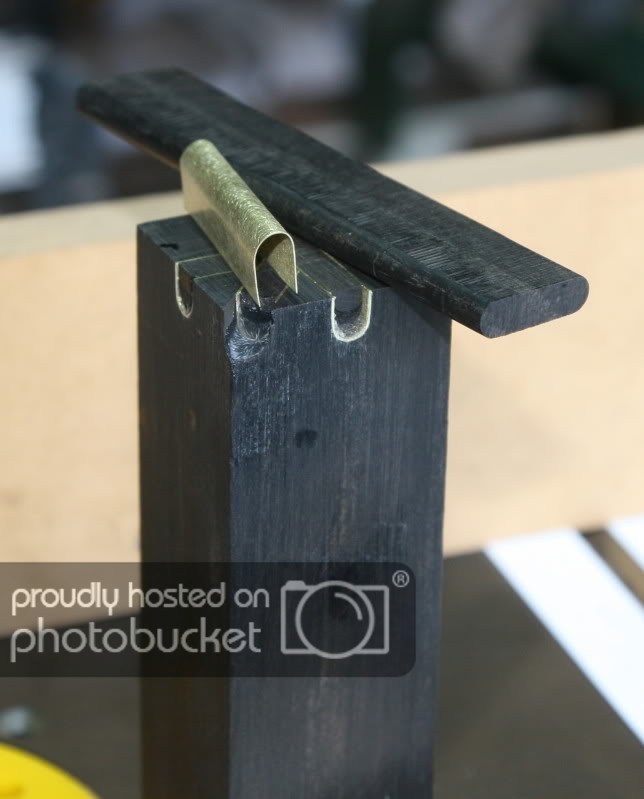
Many years ago I made a blank that took me about a year to make. It was made out of ebony and brass...very thick brass, .040 thick brass to be exact. It took about a year because I would cut a slot for one of the sheets of brass, glue it up and wait a month or two to let the ebony shrink so it would not crack later. I had 8 sheets of brass all coming together in the middle that I had to drill through. I wanted to do it right the first, one and only time. I had too much time and money invested in it. My solution was one of those Duuuhhh moments, like why hasn't anyone come up with this before? I will tell that secret later on in the tutorial. Here is a pic of the pen I was just talking about:
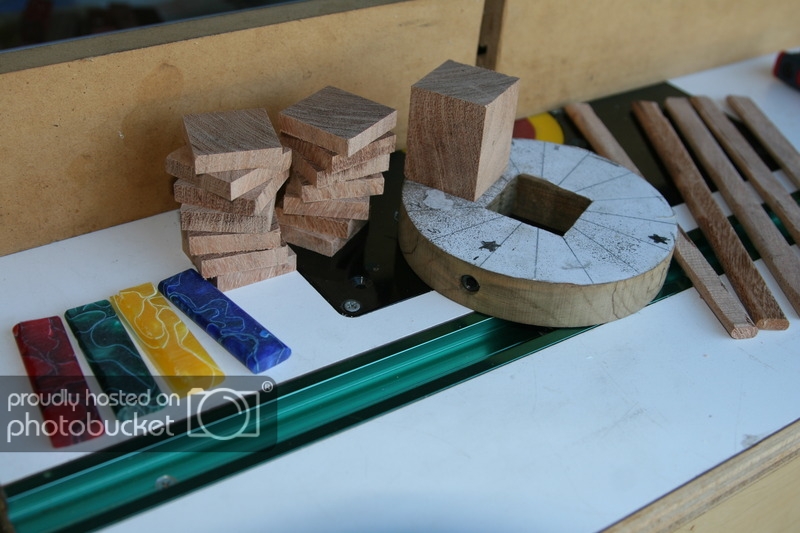
To make the fish-scale pen, you first have to make a jig. It should look like this:
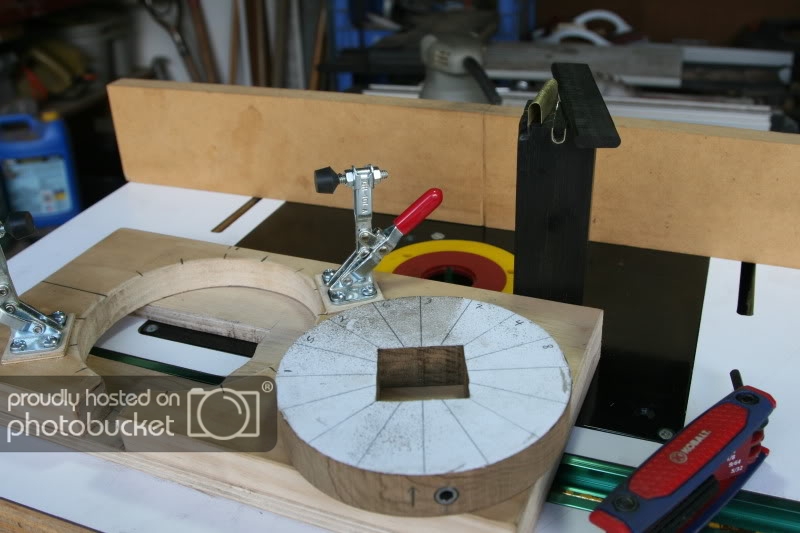
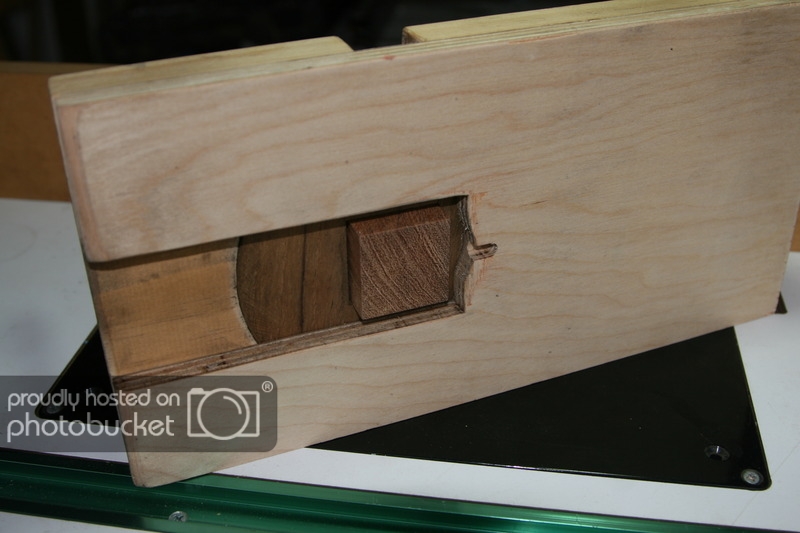
It is made for a router table. The jig is 6 1/4" wide and 12 1/4" long. The indexing circle is 4 7/8" across and is 2" from the front of the jig. The hole in the indexing circle is 1.5" square. It also has 2 set screws that go all the way to the hole to hold the blank in place each time you route a new segment. The indexing circle is held in the jig by 2 hold down clamps. The bottom board is 1/2" thick and the top is 3/4". The bottom board should have a 2" slot from the front down past where the blank is held in the indexing circle. It should look like this:
Here is how your lines should be drawn out on the indexing circle.
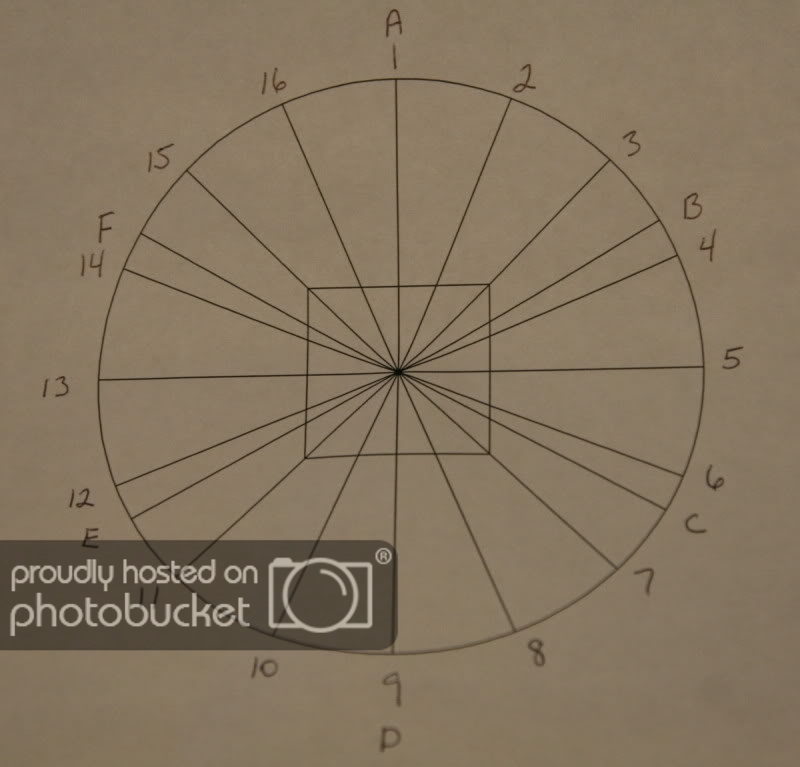
The router bit doing all the work is a 1/4 round bull nose. The blank in this tutorial uses the numbers on the indexing circle and is meant for 4 segments per level. I also put letters on it in case 3 segments wanted to be tried.
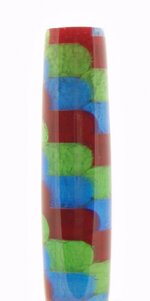
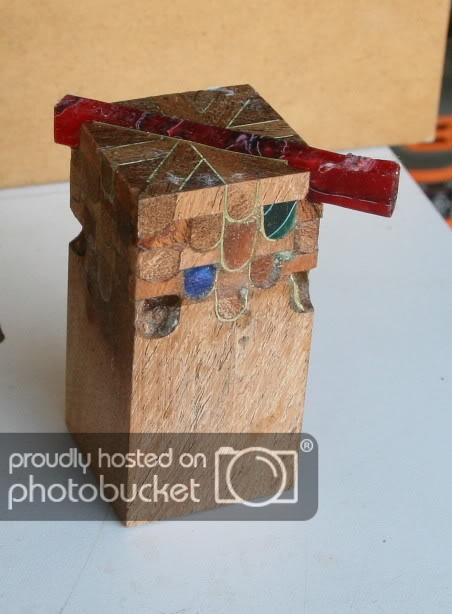
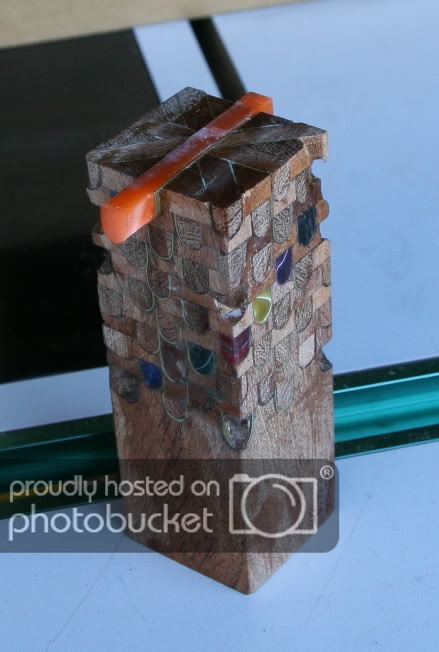
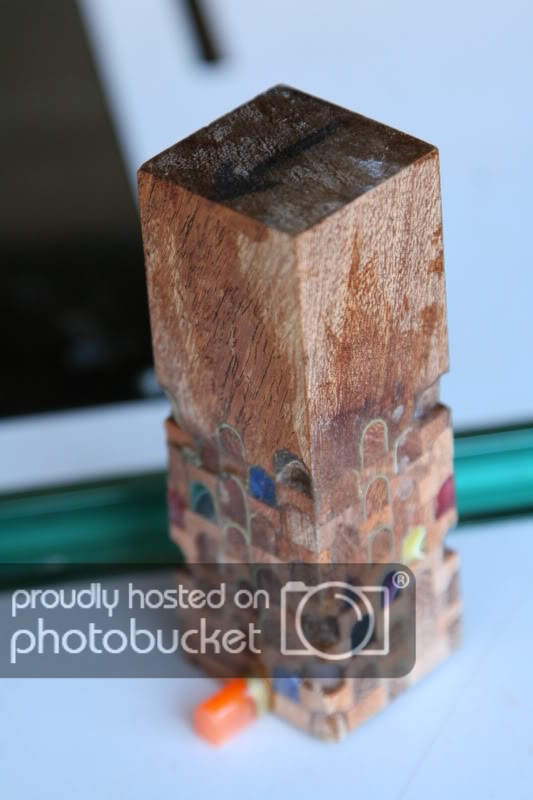
Start with a blank of wood that is 1.5" square that fits very tight into the hole of the indexing circle. Cut off squares that are 1/4 thick from the end. Cut off as many as you need for the length of the pen you are making. When you route a segment out, you refill that void with a thin piece of brass and whatever else you are making your pen out of, wood or plastic. Before you cut the brass into strips, sand it with 220 grit sandpaper to give the CA glue or epoxy something to hold onto. I use thick CA glue. Cut the brass strips about 1 inch wide and bend them around the inserts. Make sure that the brass and insert together are tight in the blank but not so tight that they might break the blank when they are gently tapped into it with a hammer. To round over the wood or plastic insert, I use a 1/8 round over router bit and sand as necessary to make a tight fit. Make sure that each insert is longer than the blank is wide. Going across the blank only needs to be longer than 1.5", from corner to corner needs to be just a little over 2". This way, the blank will remain solid all the way to the end which is needed so it will not blow up.
When you are ready to make the first cut, draw an arrow on your blank, the part of the blank you have left over after cutting the 1/4" squares off and point it to the #1 position on the indexing circle. Every time you put the blank back in the indexing circle, the arrow should always point to the #1 position. The first cut will be on level 1, so start with #1, on the indexing circle going into the router first. After you have glued a piece of brass and wood into the first routed section and let it "dry" sand the excess down so the blank stays square. The second cut will still be on level 1 but this time, route from position 3. The next cut will be from position 5, then 7. Level 1 is complete. Hand sand the next level perfectly flat by putting a piece of sandpaper down on a table saw and going in very small circles. I say hand sand because my belt sander rounds the corners up just enough to see light coming through when I hold them together. They need to be solid all the way through. After you have level 2 glued on, the next cut will start with position 2 on the indexing circle. The next cut will be from 4 then 6 then 8. Remember, each time you put the blank in the jig, the arrow should point to the #1 position. When level 2 is complete, the first cut on level 3 will be from position 3,5,7,9. Level 4 will be 4,6,8,10. Whatever level you are on, that is the position on the indexing circle you start the first cut from. Let's say you are on level 5. The arrow will point to the #1 position and your first cut on level 5 will be from position 5 then 7,9,11. Keep this going until you have the blank as long as you need it.
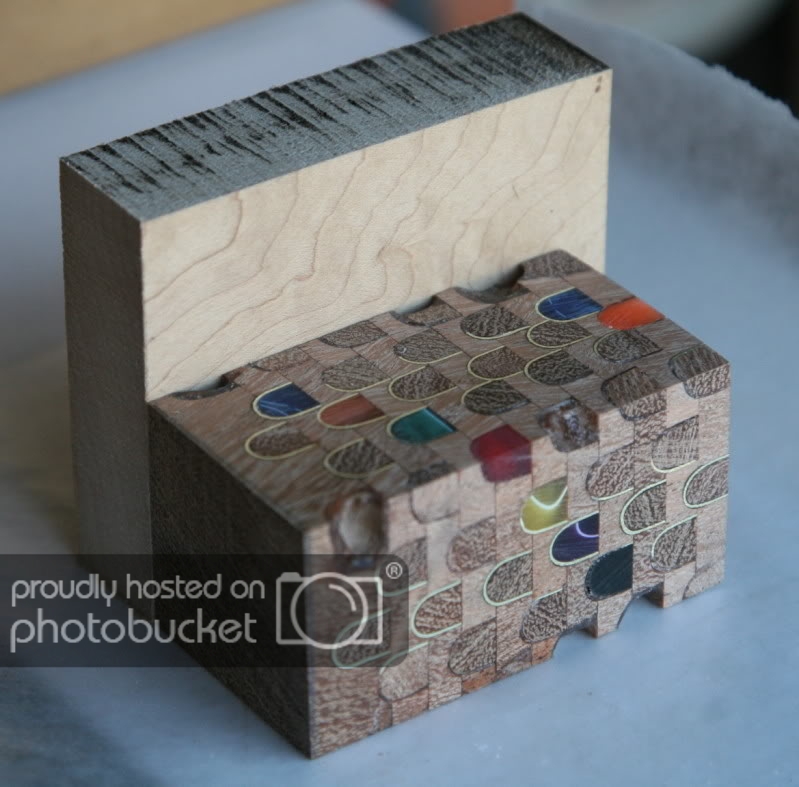
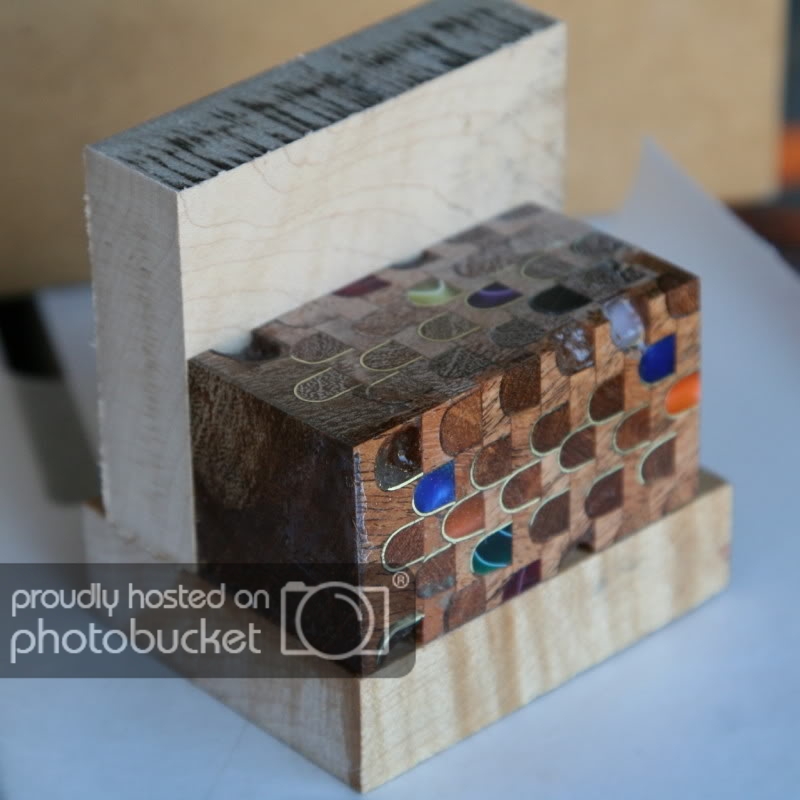
Now comes the secret I told you about earlier... ADD WOOD TO ALL FOUR SIDES. Put a piece of wax paper down on your table saw and coat one side of your blank with thick CA glue. Use plenty of glue to fill any voids that can't be sanded out.
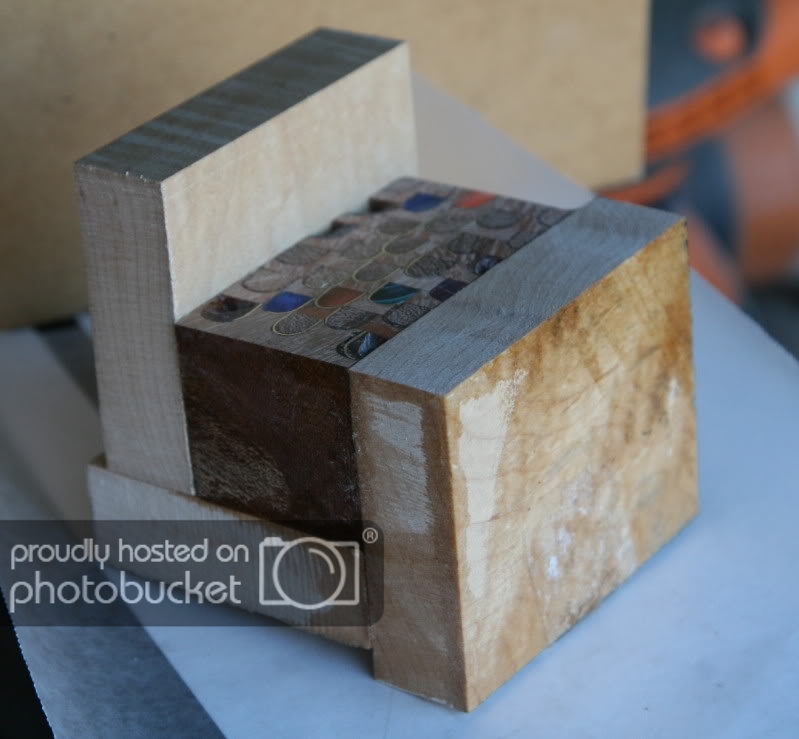
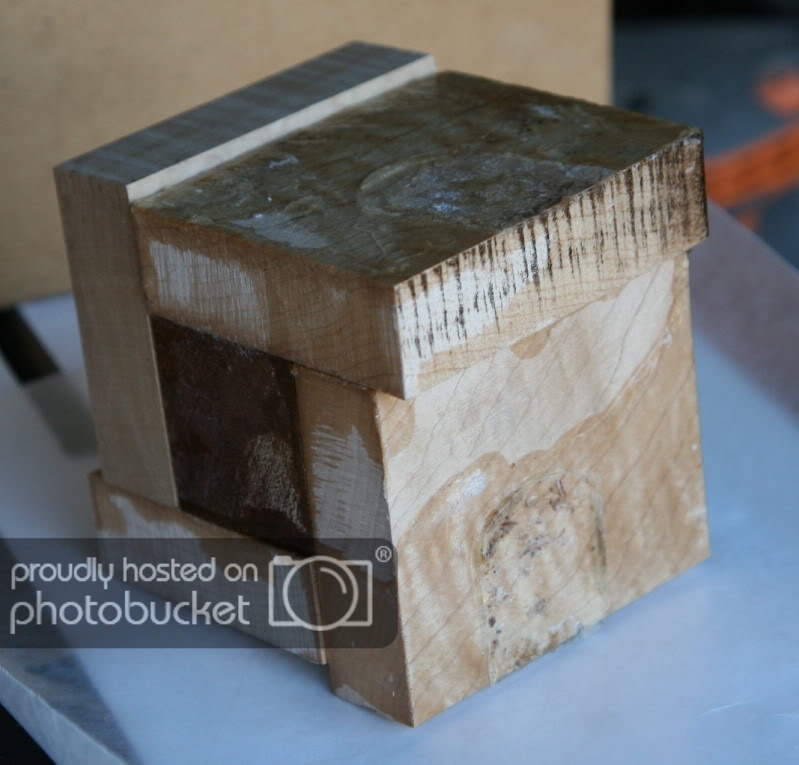
I use 1" sacrificial maple on all four sides. This is a VERY VERY strong bond. It is solid. It CAN NOT blow up...it has nowhere to go. I have been told that this is over-kill. That might be...BUT...my blanks don't blow up. After I spent a year making the first brass and ebony pen and at least 2 weeks making each of the fish-scale pens, I don't want to take any chances of a blow out. If I can go through all the segmenting of both of the fish-scale pens with one pass, I'm sure you can go through just about anything you want with no problems. I said one pass meaning that I did not have to step drill it. I think I used a 27/64th's drill bit. I had to back it out several times to clean the waste chips out and to let it cool down. For drilling... use the sharpest bits you have, it keeps the heat down.
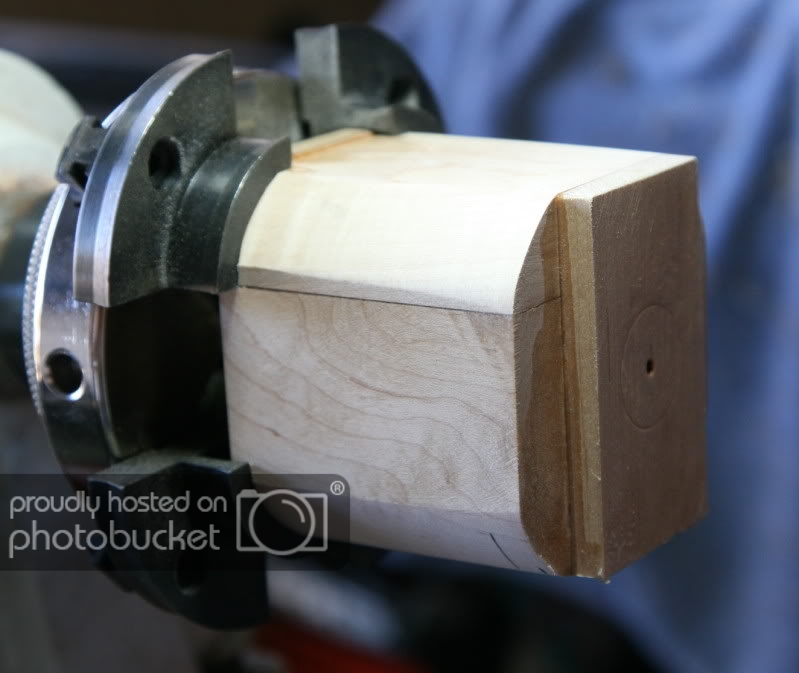
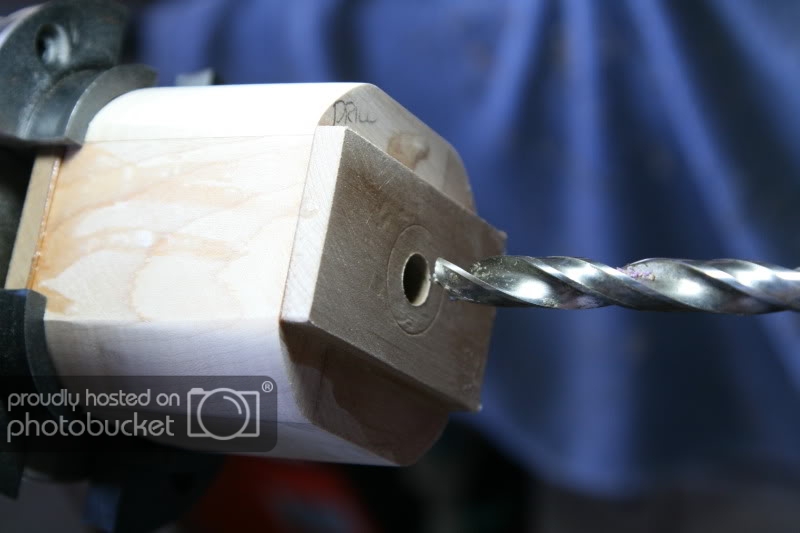
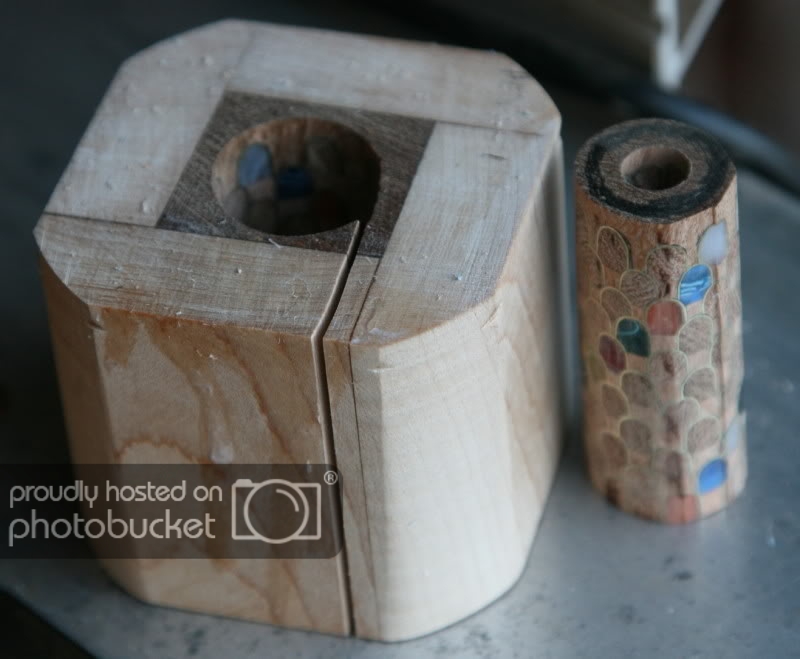
I also add sacrificial maple to the ends of the blank to prevent tear out from drilling. To get the end maple centered, put a pin in the very center of the blank. Drill a small hole in the end piece. Put glue all over the end of the blank and the end piece and then slide the end piece over the pin and down onto the blank. Do this on both ends. I used the pin holes to center the blank in my lathe so that I could knock the corners off. I drilled the blank on the lathe to keep the design straight down the middle. After you have it drilled, cut the end pieces off with you band saw. Sand the ends flat.
From this point DO NOT.....DO NOT use a gouge or a skew. If you do, all your hard work will be for nothing. No matter how sharp you think you have your gouge or skew, the second it hits any kind of metal, the sharpness is history. From this point, only use sandpaper. Start with 80 grit and go all the way through 600 grit. Then use MM, WET sanding all the way through 12K. Wet sanding will clean out all the dust and polish the brass or any other metal you are using. YES, it will take little longer, but in the end, you will have a beautiful pen and not need to start all over again. I have read on here where some have said to put popsicle sticks around your blank to keep it from blowing up. Popsicle sticks can be bent and broken with your own two hands. Can anyone bend or break one inch thick maple??? Some have also said to wrap the blank with gauze and soak it in thin CA glue. I'm sorry, but to me, that's more flimsy than popsicle sticks. 'Nuf said!
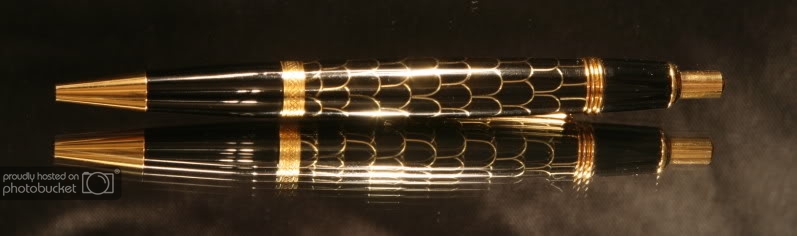
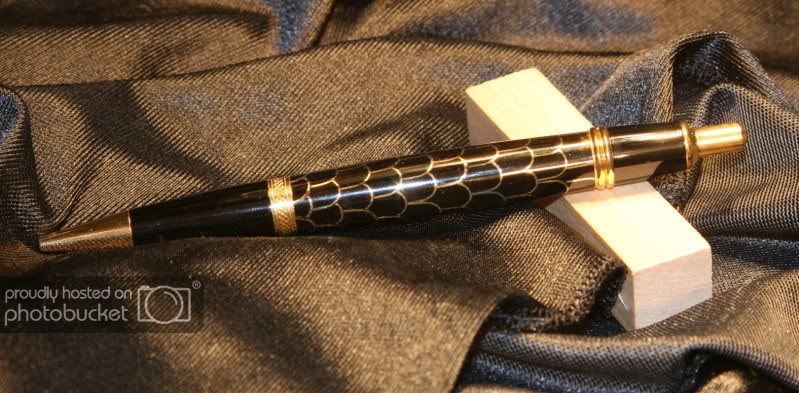
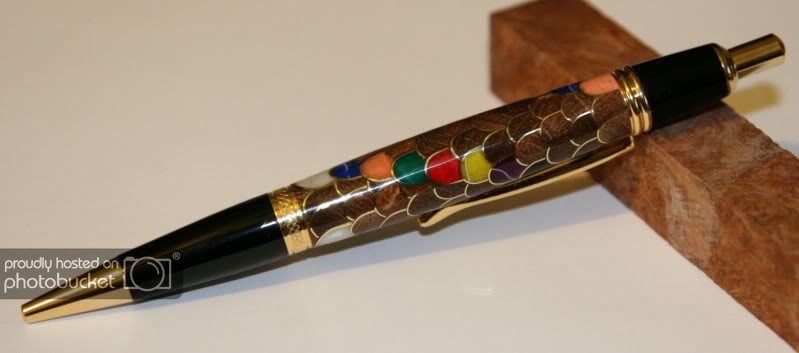
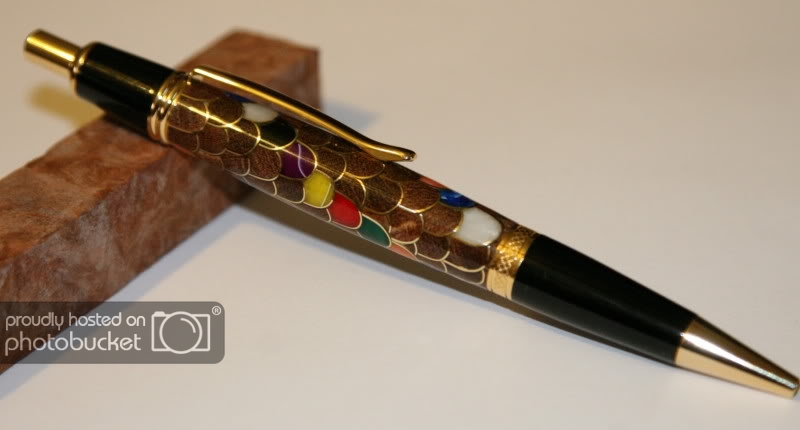
Here are the 2 fish-scale pens I have made.
I hope you have enjoyed this tutorial as much as I have had putting it together for you. Some people have asked me about putting this tutorial in the library. By all means, please, be my guest.
Roy
Many years ago I made a blank that took me about a year to make. It was made out of ebony and brass...very thick brass, .040 thick brass to be exact. It took about a year because I would cut a slot for one of the sheets of brass, glue it up and wait a month or two to let the ebony shrink so it would not crack later. I had 8 sheets of brass all coming together in the middle that I had to drill through. I wanted to do it right the first, one and only time. I had too much time and money invested in it. My solution was one of those Duuuhhh moments, like why hasn't anyone come up with this before? I will tell that secret later on in the tutorial. Here is a pic of the pen I was just talking about:

To make the fish-scale pen, you first have to make a jig. It should look like this:

It is made for a router table. The jig is 6 1/4" wide and 12 1/4" long. The indexing circle is 4 7/8" across and is 2" from the front of the jig. The hole in the indexing circle is 1.5" square. It also has 2 set screws that go all the way to the hole to hold the blank in place each time you route a new segment. The indexing circle is held in the jig by 2 hold down clamps. The bottom board is 1/2" thick and the top is 3/4". The bottom board should have a 2" slot from the front down past where the blank is held in the indexing circle. It should look like this:

Here is how your lines should be drawn out on the indexing circle.

The router bit doing all the work is a 1/4 round bull nose. The blank in this tutorial uses the numbers on the indexing circle and is meant for 4 segments per level. I also put letters on it in case 3 segments wanted to be tried.
Start with a blank of wood that is 1.5" square that fits very tight into the hole of the indexing circle. Cut off squares that are 1/4 thick from the end. Cut off as many as you need for the length of the pen you are making. When you route a segment out, you refill that void with a thin piece of brass and whatever else you are making your pen out of, wood or plastic. Before you cut the brass into strips, sand it with 220 grit sandpaper to give the CA glue or epoxy something to hold onto. I use thick CA glue. Cut the brass strips about 1 inch wide and bend them around the inserts. Make sure that the brass and insert together are tight in the blank but not so tight that they might break the blank when they are gently tapped into it with a hammer. To round over the wood or plastic insert, I use a 1/8 round over router bit and sand as necessary to make a tight fit. Make sure that each insert is longer than the blank is wide. Going across the blank only needs to be longer than 1.5", from corner to corner needs to be just a little over 2". This way, the blank will remain solid all the way to the end which is needed so it will not blow up.


When you are ready to make the first cut, draw an arrow on your blank, the part of the blank you have left over after cutting the 1/4" squares off and point it to the #1 position on the indexing circle. Every time you put the blank back in the indexing circle, the arrow should always point to the #1 position. The first cut will be on level 1, so start with #1, on the indexing circle going into the router first. After you have glued a piece of brass and wood into the first routed section and let it "dry" sand the excess down so the blank stays square. The second cut will still be on level 1 but this time, route from position 3. The next cut will be from position 5, then 7. Level 1 is complete. Hand sand the next level perfectly flat by putting a piece of sandpaper down on a table saw and going in very small circles. I say hand sand because my belt sander rounds the corners up just enough to see light coming through when I hold them together. They need to be solid all the way through. After you have level 2 glued on, the next cut will start with position 2 on the indexing circle. The next cut will be from 4 then 6 then 8. Remember, each time you put the blank in the jig, the arrow should point to the #1 position. When level 2 is complete, the first cut on level 3 will be from position 3,5,7,9. Level 4 will be 4,6,8,10. Whatever level you are on, that is the position on the indexing circle you start the first cut from. Let's say you are on level 5. The arrow will point to the #1 position and your first cut on level 5 will be from position 5 then 7,9,11. Keep this going until you have the blank as long as you need it.

Now comes the secret I told you about earlier... ADD WOOD TO ALL FOUR SIDES. Put a piece of wax paper down on your table saw and coat one side of your blank with thick CA glue. Use plenty of glue to fill any voids that can't be sanded out.


I use 1" sacrificial maple on all four sides. This is a VERY VERY strong bond. It is solid. It CAN NOT blow up...it has nowhere to go. I have been told that this is over-kill. That might be...BUT...my blanks don't blow up. After I spent a year making the first brass and ebony pen and at least 2 weeks making each of the fish-scale pens, I don't want to take any chances of a blow out. If I can go through all the segmenting of both of the fish-scale pens with one pass, I'm sure you can go through just about anything you want with no problems. I said one pass meaning that I did not have to step drill it. I think I used a 27/64th's drill bit. I had to back it out several times to clean the waste chips out and to let it cool down. For drilling... use the sharpest bits you have, it keeps the heat down.
I also add sacrificial maple to the ends of the blank to prevent tear out from drilling. To get the end maple centered, put a pin in the very center of the blank. Drill a small hole in the end piece. Put glue all over the end of the blank and the end piece and then slide the end piece over the pin and down onto the blank. Do this on both ends. I used the pin holes to center the blank in my lathe so that I could knock the corners off. I drilled the blank on the lathe to keep the design straight down the middle. After you have it drilled, cut the end pieces off with you band saw. Sand the ends flat.


From this point DO NOT.....DO NOT use a gouge or a skew. If you do, all your hard work will be for nothing. No matter how sharp you think you have your gouge or skew, the second it hits any kind of metal, the sharpness is history. From this point, only use sandpaper. Start with 80 grit and go all the way through 600 grit. Then use MM, WET sanding all the way through 12K. Wet sanding will clean out all the dust and polish the brass or any other metal you are using. YES, it will take little longer, but in the end, you will have a beautiful pen and not need to start all over again. I have read on here where some have said to put popsicle sticks around your blank to keep it from blowing up. Popsicle sticks can be bent and broken with your own two hands. Can anyone bend or break one inch thick maple??? Some have also said to wrap the blank with gauze and soak it in thin CA glue. I'm sorry, but to me, that's more flimsy than popsicle sticks. 'Nuf said!
Here are the 2 fish-scale pens I have made.


I hope you have enjoyed this tutorial as much as I have had putting it together for you. Some people have asked me about putting this tutorial in the library. By all means, please, be my guest.
Roy

")