Trying something new

Signed-In Members Don't See This Ad

skiprat

Passed Away Mar 22, 2022
In Memoriam
Joined
Oct 19, 2006
Messages
7,812
Location
In a Skip in Wales
Here's a technique I've wanted to try for some time. The end result may not seem to warrant the set up but I think it has some promise.
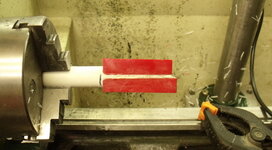
The first few pics show how I made the segments with rounded over corners that would match the cutouts.
I made a simple jig that is mounted in my rotary table. This makes the rounded corners.
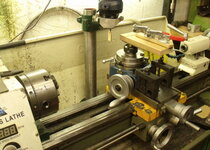
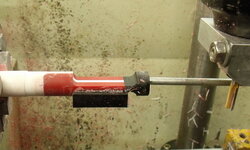
Mounting the router in the QCTP with the blank indexed in the chuck was how the inlays were cut.
I'm glad it worked out. Now just to develope the idea to make a nicer blank.
:biggrin:

Oh.....here's a question......

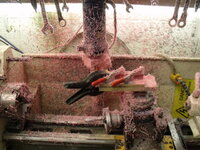
Why is it that instead of taking five minutes to rig up the vacuum cleaner while routering, we just wait till the job is done and then spend a whole hour cleaning the entire workshop of the router waste that gets EVERYWHERE !!!:confused::mad:
 

Attachments

  • DSCF2060.JPG
    DSCF2060.JPG
    217.2 KB · Views: 415
  • DSCF2062.JPG
    DSCF2062.JPG
    204.9 KB · Views: 422
  • DSCF2063.JPG
    DSCF2063.JPG
    134 KB · Views: 422
  • DSCF2064.JPG
    DSCF2064.JPG
    135 KB · Views: 434
  • DSCF2066.JPG
    DSCF2066.JPG
    125.5 KB · Views: 489
Signed-In Members Don't See This Ad
Joined
Aug 5, 2009
Messages
3,229
Location
Millersburg, OR
Interesting idea. As for the vacuum question. I always told myself it was because the router and the vacuum were on the same circuit and it would overload it. Then I realized that if I opened the door and plugged into the laundry room I had a second circuit. Alas for some strange reason I still don't plug in the vacuum and spend an hour or 2 sweeping everything in the shop.
 

Dalecamino

Local Chapter Leader
Joined
Jan 2, 2008
Messages
14,572
Location
Indianapolis, In.
Inspiration! I just love inspiration. :biggrin: Where would I be without it? :redface:
Thanks for showing this Steven. As for your question...I dunno :confused: but, my process is the same as yours :biggrin:
 
Joined
Feb 24, 2012
Messages
4,368
Location
Claremont NH
Very cool I love this idea. As far as the mess goes that doesn't bother me a bit. What bothers me is a spotless workshop. I know how I mess mine up and it happens fast, what I don't know is how to keep it clean..
 

Dalecamino

Local Chapter Leader
Joined
Jan 2, 2008
Messages
14,572
Location
Indianapolis, In.
I'm studying your photos and, got a headache trying to figure out how you rounded the ends of the pieces to fit perfectly onto the white piece. :confused:

I need more coffee :redface:
 

skiprat

Passed Away Mar 22, 2022
In Memoriam
Joined
Oct 19, 2006
Messages
7,812
Location
In a Skip in Wales
Thanks for the comments guys. :biggrin: I'm glad I'm not alone with the mess issue.....:rolleyes::biggrin:

I'm studying your photos and, got a headache trying to figure out how you rounded the ends of the pieces to fit perfectly onto the white piece. :confused:

I need more coffee :redface:

Chuck, there is an MDF jig with clamps which is held in the rotary table which is mounted on the cross slide. The pivot point of the table is set by carriage stops at the required radius from the router, which is fixed to the back of the lathe bed.
The carriage is moved past the router to make one side of the inlay. When the carriage hits the stop, the rotary table is turned to form the rounded over corner. At 90deg on the rotary table, the carriage stop is released and the carriage movement is continued past the router bit to cut the adjacent side of the inlay.
Once I have made all the inlays, the RT is removed and the router is mounted in the QCTP to cut the blank. I use a straight bit for all cuts.

Easy huh?:biggrin:


Sometimes....I want to live in a skip in Wales :biggrin:

Trust me, it's not all it's cracked up to be......:rolleyes:
 

BSea

Member
Joined
Dec 28, 2009
Messages
4,628
Location
Little Rock, Arkansas
That is very cool. I can't ever look at a finished segmented pen, and figure out how to get there from scratch. Let alone know how to come up with a new design and know how it will turn out. That is so cool.:cool:


I'm studying your photos and, got a headache trying to figure out how you rounded the ends of the pieces to fit perfectly onto the white piece. :confused:

I need more coffee :redface:

Chuck, there is an MDF jig with clamps which is held in the rotary table which is mounted on the cross slide. The pivot point of the table is set by carriage stops at the required radius from the router, which is fixed to the back of the lathe bed.
The carriage is moved past the router to make one side of the inlay. When the carriage hits the stop, the rotary table is turned to form the rounded over corner. At 90deg on the rotary table, the carriage stop is released and the carriage movement is continued past the router bit to cut the adjacent side of the inlay.
Once I have made all the inlays, the RT is removed and the router is mounted in the QCTP to cut the blank. I use a straight bit for all cutst me, it's not all it's cracked up to be......:rolleyes:
Of course. It's so simple now that you explained it. :bulgy-eyes::bulgy-eyes:

Obviously, I get it, :befuddled: but what might help others would be some pictures.
 

Dalecamino

Local Chapter Leader
Joined
Jan 2, 2008
Messages
14,572
Location
Indianapolis, In.
Oh.....clear as mud. I'll read this another 50-60 times just to see if I missed anything :redface:. Thank you Steven it's still great to look at and, there IS a chance that I WILL get a grasp on it. :biggrin: It would help if I had the equipment in front of me. Maybe!:rolleyes:
 
Top Bottom