
mpex
Member
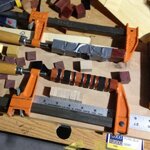
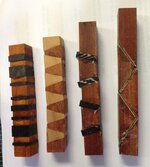
Just finished my first blank jig last night. Here are a couple segments I put together. I plan on turning them tonight. And of course a few questions.
Note that a couple of them are not straight. I'm not sure I'm doing the best job of gluing, taping and clamping.
This is what I did,
1.Cut segments as exactly as I could.
2.Layed down 3 pieces of Duct tape next to each other on a table.
3.One by one, glued the pieces together. Tried to keep them as lined up as possible. On some I used a straight piece of wood behind them to try to keep them straight.
4.Once all segments have been assembled, wrap the duct tape around the other sides.
5.Clamp together.
Questions:
1.The clamp step is when they started to slip out of place. Not sure what to do about that. I just clamped them lightly. Not sure if there will be any gaps as a result. Any advice on how to do this better?
2.Do I need to wait a full 24 hours before cutting and turning? Is 15-20 hours ok?
Thanks!


 ) and sanding on the 8" disc sander I may create another sled for the table saw and cut them that way.